DIY stress balls are an easy, low-cost way to channel fidgeting, support focus, and give kids (and adults) a safe outlet for nervous energy. This guide walks you through materials, step-by-step instructions, variations, and classroom tips so you can build a whole basket of squishy calm at home or school.
Why Stress Balls Help Kids and Teens
Many children and teenagers fidget when they feel overwhelmed, bored, anxious, or overstimulated. A simple stress ball offers a quiet, portable tool that keeps hands busy while minds stay available for learning and listening.
Unlike noisy toys or screens, a stress ball is tactile and grounding. The repeated squeezing motion can be soothing to the nervous system, helping students transition through tough moments without disrupting the people around them.
- Provides a safe outlet for extra energy in class, at home, or on the go.
- Supports focus for students who concentrate better when their hands are busy.
- Offers a discreet coping tool for anxiety or sensory overload.
Planning Your DIY Stress Ball Project
Before you start pouring flour into balloons, take a moment to plan the project. A few simple choices—like filler type and balloon size—will make a big difference in the final feel and durability of your stress ball.
Think about who will use the stress balls, where they will be used, and how often. Younger kids might prefer softer, squishier textures, while older students often like firmer resistance that feels more like a workout for their hands.
Common Filling Options and How They Feel
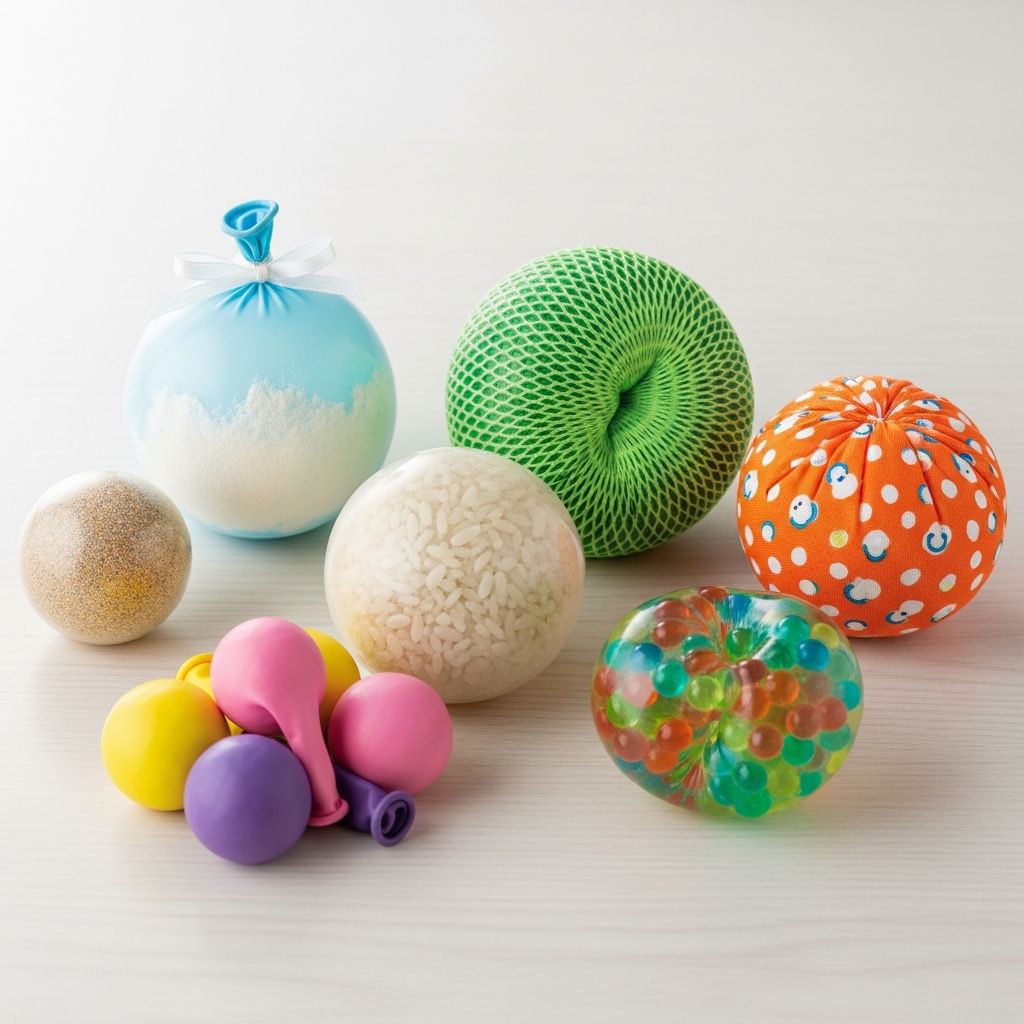
Each filler creates a different sensory experience. You can easily test several types during one craft session and let kids choose their favorite.
| Filler | Texture | Best For | Notes |
|---|---|---|---|
| Flour | Soft, dough-like, very squishy | Gentle squeezing, younger kids, calming play | Messy if it leaks; avoid if there are wheat allergies. |
| Dry rice | Grainy, firm, noticeable individual pieces | Kids who like texture and more resistance | Feels heavier in the hand, durable when double-layered. |
| Fine sand | Dense, smooth, solid squeeze | Older kids and teens who want strong resistance | Use sturdy balloons; sand can escape through tiny holes. |
| Cornstarch mix | Slow, almost putty-like squish | Sensory seekers who like slow squish and shape change | Can compact over time; knead to soften again. |
| Water beads (pre-soaked) | Bumpy, jelly-like, very sensory-rich | Supervised sensory play, older kids | Choking hazard; not for young children or mouthers. |
Supplies You Will Need
Most of what you need for this project is already in your kitchen or craft cabinet. Choose one filler for a simple project, or set up a mini \”stress ball bar\” so kids can experiment with several textures.
Basic Supply List
- Sturdy latex balloons (standard 9–12 inch size works well).
- Your chosen filler (flour, rice, sand, or cornstarch mixture).
- Small funnel or a homemade funnel from a cut plastic bottle.
- Measuring cup or spoon for portioning the filler.
- Optional: permanent markers for drawing faces or patterns.
- Optional: yarn, ribbon, or washi tape for decoration.
- Optional: a tray or baking sheet to contain spills.
Safety and Allergy Checks
Before crafting, quickly review allergies and safety concerns. For example, flour can be an issue for gluten-sensitive kids, while balloons are not appropriate for children who still mouth toys or for anyone with a latex allergy.
If needed, swap balloon latex for fabric pouches or socks and use alternative fillers such as plastic beads or dried beans, always considering choking risks for younger children.
Step-by-Step: Classic Balloon Stress Ball
The classic balloon stress ball is simple, satisfying, and fast to make. Once you understand the basic process, you can scale it up for a whole classroom or youth group.
Step 1: Prepare the Workspace
- Cover the table with newspaper, a plastic tablecloth, or a tray to catch spills.
- Lay out all supplies within easy reach: balloons, filler, funnel, spoons, and markers.
- If multiple children are involved, give each person a small bowl of filler to prevent arguments and spills.
Step 2: Stretch and Soften the Balloon
A stretched balloon is easier to fill and less likely to tear.
- Gently inflate the balloon once or twice and let the air out to loosen the rubber.
- Pull and stretch the balloon in different directions to give it more flexibility.
Step 3: Attach the Funnel
- Place the neck of the balloon over the narrow end of the funnel.
- If you are using a cut plastic bottle as a funnel, slide the balloon over the bottle’s mouth.
- Check that the balloon is secure so it does not pop off mid-fill.
Step 4: Add the Filler
This is where kids usually get excited—and where the mess is most likely—so move slowly and patiently.
- Use a spoon or small measuring cup to pour filler into the funnel.
- Tap the funnel gently or squeeze the balloon to help the material slide down.
- Pause every so often to check the size of the balloon in your hand.
- Stop when the balloon fits comfortably in a palm and still has a bit of room to move.
Step 5: Remove Air and Tie the Knot
Too much trapped air makes a stress ball feel bouncy instead of squishy. Removing extra air also reduces strain on the balloon.
- Carefully pinch the balloon where it meets the funnel and remove the funnel.
- Hold the balloon neck firmly and slowly release any extra air while keeping the filler inside.
- Once the air is out and the filler is settled, tie a snug knot in the balloon neck.
Step 6: Add a Second Balloon for Strength
Double-layering makes the stress ball sturdier and less likely to leak, especially with sand or rice.
- Take a second balloon and snip off the thin neck portion.
- Stretch the cut balloon wide and carefully wrap it around the filled stress ball, hiding the original knot inside.
- Adjust the outer layer so it lies smooth without major wrinkles.
Variations for Different Sensory Needs
Once you master the basic balloon version, experiment with other materials and shapes. This makes the project more engaging and allows kids to customize the feel that works best for them.
Soft and Squishy Version
For children who prefer gentle pressure, choose a softer filler.
- Use flour or a cornstarch mix to create a dough-like consistency.
- Fill the balloon only about two-thirds full so it molds easily to the hand.
- Pair with calming colors like blue, green, or lavender.
Firm and Focused Version
Some kids focus better when they can press harder and feel resistance.
- Use dry rice or fine sand as the main filler.
- Fill more densely, leaving less empty space inside the balloon.
- Double-layer every stress ball to handle stronger squeezing.
Visual and Tactile Version
For older children who are not at risk of mouthing or popping the balloon, you can add extra visual interest.
- Use pre-soaked water beads in a transparent balloon for a bright, bubbly look.
- Combine small beads with rice for a more complex texture.
- Always supervise use and store out of reach of siblings or pets.
Decorating and Personalizing Your Stress Balls
Personal touches turn a simple stress ball into a small companion, making kids more likely to use it when they need support. Decorating is also a chance to talk about emotions and coping skills in a relaxed, creative way.
Easy Decoration Ideas
- Draw faces: happy, sleepy, silly, calm—whatever mood your child wants to remember.
- Add yarn \”hair\” by tying small bundles around the knot or outer balloon.
- Use washi tape or small adhesive stickers on the knot area (not the stretched parts).
- Assign names to each stress ball and store them in labeled jars or cups.
Using Decoration as a Coping Tool
While decorating, invite kids to connect the design with a purpose. For example, a blue ball with closed eyes can represent “calm time,” while a bright yellow ball might be the “focus helper” for homework.
Encourage students to choose a stress ball that matches how they feel or how they want to feel, turning the act of squeezing into a small ritual of self-awareness.
Stress Balls in the Classroom and at Home
Stress balls can be a powerful support in both classrooms and living rooms, but clear expectations keep them from becoming toys that distract instead of tools that help.
Setting Ground Rules
- Explain that stress balls are quiet tools for helping bodies stay calm and focused.
- Decide when they may be used: during independent work, reading time, or transitions.
- Clarify that throwing, trading during lessons, or popping on purpose means the tool is put away.
Building a Calm-Down Kit
Stress balls work even better as part of a small \”calm corner\” or regulation kit. Pair them with items like simple breathing cards, noise-reducing headphones, or drawing supplies.
At home, keep stress balls in a basket near homework spaces, the couch, or the bedside table so kids can reach for them when they notice stress rising.
Care, Cleaning, and When to Replace
Even the strongest homemade stress ball will not last forever, especially with daily squeezing. A little maintenance can extend its life and keep it hygienic.
Basic Care Tips
- Wipe the outer balloon with a damp cloth and mild soap when needed.
- Store stress balls away from sharp objects, direct sunlight, and extreme heat.
- Check periodically for thin spots, powdery residue, or small leaks.
When to Retire a Stress Ball
If the balloon feels fragile, sticky, or visibly worn, it is safer to retire it and make a new one. Stress-ball making itself can become a fun ritual every few months.
Use the opportunity to ask kids whether they want to keep the same filler or experiment with a different texture that matches their current needs.
Frequently Asked Questions
1. Are homemade stress balls safe for young children?
Homemade stress balls can be safe when used with supervision and age-appropriate materials. For toddlers and children who still mouth objects, avoid balloons and small fillers such as rice, beads, or water beads, which pose choking risks.
2. How long does a DIY stress ball usually last?
With gentle use and double-layered balloons, many stress balls last several weeks to a few months. Frequent or very strong squeezing, especially with sand or rice fillings, will wear out the balloon faster.
3. What is the best filler for classroom use?
Dry rice or flour are popular choices because they are inexpensive and easy to find. Rice feels firmer and is often less dusty, while flour offers a softer squeeze but can be messier if a balloon breaks.
4. Can stress balls really help with focus and anxiety?
Many students find that having something quiet to squeeze makes it easier to sit through lessons or calm down when they feel overwhelmed. While stress balls are not a cure-all, they can be a simple, practical part of a larger support plan.
5. How can I make this project more eco-friendly?
To reduce waste, repurpose old socks or fabric scraps as pouches instead of balloons. Fill them with dried beans or rice and sew or tie them securely, creating a reusable, washable stress toy.
Bringing It All Together
With a handful of balloons, a scoop of filler, and a few minutes of time, you can create simple tools that make a real difference in how kids handle stress and fidgeting. Let children help choose colors, textures, and decorations so they feel ownership over their new calming companions.
Whether you are a parent, teacher, or caregiver, a basket of homemade stress balls offers an invitation: squeeze, breathe, reset, and then return to the task at hand with a little more ease.