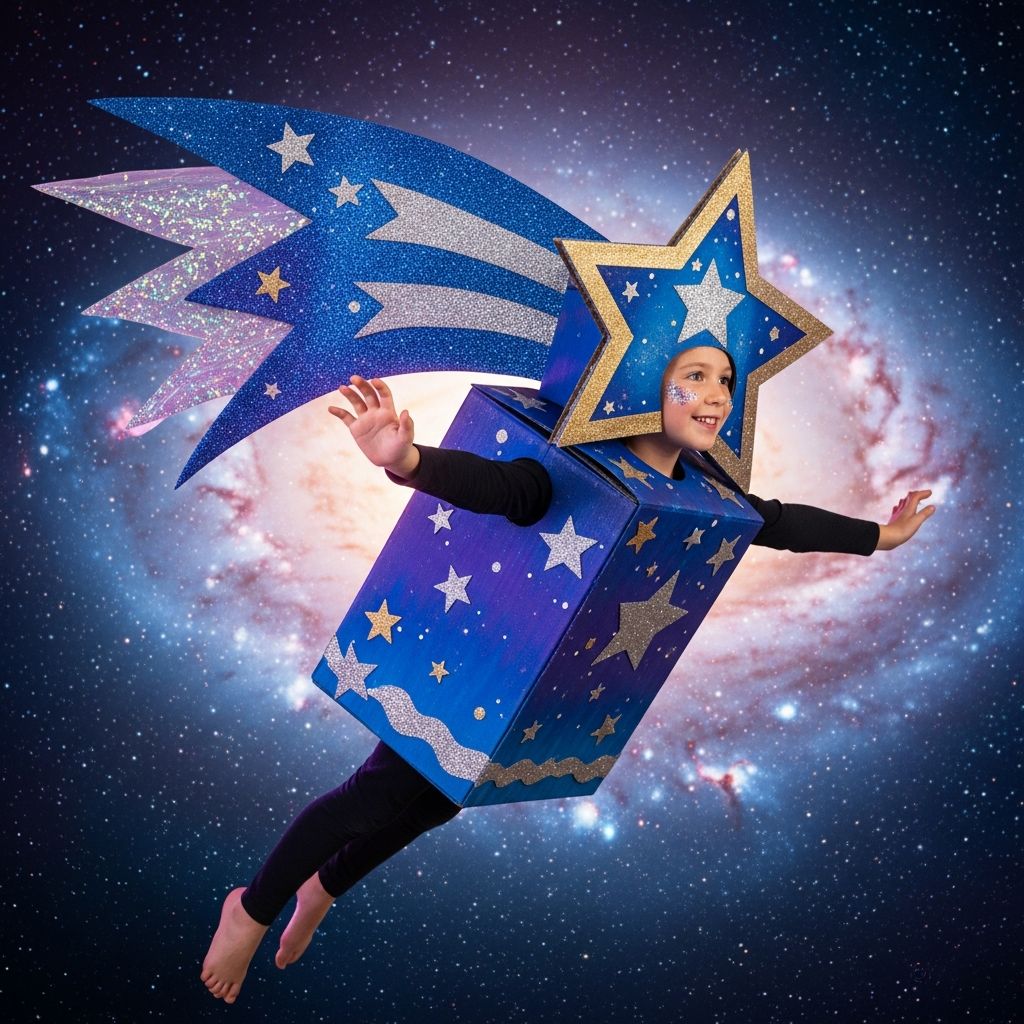
If you have a cardboard box, a bit of paint, and a kid who loves to shine, you can build a magical shooting star Halloween costume in a single afternoon. This guide walks you through each step, from planning the shape to adding sparkly finishing touches, using materials you probably already have at home.
Why a Shooting Star Costume?
A shooting star costume is eye-catching, comfortable to wear, and surprisingly simple to build from cardboard, making it perfect for busy parents and crafty kids. Unlike store-bought costumes, it can be customized with favorite colors, glowing lights, and personal details that make your child feel like the star of the night.
- Uses inexpensive and often recycled materials.
- Easy to adapt to different ages and sizes.
- Offers huge creative freedom with paint, glitter, and fabrics.
- Sturdy enough for trick-or-treating but light enough for kids to wear comfortably.
Supplies and Tools Checklist
Gather your supplies before you start so you can build the costume from start to finish without interruptions. Feel free to substitute items you already have on hand to keep the project low-cost and sustainable.
Core materials
- 1–2 large pieces of corrugated cardboard (from shipping boxes or moving boxes).
- Pencil and ruler for sketching the star and tail shape.
- Utility knife or craft knife for cutting cardboard.
- Scissors (for trimming details and fabric or ribbon).
- Strong tape (packing tape, duct tape, or gaffer tape).
- Glue (hot glue gun with glue sticks, or strong craft glue).
Painting and decoration supplies
- Acrylic paint or tempera paint in yellow, gold, white, and accent colors.
- Paintbrushes in several sizes (one wide brush and one small detail brush).
- Glitter, metallic markers, or metallic craft paper.
- Colored tissue paper, crepe paper, or fabric scraps for the star tail.
- Optional: battery-powered fairy lights or glow sticks for extra sparkle.
Comfort and fit supplies
- Wide ribbon, elastic, or old backpack straps for shoulder straps.
- Soft fabric, felt, or foam scraps for padding edges.
- Velcro strips or safety pins (for quick adjustments on Halloween night).
Planning the Costume Design
Before you touch the cardboard, take a moment to plan the costume on paper. This helps you choose the right size, decide how the tail will flow, and ensure your child can walk, sit, and move easily while wearing it.
Key design decisions
- Front-only vs. sandwich board: Decide whether the star will only be on the front of the body or whether you want a front-and-back star connected by shoulder straps.
- Star position: Some kids like the star centered on the chest, while others love an off-center, diagonal shooting star look.
- Tail direction: Most designs look dynamic with the tail sweeping diagonally down and to one side.
- Color scheme: Classic yellow and gold are always beautiful, but deep blues, purples, or rainbow tails can make the costume unique.
Measuring and Sketching the Star Shape
Good measurements keep the costume looking balanced and comfortable on your child. Use a flexible measuring tape or a piece of string to estimate width and height before you sketch onto the cardboard.
- Measure your child: Note shoulder width, torso length (from shoulder to hip), and how far down you want the star tail to reach.
- Decide the star size: The main star should be a bit wider than the shoulders but not so wide that it knocks into doorframes.
- Sketch a star: On scrap paper, draw a five-pointed star. When you are happy with the shape, lightly transfer it to cardboard with pencil.
- Add a tail outline: From one side of the star, draw long, curved bands flowing down and away like a comet tail.
Cutting the Cardboard Safely
Cutting cardboard is straightforward, but safety comes first if kids are helping. Adults should handle sharp tools while children focus on decorating and painting.
- Place the cardboard on a cutting mat or thick scrap board to protect your table or floor.
- Use a sharp craft knife and cut slowly along the star lines, making several light passes instead of one deep cut.
- Cut the tail pieces as long, curved strips that connect smoothly to the star.
- Round any sharp corners on the tail so nothing pokes or scratches during wear.
Building the Star Body
The star body is the main feature of the costume. You can keep it flat for a sleek look or layer multiple pieces for a thicker, more dimensional star.
Single-layer star
A single layer of cardboard works well for younger kids or for trick-or-treating where weight matters. Simply cut the star shape and smooth the edges with a bit of sandpaper or by gently bending rough sections inward.
Layered star for extra depth
- Cut two identical stars from cardboard.
- Glue them together, but leave small gaps near the center if you plan to hide battery packs for lights.
- Clamp or weigh down the pieces while drying to keep the star flat.
Creating the Glowing Tail
The star tail makes the costume look like it is streaking across the sky. This part can be as simple or as elaborate as you like, and it is a great place to involve kids in the creative process.
Tail base
- Cut 3–5 long curved strips of cardboard attached to the star or separate strips that will be taped to the back.
- Vary the width of the strips so the tail looks more organic and flowing.
- If needed, cut the tail pieces separately and glue them under the star points at a diagonal angle.
Adding texture and movement
- Glue or tape layers of tissue paper, crepe paper, or fabric strips along the cardboard tail.
- Alternate colors such as gold, silver, white, and a bold accent like blue or pink.
- Cut the ends of the strips into points or waves so they flutter as your child walks or runs.
Painting and Decorating the Star
Paint brings the costume to life. Work in thin layers so the cardboard does not warp, and let each coat dry before adding details, glitter, or metallic accents.
Base coat
- Apply a light base coat of white or pale yellow paint to seal the cardboard.
- Once dry, add a richer layer of gold, yellow, or your chosen main color.
- Paint the tail strips in gradient shades (for example, white near the star fading into deep blue at the ends).
Details and sparkles
- Use a small brush to paint highlights along the edges of the star points.
- Add tiny dots and short lines radiating from the center to mimic light rays.
- Brush on a thin layer of glue and sprinkle glitter in select areas, keeping some spots plain so the design does not overwhelm.
- Consider adding small cardboard or foam stars on top of the main star for a layered, 3D effect.
Attaching Comfortable Straps
Straps are what make the costume wearable and comfortable for more than a few minutes. Use wide materials to distribute weight and avoid digging into shoulders.
- Positioning: Hold the star against your child’s chest or back and mark where the straps should attach to sit comfortably on the shoulders.
- Cut straps: Cut two equal lengths of ribbon, elastic, or old backpack straps. Make them long enough to slip over the head but short enough to hold the star in place.
- Attach securely: Hot glue and tape each strap end to the back of the star, then reinforce with an extra patch of cardboard over the connection point.
- Test fit: Have your child walk, turn, and sit while wearing the costume. Adjust strap length if the star rides too high, too low, or tilts to one side.
Optional Lights and Glow Effects
Adding lights is optional but creates a magical glowing effect for nighttime events. Always use battery-powered, low-heat lights designed for crafts or costumes.
- Attach tiny fairy lights around the star’s edges using clear tape or glue, hiding the wire along the back.
- Tuck the battery pack into a small cardboard pocket on the back of the star where an adult can reach it easily.
- Use glow sticks or glow-in-the-dark paint on the tail strips for a softer, diffused glow.
- Check that no wires or battery packs press uncomfortably into your child’s back or chest.
Safety and Comfort Tips
A successful costume is not only cute but also safe and easy for kids to manage on their own. Use these quick checks before your child heads out the door.
- Ensure the bottom of the tail does not drag on the ground or catch on stairs.
- Make sure your child can raise their arms freely and turn their head without the star blocking their view.
- Round or pad any rough edges with felt or tape to prevent scratches.
- Use lightweight materials and avoid overloading the costume with heavy decorations.
Fun Ways to Personalize the Costume
The best part of a DIY shooting star costume is personalization. Encourage kids to add their own style so the final costume reflects their imagination.
- Write a fun phrase across the star such as “Make a Wish” or your child’s name in metallic letters.
- Add smaller planets, moons, or clouds cut from cardboard and painted in matching colors.
- Create matching accessories, such as a star crown, wand, or glow-in-the-dark sneakers.
- Use different color schemes: icy blues for a comet theme, warm oranges and reds for a fiery meteor look, or pastel rainbow tails for a dreamy night-sky vibe.
Outfit Ideas to Match the Costume
What your child wears under the star costume can complete the look and keep them warm if the night is chilly. Simple, solid-colored clothing works best to keep the focus on the cardboard creation.
| Theme | Clothing Colors | Extra Accessories |
|---|---|---|
| Classic Golden Star | Black or navy long-sleeve top and leggings | Gold headband, gold gloves, simple black shoes |
| Rainbow Comet | White shirt, rainbow leggings or multicolor tights | Rainbow hair clips, colorful sneakers |
| Galaxy Explorer | Dark purple or midnight blue outfit | Star-print scarf, toy telescope, glow bracelets |
| Frosty Shooting Star | Light blue or silver top and pants | Silver beanie, metallic boots or shoe covers |
Time and Budget Overview
Every family has different schedules and budgets, so it helps to have a general idea of what this project will require. The table below offers a rough guide; your actual time and cost may be lower if you repurpose materials.
| Step | Estimated Time | Typical Cost Range |
|---|---|---|
| Planning and sketching | 20–30 minutes | Free (paper and pencil) |
| Cutting cardboard | 30–45 minutes | Free (using recycled boxes) |
| Painting base coats | 45–60 minutes plus drying time | Low (paints and brushes) |
| Decorating and adding tail | 45–60 minutes | Low to moderate (glitter, tissue paper, extras) |
| Attaching straps and final fit | 20–30 minutes | Low (ribbon, tape, glue) |
Frequently Asked Questions
How long does this costume take to make?
Most families can finish the costume in one afternoon, especially if paint dries quickly where you live. If you plan to add lots of layers, detailed painting, or lights, spread the work over two days to keep the process relaxed.
Is cardboard strong enough for a full evening of trick-or-treating?
Yes, if the cardboard is in good condition and you reinforce strap areas with extra pieces, it will usually hold up for an evening of walking and playing. Avoid letting the costume get soaked in heavy rain, and store it flat when not in use to prevent bending.
Can I adapt this idea for an adult costume?
Absolutely. Simply scale up the measurements, choose thicker straps, and consider making two separate star panels (front and back) for a more balanced feel. Adults may also want additional padding where the costume rests on the shoulders.
What if I do not have glitter or fancy paints?
You can still achieve a beautiful costume using simple supplies. Try using white paint for strong highlights, darker shades for shadows, and metallic markers or aluminum foil pieces glued on for shine instead of glitter.
How do I store the costume after Halloween?
Let all glue and paint fully dry, then gently fold or tuck the tail strips behind the star. Store the costume flat in a dry place, such as under a bed or on top of a closet shelf, so it stays ready for dress-up play long after Halloween is over.