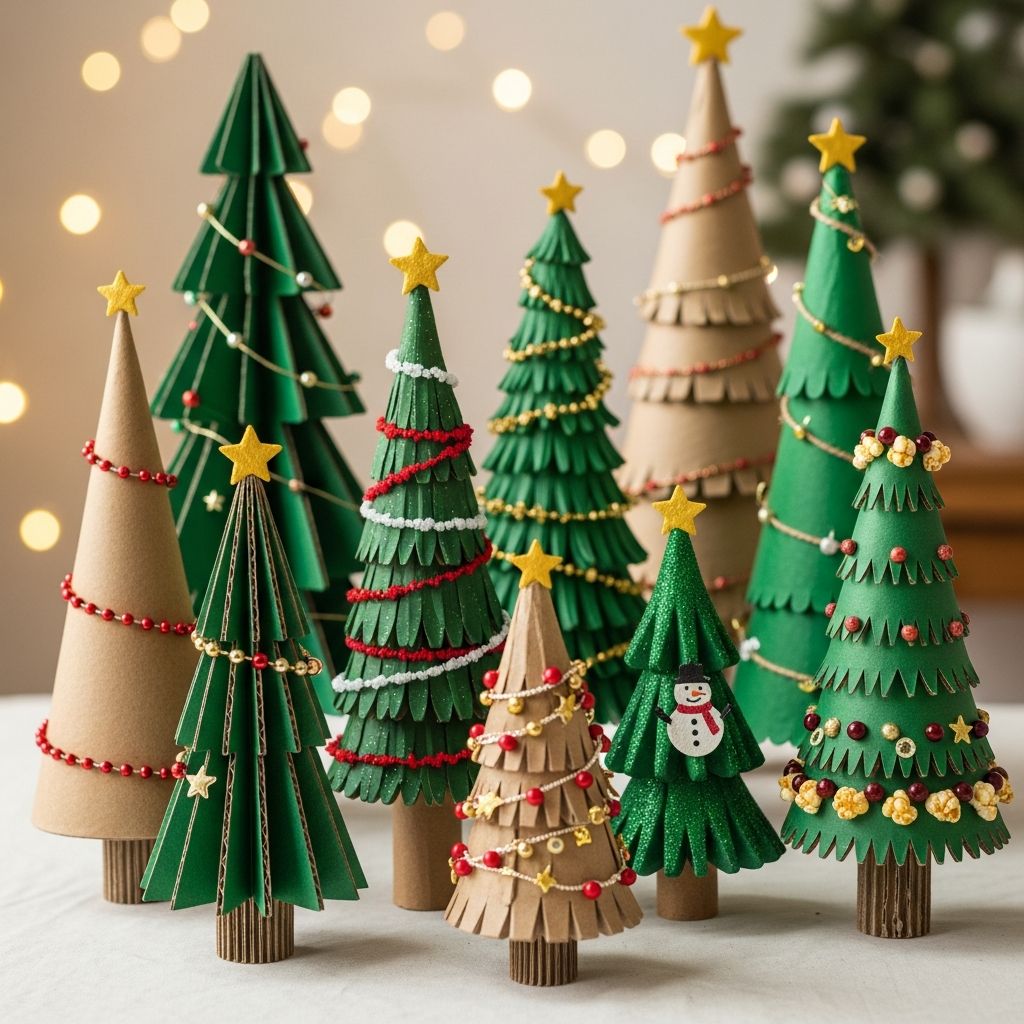
Mini cardboard Christmas trees are an easy way to bring holiday magic into your home while reusing packaging that would otherwise be thrown away. This guide walks through a simple, kid-friendly project that turns scrap cardboard into a cheerful miniature forest for mantels, window sills, or table centerpieces.
Why Cardboard Trees Make Sense
Cardboard Christmas trees offer a low-cost, low-waste alternative to store-bought decor while giving families a cozy activity to enjoy together. Because the materials are lightweight and easy to cut, children can participate at almost every stage with appropriate supervision.
- Uses recycled cardboard from shipping boxes and packaging.
- Encourages creativity through painting, drawing, and embellishing.
- Stores flat or in a small box to reuse year after year.
Materials and Tools Checklist
Before starting, gather your supplies so the crafting session runs smoothly. Most of these items can be found around the house or at any basic craft aisle.
- Cardboard sheets from boxes (corrugated or cereal-box weight)
- Pencil and ruler for sketching tree shapes
- Child-safe scissors for thin cardboard
- Craft knife or box cutter for adults to use on thicker cardboard
- Cutting mat or thick scrap cardboard to protect your table
- White glue, craft glue, or a low-temperature glue gun (adult use)
- Paints (tempera, acrylic, or washable children’s paint)
- Paintbrushes or foam brushes
- Optional: markers, colored pencils, stickers, sequins, buttons, ribbon, twine, glitter, tissue paper, felt scraps
Planning Your Mini Tree Forest
Instead of making just one tree, plan a small collection in different sizes for a more eye-catching display. Varying the height and width creates the feeling of a tiny winter forest you can arrange and rearrange throughout the season.
- Choose two to four sizes (for example: 8 cm, 12 cm, 18 cm tall).
- Decide on a style: simple triangles, rounded branches, or whimsical curved trees.
- Pick a color palette such as classic green, snowy white, or metallic accents.
Step-by-Step: Flat Stand-Up Cardboard Trees
This basic version creates simple flat trees that stand upright in a small base. It is an excellent choice for younger crafters because each tree is cut as a single piece.
- Draw the tree outline.
Use a pencil and ruler to sketch a tall triangle or stylized tree shape on the cardboard. Slightly curve the edges or add gentle zigzags for a branch-like look.
- Cut out the tree.
Children can cut thin cardboard with scissors, while adults handle thicker pieces with a craft knife on a safe cutting surface. Trim any rough edges so the tree looks clean.
- Create a simple base.
Cut a small rectangle or oval from cardboard and slice a short slit in the center. Make a matching slit at the bottom of the tree so the two pieces slide together and form a cross-shaped stand.
- Test for balance.
Assemble the tree in the base and set it on a flat surface. If it leans, shorten the slit, widen the base, or trim the tree bottom until it stands straight.
Step-by-Step: Interlocking 3D Cardboard Trees
For crafters ready for a slightly more advanced project, interlocking trees provide a more sculptural look. Two flat pieces fit together to create a tree that forms a cross when viewed from above.
- Trace matching shapes.
Draw a tree shape on cardboard, then cut it out. Use this first tree as a template to trace an identical second tree so the two pieces match.
- Mark the center line.
Lightly draw a straight line from the top point through the center down to the bottom point on both pieces. This line shows where the slots will go.
- Cut the slots.
On one tree, cut a slot from the bottom up to the middle. On the second tree, cut from the top down to the middle. The width of each slot should roughly match the thickness of the cardboard so the pieces fit snugly.
- Assemble the tree.
Slide the two pieces together along the slots until they intersect at right angles. Adjust the cut depth or widen the slots slightly if the pieces do not slide fully into place.
- Stabilize if needed.
If the tree feels wobbly, glue a small circle or square of cardboard under each of the four bottom points to act as “feet.”
Decoration Ideas for Every Style
Once the basic tree shapes are prepared, decorating becomes the most enjoyable part. Encourage each family member to personalize a tree, turning the display into a collection of individual mini artworks.
- Painted classics: Brush on layers of green, white, or deep blue and add dotted “snow” with the end of a paintbrush.
- Modern minimal: Leave the cardboard unpainted and add only a few simple white or gold lines.
- Kid-made ornaments: Glue on buttons, sequins, punched paper circles, or small pom-poms to mimic ornaments.
- Textured trees: Collage tissue paper, torn magazine pieces, or fabric scraps for a patchwork effect.
- Rustic style: Wrap sections of the tree with twine, jute, or narrow ribbon for a cozy, homemade look.
Adding Tree Toppers and Bases
Tree toppers and decorative bases help the mini forest look finished and cohesive. Even the smallest detail, such as a tiny star cut from cardboard, can give each tree a distinctive personality.
- Cut stars, hearts, or snowflakes from scrap cardboard and glue them to the tips.
- Wrap the base in brown paper, felt, or fabric to disguise slits and joins.
- Glue cotton balls or white tissue pieces around the base to suggest snowdrifts.
Simple Size Guide for Your Mini Forest
The table below offers a quick reference for planning a variety of tree sizes and display ideas. Use these numbers loosely; the joy of this project lies in experimenting rather than following exact measurements.
| Tree Height | Suggested Width | Best Display Spot | Decoration Style |
|---|---|---|---|
| 8–10 cm | 4–6 cm | Office desk, bookshelf, windowsill | Minimal paint, fine marker details |
| 12–15 cm | 6–8 cm | Table centerpiece or nightstand | Buttons, sequins, and small paper ornaments |
| 18–20 cm | 8–10 cm | Mantel, kitchen counter, or entryway table | Layered paint, collage textures, and ribbon toppers |
Kid Participation and Safety Tips
This project is ideal for family craft time, but a few simple guidelines keep everyone safe and happy. Match tasks to each child’s age, and keep all sharp tools in adult hands.
- Let young children handle painting, gluing decorations, and placing stickers.
- Assign older kids supervised tracing and simple cutting with child-safe scissors.
- Reserve craft knives, box cutters, and hot glue for adults only.
- Cover the table with newspaper or a washable cloth and keep a damp cloth nearby for quick paint clean-ups
Creative Ways to Display Your Trees
After the glue dries, the trees can be arranged in almost any room of the house. Grouping them in small clusters creates a stronger visual impact than scattering them one by one.
- Arrange several sizes together on a tray with faux snow and LED tea lights (battery powered).
- Line a windowsill with trees and hang paper snowflakes above for a mini winter scene.
- Place one at each table setting as a place marker, writing names on the bases.
- Create a “forest shelf” in a child’s room and let them rearrange the trees during the season.
Turning the Craft Into a Holiday Tradition
Repeating the project each year helps mark the season and shows how children’s skills and tastes evolve over time. Keep past years’ trees stored carefully so they can reappear beside new creations every December.
- Date the underside of each tree and add the crafter’s name or initials.
- Photograph the full collection annually to record how it grows.
- Invite visiting friends or relatives to make a tree to add to the family forest.
Storage and Reuse Tips
One of the benefits of cardboard crafts is the ease of storage and recycling. With a little care, the same mini forest can decorate your home for several seasons.
- Allow all paint and glue to dry fully before packing.
- Wrap trees loosely in tissue paper and store them in a dry, flat-sided box.
- If a tree becomes bent, press it under a heavy book for a few days to help it flatten.
- When a piece is too worn to keep, remove reusable embellishments and recycle the cardboard.
Frequently Asked Questions
What kind of cardboard works best?
Most household cardboard can be used, but thin cereal-box style cardboard is easier for children to cut, while corrugated box cardboard creates sturdier trees. For very small trees, thinner cardboard is usually more comfortable to work with because it allows finer details and cleaner cuts.
How can I avoid the cardboard warping when painted?
Applying thick, wet paint to only one side of the cardboard can cause it to curl. To reduce warping, use lighter coats of paint, allow each layer to dry thoroughly, and consider painting both sides of the tree so the moisture is more evenly distributed.
Can this project work in a classroom or group setting?
Yes, mini cardboard trees are well suited to classrooms, clubs, and community groups because the materials are inexpensive and easy to collect in bulk. Preparing pre-cut tree shapes in advance allows group leaders to focus time on decorating and assembling rather than cutting.
What if I do not have paint at home?
If paint is not available, crayons, colored pencils, markers, and collage materials can all decorate cardboard effectively. Decorative tape, colored paper, and stickers also provide color and texture without requiring any drying time.
How can I make this craft more eco-friendly?
To keep the project as sustainable as possible, use only recycled cardboard and leftover craft materials, and choose glue and paints that clean up with water. When you are finished using the trees, remove any reusable decorations and place the plain cardboard pieces into your local recycling stream if accepted.