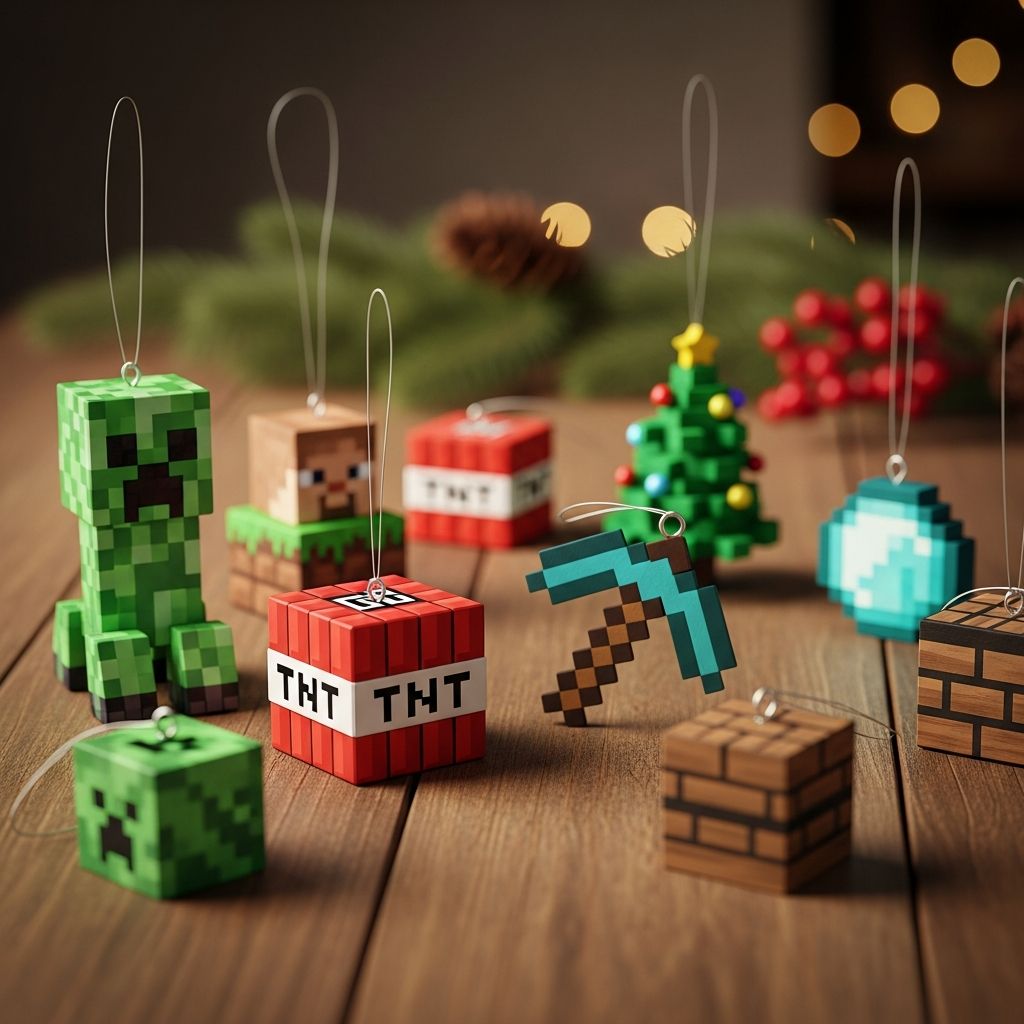
Bring the pixelated world of your favorite game to life on your Christmas tree with handmade Minecraft-inspired ornaments that kids and grown-up gamers can craft together.
Why Minecraft Belongs on Your Christmas Tree
For many families, Minecraft is more than just a game; it is a shared hobby that encourages creativity, problem-solving, and imagination. Turning that love of block-building into Christmas ornaments is a fun way to celebrate both the holidays and your favorite virtual world.
These DIY ornaments are simple enough for kids, customizable for serious crafters, and flexible enough to adapt to any character or block from the game. Once you understand the basic method, you can easily expand your collection year after year.
Essential Supplies and Tools
You can make these ornaments with common craft materials, many of which you may already have at home. Choose sturdy supplies so your creations last for several holiday seasons.
Core Materials
- Wooden cubes, approximately 1 inch (2.5 cm) on each side
- Acrylic craft paint in assorted colors (greens, browns, pinks, blues, blacks, whites, reds)
- Small screw eye-hooks for hanging
- Strong, clear-drying craft glue or decoupage medium
- Ribbon, baker’s twine, or thin cord for loops
- Fine-grit sandpaper for smoothing rough edges
Optional Embellishments
- Glitter or metallic paint for festive shine
- Paint pens or permanent markers for small details
- Printed pixel art faces or grids (designed by you) for decoupage
- Tiny stickers or gems for extra sparkle
Basic Tools
- Small paintbrushes in flat and fine-tip sizes
- Awl, thin nail, or small drill for pilot holes
- Protective table covering and scrap paper
- Water cup and paper towels for brush cleaning
Preparation: Setting Up for Crafting Success
A bit of prep work makes the crafting session smoother and less messy, especially when working with kids. Take a few minutes to get the space, blocks, and paints ready before anyone dips a brush.
Step 1: Smooth and Inspect the Blocks
Run your fingers along the edges of each wooden cube to check for splinters or rough corners. Use fine-grit sandpaper to round off sharp edges and smooth any uneven spots so the blocks are pleasant to handle and easy to paint.
Step 2: Create a Simple Drying Rack
Painted cubes can be tricky to dry without smudging. Make a basic drying stand by pushing four thumbtacks through a small square of cardboard so the points face up, then balance a wet block on the tips. This allows air to circulate around all sides as the paint cures.
Step 3: Add Pilot Holes for Hooks
If the wood is dense, use a thin drill bit, nail, or awl to create a shallow starter hole in the center of what will become the top face of the ornament. The screw eye-hooks will twist in more easily and sit straighter when you take this step first.
Choosing Characters and Blocks
The charm of Minecraft ornaments lies in their variety. You can represent characters, friendly animals, and recognizable blocks all within the same set of wooden cubes. Plan a small collection in advance so you know which base colors and details you will need.
| Ornament Theme | Suggested Base Color | Key Details |
|---|---|---|
| Creeper head | Bright or mid green | Black pixelated face features |
| Grass block | Brown sides, green top | Pixel-style edge between dirt and grass |
| Player face (Steve or custom skin) | Skin-tone front, brown or custom hair | Square eyes, hairline, mouth or beard |
| Pig head | Light pink | Darker pink snout and squared eyes |
| Snow block | White or very pale blue | Small gray or blue squares for texture |
Painting the Base Layers
Once the prep is finished, it is time to give each cube its main color. The base layer sets the tone of the ornament, so aim for even coverage while keeping brushstrokes as smooth as possible.
General Painting Process
- Insert the eye-hook into the pilot hole or at least mark the top of the block so you know which side will hang upward.
- Choose a single base color for the entire cube or separate colors for the top and sides, depending on the design.
- Use a flat brush to apply paint in thin coats, rotating the block and resting it on your drying rack between coats.
- Allow each coat to dry fully before adding another to avoid sticky or streaky surfaces.
Tips for Working with Kids
- Pre-mix key colors in disposable cups so children do not need to blend shades on their own.
- Offer a spare block as a “practice cube” where kids can test brush pressure and color intensity.
- Keep a damp cloth nearby so hands can be cleaned quickly if paint smudges.
Adding Pixelated Faces and Textures
After the base coat dries, you can begin turning plain blocks into recognizable characters and terrain. The key is to think in squares and rectangles, mimicking the pixelated aesthetic while still keeping the project manageable for your skill level.
Method 1: Freehand Pixel Painting
Use a fine brush or paint pen to sketch a simple grid using faint pencil lines, then fill selected squares with darker shades to form eyes, mouths, and texture. This approach works well for crafters who enjoy painting and want each ornament to feel one-of-a-kind.
Method 2: Printed Pixel Faces
If you prefer crisp edges or have several ornaments to make for a party or classroom, design pixel faces in a digital drawing program and print them on regular or light cardstock. Cut the faces into squares that fit your cube fronts, then glue them on with a thin layer of decoupage medium, sealing over the top once they are positioned.
Method 3: Simple Shape Blocking
For young children or quick projects, skip tiny grids and focus on basic geometric shapes. For example, paint two black rectangles for eyes and a long, stepped shape for a Creeper mouth, or use a darker pink rectangle to suggest a pig snout without worrying about perfect pixel alignment.
Sealing and Protecting Your Ornaments
A protective top coat helps ornaments survive curious hands, storage boxes, and future holiday seasons. It also gives wooden cubes a finished, professional look that stands out on the tree.
How to Seal the Surface
- Wait until all paint and glued paper elements are fully dry to prevent smearing.
- Brush a thin, even layer of clear-drying sealer or decoupage medium over every side of the block.
- Rest the ornament on the drying rack and allow it to cure before handling or stacking.
If you prefer a subtle, natural wood effect, choose a matte finish; for a festive shine and more vibrant colors, use a glossy or satin formula. Either way, sealing the surface reduces chipping and makes the ornaments easier to dust or wipe off.
Creative Variations for Different Skill Levels
Once you master the basic wooden cube ornament, you can experiment with variations that suit your crafting style, time, and budget. Mix and match techniques to create a tree that looks like a miniature Minecraft landscape.
Fast and Simple Ideas
- Single-face ornaments: Only decorate one side with a detailed face and keep the rest of the cube a solid color.
- Monochrome blocks: Paint cubes in solid greens, reds, or blues and add simple black shapes to hint at in-game items without replicating them precisely.
- Name tags: Add each family member’s name along one side in blocky lettering to personalize the pieces.
Advanced Crafting Options
- Layered textures: Use tiny paper squares or thin craft foam to build raised pixel patterns before sealing.
- Glitter overlays: Brush a thin glue layer over selected areas and sprinkle glitter for snowy tops, magical armor, or holiday lights.
- Themed sets: Design coordinated sets, such as all farm animals, all hostile mobs, or ornaments that represent different biomes.
Making It a Party Activity
These ornaments are perfect for a game-themed birthday party or a relaxed holiday gathering. With a little organization, guests of various ages can work on the same project without chaos or long waits for supplies.
Setup Tips for Groups
- Pre-paint base colors on the cubes the day before so guests only need to add faces and details.
- Arrange paints, brushes, and printed designs in stations (for example, Creepers at one table, pigs at another) to avoid crowding.
- Prepare labeled bags or boxes so each person can safely transport their drying ornament home.
Kid-Friendly Guidelines
- Use non-toxic, water-based paints and supervise younger children when handling small eye-hooks.
- Encourage creativity by allowing kids to invent their own characters instead of copying in-game versions exactly.
- Offer simple stencils or outline sketches for guests who feel less confident drawing freehand.
Displaying and Storing Your Creations
Once the ornaments are finished, there are many ways to showcase and care for them so they become a beloved part of your annual holiday tradition. Think beyond the main tree to other areas of your home.
Display Ideas
- Hang a dedicated mini-tree in a playroom or gaming area and fill it exclusively with Minecraft-style ornaments.
- String several cubes along a length of ribbon to form a garland for a bookshelf or window frame.
- Attach a single ornament to the top of a wrapped gift as a bonus present and reusable tag.
Storage Suggestions
- Wrap each ornament in tissue paper or paper towels and place them in a divided box to prevent chipping.
- Label storage containers so the game-themed ornaments are easy to find when holiday decorating begins.
- Consider adding the year discreetly on the bottom of each cube so you can remember when they were made.
Frequently Asked Questions
Can beginners make these ornaments?
Yes. The basic project only requires painting simple shapes on wooden cubes, which makes it accessible even for first-time crafters and young children with supervision.
Do I have to use wooden blocks?
No. Wooden cubes are sturdy and easy to paint, but you can adapt the idea to cardboard boxes, foam blocks, or cube-shaped plastic ornaments as long as your paints and glues are appropriate for the chosen surface.
How long do the ornaments take to make?
Most of the time is spent waiting for paint and sealer to dry. The active crafting portion for one ornament can take as little as 20–30 minutes, especially if base coats are prepared in advance.
Can I customize characters to match a player’s skin?
Absolutely. Use a photo or screenshot of a player’s in-game character as a loose guide for hair color, eye design, and outfit shades, then translate those traits into simplified blocks and rectangles on the cube.
Are these ornaments durable enough for kids to handle?
When painted with acrylics and sealed properly, wooden cube ornaments hold up well to normal holiday handling. However, very young children should still be supervised, as the metal hooks and small parts may pose a hazard if handled roughly or put in the mouth.
Bring Your Block World into the Holidays
Transforming basic craft supplies into Minecraft-inspired ornaments is a playful way to merge digital adventures with real-world creativity. With simple wooden cubes, a few colors of paint, and a bit of imagination, your family can build a holiday display that feels personal, handmade, and delightfully game-themed.