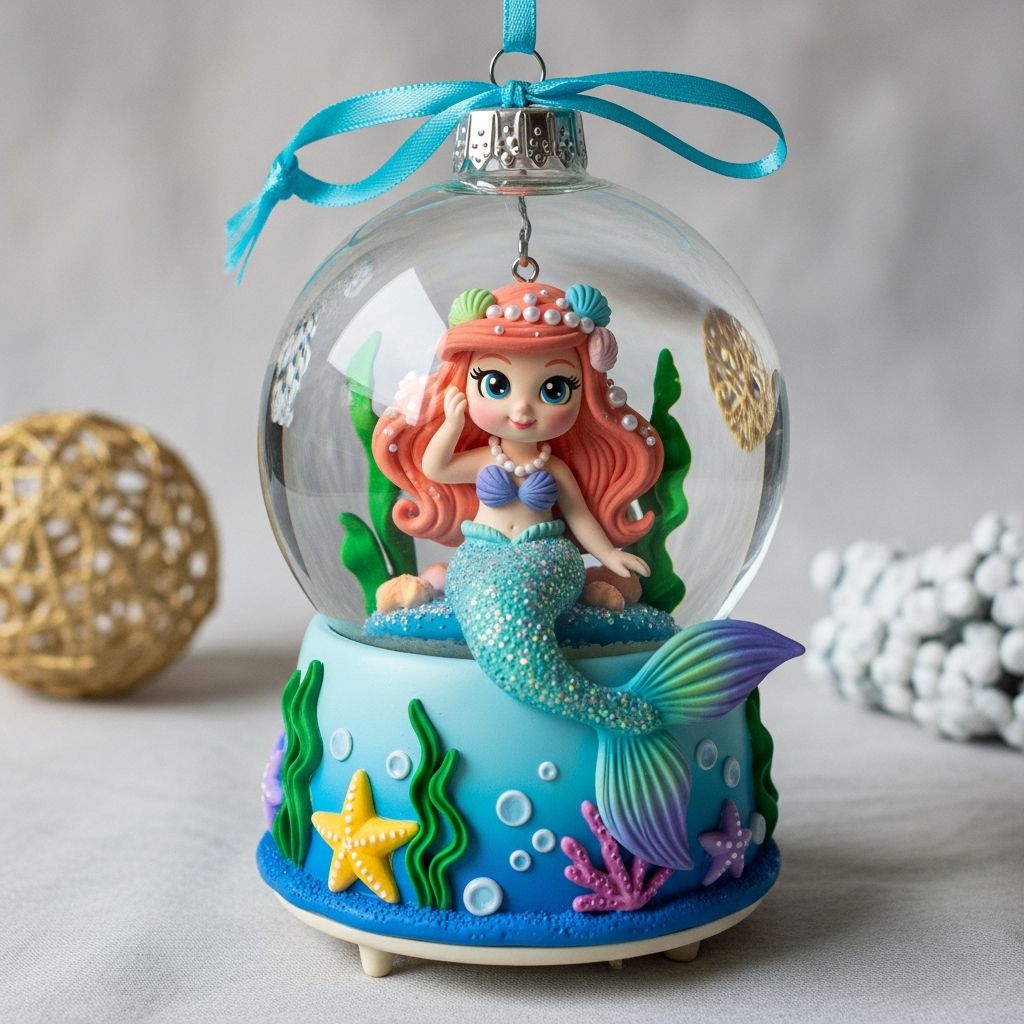
Mermaid snow globe ornaments blend winter sparkle with ocean fantasy, turning simple clear baubles into tiny underwater worlds that shimmer on your Christmas tree. This guide walks you through planning, building, and customizing your own ornaments so you can create keepsakes that feel both festive and delightfully mystical.
Why Mermaid Snow Globes Make Perfect Holiday Crafts
Mermaid snow globe ornaments are ideal for holiday crafting because they are visually striking, surprisingly simple to assemble, and easy to adapt to different ages and skill levels. Instead of relying on complicated techniques, this project uses basic supplies arranged in thoughtful layers to create a miniature scene with big impact.
They also work beautifully as personalized gifts, since each ornament can feature a unique mermaid, different colors of “sea snow,” and custom details like initials, dates, or tiny treasures. Whether you are crafting with children, friends, or on your own, these ornaments offer a creative break from traditional red-and-green decor.
Planning Your Under-the-Sea Ornament Theme
Before gathering supplies, decide on the overall look you want for your mermaid snow globes. Thinking ahead about color palettes, embellishments, and style will help you choose the right materials and avoid over-cluttering the inside of the ornament.
- Choose a color scheme, such as pastel ocean hues, jewel-tone mermaid scales, or icy blues with silver accents.
- Pick a style: cartoon-cute mermaids for kids, elegant silhouettes for a chic tree, or sparkly fantasy designs for maximum shimmer.
- Decide whether you want one central mermaid figure per ornament or a small scene with shells, seaweed, and tiny fish.
Planning a theme also helps if you want a coordinated tree or a set of ornaments to gift as a collection. A cohesive palette of glitter, faux snow, and ribbon can make even a wide mix of mermaid figures look like they belong together.
Essential Supplies and Tools
You can make these ornaments with either store-bought mini mermaid figures or flat images mounted inside the globe. Most supplies are available at basic craft stores, so there is no need for specialized equipment.
Core Materials Checklist
- Clear plastic or glass fillable ornaments (round or flat-disc styles)
- Mini mermaid figurines or mermaid images printed on sturdy cardstock
- Artificial snow, iridescent glitter, or tiny plastic beads
- Small seashells, faux pearls, or miniature sea-themed charms
- Strong craft glue or hot glue sticks for permanent adhesion
- Ribbon, twine, or metallic cord for hanging loops and bows
Helpful Tools
- Scissors and, if using images, a craft knife for detailed cutting
- Fine-tipped paintbrushes for details or touch-ups
- Small funnel or folded paper cone to pour glitter and snow neatly
- Wooden skewer or chopstick to position tiny pieces inside the globe
- Permanent markers or paint pens for dates, names, and messages
Quick Materials Reference Table
| Item | Purpose | Kid-Friendly Alternative |
|---|---|---|
| Clear fillable ornaments | Holds the mermaid scene and snow | Plastic ornaments instead of glass for safety |
| Mermaid figure or image | Main focal point of the snow globe | Cardstock cutouts instead of fragile miniatures |
| Glitter and faux snow | Creates a floating, magical effect inside | Larger plastic confetti that is easier to clean up |
| Shells and pearls | Decorative seabed and texture | Foam shapes or paper cutouts if shells are heavy |
| Hot glue gun | Secures elements firmly in place | Low-temp glue gun or strong tacky glue with supervision |
Step-by-Step: Building the Mermaid Snow Globe Ornament
Once supplies are gathered, it is time to assemble your miniature ocean world. The basic idea is to build a stable base, fix the mermaid in place, add decorative elements, and then seal the ornament with snow and sparkle inside.
Step 1: Prepare the Mermaid and Background
If using figurines, check that each mermaid fits comfortably inside the ornament half without scraping the sides. When working with images, print them on heavyweight paper, cut carefully around the silhouette, and mount them on an additional strip of cardstock so they can stand upright like a tiny sign.
- Test-fit each mermaid piece inside a clean ornament half before gluing anything.
- Consider painting or lining the interior back of the ornament with a soft gradient of blues and greens to suggest water.
- Add silhouettes of coral, seaweed, or fish cut from colored paper to build a layered background.
Step 2: Create a Stable Seabed
The base inside the ornament needs to support the mermaid figure and smaller decorations. A slightly flattened mound provides the illusion of sand or rock, while also providing a firm surface for glue.
- Form a shallow mound using air-dry clay, a trimmed foam ball, or stacked cardstock circles glued together.
- Paint the mound sandy beige, pearl white, or teal, depending on whether you want sand, rock, or a magical glow.
- Press small shells and faux pearls into the surface before it dries, or glue them on once your base is set.
After the seabed is solid, glue it to the interior bottom of one ornament half. Give the adhesive time to fully cure so the base does not shift under the weight of the mermaid.
Step 3: Secure the Mermaid and Sea Details
Position the mermaid slightly off-center so there is room for shells, plants, or tiny treasure chests around her. Securing the main figure firmly is essential to avoid wobbling or falling over when you shake the snow globe.
- Attach the mermaid to the top of the seabed using a generous dab of strong glue at the tail or feet.
- Hold the figure in place for several seconds, then prop it gently with a skewer until the adhesive sets.
- Arrange accent pieces like miniature starfish, coral branches, or small beads to frame the mermaid without blocking the view.
Step 4: Add Mermaid “Snow” and Sparkle
Instead of traditional white snow, consider a mix of textures that feel both oceanic and wintry. The goal is to have pieces light enough to move when you gently shake the ornament, but not so large that they bury the scene.
- Use a funnel or paper cone to pour in a teaspoon or two of glitter, microbeads, or faux snow flakes.
- Mix cool colors like aqua, silver, and iridescent white to suggest sea foam and shimmering currents.
- Test the effect by lightly shaking the ornament half; adjust the amount if the details inside seem too covered.
Step 5: Close and Seal the Ornament
Once you are satisfied with the contents, close the ornament carefully to avoid spilling glitter or knocking the mermaid loose. A clean seal prevents snow from leaking out and protects your design.
- Align the two halves of the ornament and press them together gently but firmly.
- If the design allows, add a thin line of clear-drying glue along the seam for extra security.
- Wipe away any stray adhesive before it dries, then set the ornament aside to cure completely.
Customizing Ornaments for Kids, Gifts, and Collections
Once the basic technique is familiar, you can easily adapt your mermaid snow globes for different occasions and recipients. Thoughtful customization transforms each ornament into a meaningful keepsake instead of just another decoration.
Ideas for Kids and Families
- Let children choose their own mermaid colors, hair styles, and accessories using markers or paint pens on cardstock cutouts.
- Add the child’s name and the year to the back of the ornament using a metallic pen.
- Invite kids to collect small shells on a beach trip to include in the seabed as a memory of a favorite vacation.
Gift-Ready Variations
- Create a matching set of two or three ornaments with coordinated colors for siblings or best friends.
- Wrap ornaments in tissue paper and place them in a small box lined with shredded paper “seaweed.”
- Include a handwritten tag describing the scene inside, such as “Mermaid of the Northern Lights” or “Guardian of Coral Reef Dreams.”
Themed Mermaid Collections
If you enjoy collecting ornaments, consider designing a different mermaid world each year. Over time, your tree will tell a story of gradually evolving creativity.
- One year, focus on snowflake crowns and icy tails; another year, build tropical coral scenes with bright fish.
- Experiment with different ornament shapes, such as teardrops for swimming mermaids and flat discs for full-figure portraits.
Safety and Crafting Tips for All Ages
Although mermaid snow globe ornaments are simple, a few precautions make the project safer and more enjoyable, especially when working with children. Adjust materials and tools to match the age and experience level of your helpers.
Working Safely with Children
- Use plastic ornaments instead of glass to avoid breakage and sharp edges.
- Reserve hot glue guns and craft knives for adults or older teens; provide younger children with pre-cut pieces and non-toxic tacky glue.
- Contain glitter by using small trays or shallow boxes under the work area, and wash hands thoroughly after crafting.
Design and Durability Tips
- Avoid very heavy items inside the ornament that may strain the hanging loop over time.
- Keep liquids out of these ornaments; this tutorial focuses on dry snow globes that are easier to store and less prone to leaks.
- Store finished ornaments in padded boxes in a cool, dry place to protect them from heat and crushing.
Frequently Asked Questions
Can real water be used in mermaid snow globe ornaments?
For this project, it is best to avoid real water because it can leak, grow cloudy over time, and can damage paper or painted components inside the ornament. Dry “snow” and glitter still provide a magical effect while being much easier to store and maintain from year to year.
What type of glitter works best?
Fine iridescent glitter gives the most ethereal, underwater sparkle, but combining it with slightly larger flakes or sequins helps keep the snow visible when the ornament is hanging still. Avoid very chunky pieces that might scratch the inside of plastic ornaments or hide too much of the mermaid.
How can the mermaid be kept from tipping over?
A wide, stable base is the key to keeping the figure upright. Mount the mermaid on a flattened clay or foam platform with glue, then secure that platform firmly to the ornament half and allow it to cure before adding snow and closing the globe.
Is it possible to make these ornaments without a glue gun?
Yes, as long as you use a strong, fast-grabbing craft adhesive suitable for the materials in your design. Drying time will be longer, so plan to work in stages, allowing each layer—base, figure, and decorative elements—to fully set before moving on.
How should these ornaments be stored after the holidays?
Wrap each ornament in soft tissue or bubble wrap and place them in a sturdy box where they will not be crushed by heavier items. Storing them upright or in individual compartments helps preserve the interior scenes and prevents the snow mixture from compacting too tightly against one side.
Bringing Ocean Magic to Your Holiday Tree
Mermaid snow globe ornaments bring a touch of fantasy to traditional holiday decor by combining swirling winter sparkle with the mystery of the sea. With simple materials, basic tools, and a bit of imagination, your tree can become a shimmering underwater forest filled with tiny stories captured in each globe.
Whether you make a single ornament as a keepsake or a full set as gifts, the process invites creativity, encourages hands-on time with family, and results in decorations that feel both personal and enchanting year after year.