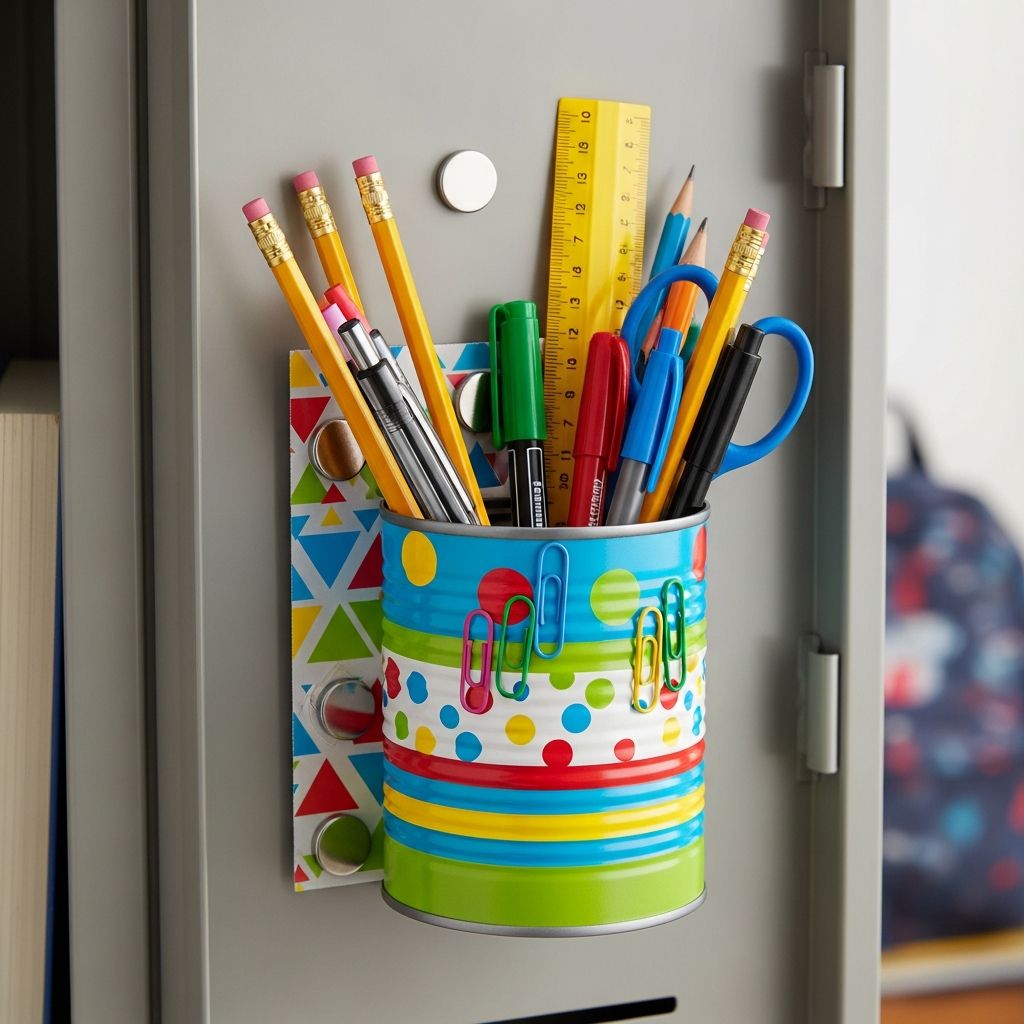
Back-to-school season is the perfect time to combine creativity with organization. A simple, magnetic pencil holder helps kids keep their pens, markers, and highlighters within easy reach while adding color and personality to a plain metal locker or study space.
Why Make a Magnetic Pencil Holder?
A magnetic pencil holder is more than just a cute craft project. It keeps essential writing tools together, saves locker space, and encourages kids to take responsibility for their supplies. Instead of digging at the bottom of a messy backpack, students can grab what they need in seconds.
- Reduces clutter by keeping pencils, pens, and markers in one visible spot.
- Uses vertical space on metal lockers, whiteboards, or filing cabinets instead of crowding shelves.
- Encourages kids to design a holder that reflects their style, hobbies, or favorite colors.
Supplies You Will Need
This project works best when it starts with a recycled plastic or lightweight container. From there, the rest is all about decorating and attaching strong magnets so it can cling to any metal surface.
- Clean, empty plastic or lightweight container (drink mix tub, snack can, etc.)
- Decorative paper or fabric (scrapbook sheets, wrapping paper, or fabric scraps)
- Craft adhesive (craft glue, decoupage medium, or double-sided tape)
- Sharp scissors or craft knife (for adults or supervised older kids)
- Self-adhesive magnets or strong flat magnets with hot glue
- Optional: stickers, washi tape, ribbon, felt, foam shapes, buttons, or letter stickers for names
- Optional: clear sealant or an extra coat of decoupage medium to protect the design
Choosing and Preparing the Container
The base of your pencil holder can be almost any small container, as long as it is light enough for magnets to support and deep enough to hold writing tools upright. The key is to clean it thoroughly and smooth any sharp edges before kids start decorating.
Good Container Options
- Plastic drink mix tubs with lids and straight sides.
- Sturdy snack cans or oatmeal-style containers (with any metal edges covered).
- Small plastic food tubs, like yogurt or sour cream containers.
Wash the container with warm soapy water, let it dry completely, and remove any labels or sticky residue. If you are using a container with metal or rough edges, cover those areas with tape, felt, or folded paper so kids can handle it safely.
Step-by-Step Instructions
The process is simple: decorate, secure the design, then attach magnets on the back. Younger kids can help with color choices and decorating, while adults or older children can handle cutting and hot glue.
1. Measure and Cut Your Covering
- Wrap a sheet of decorative paper or fabric loosely around the container to estimate how much you need.
- Mark the height and length with a pencil.
- Cut the piece so it wraps fully around with a small overlap at the seam.
- If you want a tidy top edge, leave an extra 1–2 cm to fold over the rim.
2. Attach the Paper or Fabric
- Apply a thin, even layer of glue or decoupage medium to the outside of the container.
- Starting at the “back” seam, press one edge of the paper or fabric into the adhesive.
- Smooth it around the container, pressing out air bubbles or wrinkles as you go.
- Overlap the ends slightly at the back and secure them with extra glue or tape.
- If you left extra height at the top, snip small vertical cuts along the overhang and fold the tabs neatly over the rim.
3. Seal and Protect the Design
This step is optional but helpful if the holder will be used daily. A protective layer keeps the design from peeling or getting smudged by ink or marker.
- Brush on a thin topcoat of decoupage medium or clear-drying glue.
- Let it dry completely according to product instructions.
- Apply a second coat if the container will be heavily used or stored in a backpack.
4. Add Decorative Details
Now comes the fun part: turning a plain container into something that feels personalized and special. Encourage kids to think of themes that make them smile every time they open their locker.
- Spell out a name or initials with alphabet stickers or foam letters.
- Use washi tape to create stripes, chevrons, or borders.
- Glue on buttons, small charms, or foam shapes for a 3D look.
- Draw doodles or tiny patterns directly on the paper using permanent markers.
5. Attach the Magnets
Magnets must be strong enough to support the weight of the filled container. Always test on a metal surface before declaring your project finished.
- Decide which side of the container will rest against the locker door. This is the “back.”
- Place two or more magnets in a vertical line on the back for stability.
- If using glue-on magnets, attach them with hot glue or a strong adhesive and press firmly.
- Allow the glue to dry fully.
- Test the holder on a locker, fridge, or metal board. Load it with a few pencils to check strength.
Locker-Friendly Design Ideas
One of the best parts of this project is how easily it adapts to different ages and personalities. You can keep it simple for young kids or lean into trends and fandoms for tweens and teens.
- Minimalist look: Solid-color paper with a single stripe of metallic tape and initials.
- Sports theme: Team colors, jersey numbers, and tiny printed logos (not copyrighted materials).
- Nature style: Leaf or floral patterns, earthy colors, and ribbon “vines.”
- Galaxy vibes: Starry paper, glitter accents, and glow-in-the-dark stickers.
- Study focus: Calm pastel tones and a small motivational word like “Focus” or “Create.”
Safety Tips for Crafting with Kids
Because this project involves cutting and potentially hot glue, it is important to divide tasks according to age and skill level. Younger children can help choose colors and decorate, while adults handle anything sharp or very hot.
- Let adults or responsible teens handle craft knives and hot glue guns.
- Use child-safe scissors for younger crafters and supervise at all times.
- Check for sharp container edges and cover them with tape, felt, or folded paper.
- Keep small magnets away from toddlers and pets, as they can be dangerous if swallowed.
Suggested Uses Beyond Lockers
Although this magnetic holder is perfect for student lockers, its usefulness does not stop at the school door. Anywhere you have a metal surface, you have a chance to organize small supplies and reduce clutter.
- Attach to the side of a metal desk to hold pens, scissors, or highlighters.
- Use on a refrigerator for shopping list pens, coupons, or notepads.
- Place on a magnetic dry-erase board to hold markers and an eraser.
- Stick to a metal tool cabinet to organize small screwdrivers or paint markers.
Magnetic Holder Ideas Table
The table below gives a quick overview of how you can adapt one basic project to different settings and users.
| Who Its For | Suggested Style | Where to Use It |
|---|---|---|
| Elementary students | Bright colors, cartoon stickers, bold names | School locker, art cart, bedroom metal board |
| Middle & high schoolers | Trendy patterns, subtle colors, initials or small quotes | Locker door, study nook, metal bookshelf |
| College students | Minimalist designs, neutral colors, functional labels | Dorm room fridge, shared whiteboard, filing cabinet |
| Home office users | Coordinated with decor, simple solid colors, labeled sections | Metal desk, cabinet, or organizational board |
| Crafters & hobbyists | Pattern mixing, textured materials, bold embellishments | Craft cart, metal toolbox, workshop wall |
Eco-Friendly and Budget-Friendly Benefits
One hidden advantage of this project is how easily it turns recycling into something useful. Instead of throwing away containers, families can give them a second life as organizers that reduce the need to buy new plastic items.
- Reuses packaging that would otherwise end up in the trash or recycling bin.
- Lets you use leftover scraps of paper, fabric, ribbon, and tape from other crafts.
- Costs far less than store-bought locker organizers while offering more customization.
Tips for Making the Holder Last All Year
With a few small adjustments, this craft can easily survive an entire school year of open-and-shut locker doors and daily use. Strong magnets and good sealing are the two most important factors when building a durable holder.
- Choose strong, flat magnets rated for the weight you expect the holder to carry.
- Avoid overfilling the cup; limit it to pens, pencils, and a slim highlighter or two.
- Add an extra strip of tape along the back seam to prevent peeling.
- Consider a second, smaller holder for scissors or heavier items so magnets do not strain.
Frequently Asked Questions
Can I use metal cans instead of plastic?
Yes, metal cans can work as long as they are light, clean, and all sharp edges are completely covered. Use felt, tape, or folded paper to cover any exposed metal, and always check that your magnets are strong enough to hold the extra weight.
What type of magnets should I buy?
Flat, strong magnets designed for crafts or office use are the best choice. Avoid tiny novelty magnets that are too weak; look for magnets manufactured to support small containers or tools and follow the weight recommendations on the package.
Is regular school glue enough for this project?
Regular school glue can work for paper-on-plastic decorations, but it may not hold magnets securely. For attaching magnets and heavier embellishments, choose a stronger craft adhesive or hot glue under adult supervision.
How can we make this project faster for a group activity?
If you are crafting with a group, pre-cut the paper or fabric wraps and pre-attach magnets to the containers. Kids can focus just on decorating, adding stickers, washi tape, and markers, which reduces mess and waiting time.
Can this project work without any glue?
It is possible to wrap the container using only double-sided tape and self-adhesive magnets, but the result may not be as durable. Glue or decoupage medium creates a more secure bond that is better for long-term, everyday use at school.
Making Back-to-School More Fun
Preparing for a new school year often focuses on supply lists and schedules, but creative projects like this magnetic pencil holder add excitement to the transition. When kids decorate something they will use every day, they feel more invested in their space and more motivated to keep it neat.
With simple supplies, a bit of imagination, and a few magnets, families can transform a plain container into a colorful locker accessory that is both practical and personal. It is a small project with a big impact on everyday school routines.