Graduation is one of those rare milestones that deserves something more personal than a rushed trip to the florist. A DIY graduation flower bouquet lets you celebrate the hard work, late nights, and big dreams of your grad with a handmade gift that feels genuinely thoughtful and unique.
This guide walks through how to plan, design, assemble, and present a graduation flower bouquet that looks professional but is completely crafted by you—no floral design experience required.
Why Make a Graduation Bouquet Yourself?
Store-bought bouquets are beautiful, but they rarely capture the specific story and personality of the graduate you love. Crafting the bouquet yourself allows you to customize every detail, from the colors and blooms to the ribbons and keepsake accents.
- Create a one-of-a-kind gift that reflects the graduate’s favorite colors, hobbies, or future plans.
- Control the budget by mixing fresh flowers, greenery, and inexpensive decorative elements.
- Turn the process into a meaningful ritual: making the bouquet can be just as special as giving it.
Planning Your Graduation Bouquet
Before you buy a single flower, spend a few minutes planning. A little forethought will keep your bouquet cohesive instead of chaotic and help you avoid last-minute stress on graduation day.
Think About the Graduate’s Personality
Ask yourself what kind of visual style best represents the grad. Bold and dramatic? Soft and romantic? Simple and modern? The answer will guide your choices of blooms, colors, and wrapping style.
- Classic and elegant: Think roses, lilies, or tulips with simple ribbon and neutral wrapping.
- Playful and fun: Choose bright gerbera daisies, sunflowers, and colorful wrapping paper.
- Minimal and modern: Stick to one or two flower types, clean lines, and monochrome colors.
Match or Complement School Colors
Incorporating school colors into the bouquet helps tie the gift to the occasion and looks great in photos. You do not need to match the exact shades perfectly; complementing tones work just as well.
- Use blooms in one school color and ribbons or tissue paper in the other.
- If the colors are very bold (like bright red and black), soften the look with white or greenery.
- For multiple graduates from different schools, vary the ribbon and wrapping colors while keeping similar flower types.
Essential Supplies and Tools
You do not need professional tools to create a polished bouquet, but a basic set of supplies will make the project easier and more enjoyable.
Suggested Materials Checklist
- Fresh flowers (primary blooms and a few filler flowers)
- Greenery (eucalyptus, ferns, or other foliage)
- Floral tape or masking tape
- Sharp scissors or floral shears
- Ribbon or twine for tying the stems
- Wrapping paper, craft paper, or tissue paper
- Optional: decorative picks, small cards, faux diploma, miniature graduation cap, or confetti
| Component | Purpose | Budget-Friendly Ideas |
|---|---|---|
| Main flowers | Create the focal point and overall color scheme. | Seasonal supermarket flowers, market bundles, or garden blooms. |
| Filler flowers | Add texture and volume without overwhelming the main blooms. | Baby’s breath, waxflower, statice, or small daisies. |
| Greenery | Frames the bouquet and makes it look fuller. | Eucalyptus, fern fronds, or clipped garden foliage. |
| Wrapping | Protects the stems and finishes the bouquet visually. | Kraft paper, tissue paper, recycled gift wrap, or fabric. |
| Ribbon & accents | Secure the stems and personalize the design. | Fabric ribbon, yarn, twine, school-colored ribbon, or lace. |
Choosing Flowers That Last Through the Celebration
Because graduation days often involve travel, long ceremonies, and hours of photo-taking, choose blooms that hold up well and do not wilt quickly outside of water.
- Look for sturdy flowers such as chrysanthemums, carnations, alstroemeria, or sunflowers.
- Add a few premium blooms (like roses or lilies) as focal points, supporting them with hardier filler flowers.
- Pick stems with tight or just-opened buds so they open gradually and last longer after the ceremony.
Step-by-Step: Assembling the Bouquet
The easiest way to build a bouquet is from the inside out. Start with a focal flower and gradually add blooms and greenery around it, turning the bouquet as you go.
Step 1: Prepare and Condition Your Flowers
Proper preparation makes a big difference in how professional your bouquet looks and how long it lasts. Give yourself 20–30 minutes to clean and trim the stems.
- Remove any leaves that would sit below the binding point or below the water line in a vase later.
- Trim stems at an angle using sharp scissors or floral shears.
- Place the flowers in cool water while you work to keep them hydrated.
Step 2: Create the Focal Cluster
Every bouquet needs a visual center. Choose two or three main flowers that will anchor the design and hold the viewer’s attention in photos.
- Select 2–5 primary blooms in complementary colors.
- Hold them together in one hand, adjusting until they sit at slightly different heights for dimension.
- Secure the cluster lightly with floral tape so it does not shift as you add more stems.
Step 3: Build Shape and Volume
With the focal cluster in place, begin adding supporting flowers and greenery, always rotating the bouquet so it looks balanced from all sides.
- Add filler flowers around the focal cluster, tucking them slightly lower or higher to avoid a flat, single-layered look.
- Insert greenery in between flower stems to frame and separate the blooms.
- Continue turning the bouquet and checking it from every angle; aim for a rounded, slightly domed shape that is comfortable for the graduate to hold.
Step 4: Secure the Stems
Once you are happy with the overall shape, secure all the stems together firmly so they do not shift during transport or the ceremony.
- Wrap floral tape or masking tape tightly around the stems where the graduate’s hand will hold the bouquet.
- Trim the ends of the stems so they are all the same length and easy to wrap.
- Test by gently shaking the bouquet; if it feels loose, add another layer of tape.
Creative Graduation-Themed Embellishments
The difference between a beautiful bouquet and a truly memorable graduation bouquet is in the small, themed details. These extras do not have to be expensive; even simple paper elements can add personality.
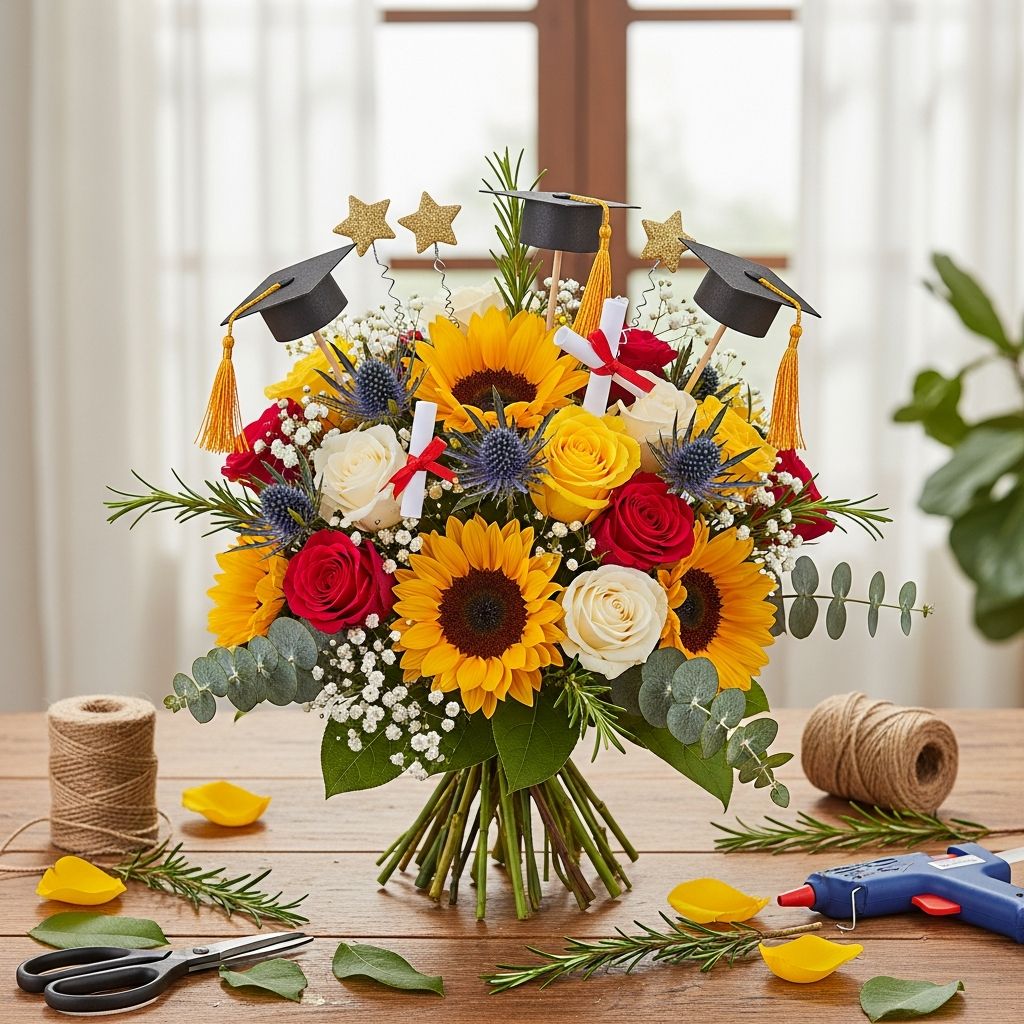
- Attach a small rolled paper “diploma” tied with a ribbon and nestle it among the flowers.
- Add a miniature graduation cap or tassel pick near the top of the bouquet.
- Include a tiny photo of the graduate, laminated or framed in cardstock, secured on a stick.
- Write a short message on a small tag—such as “Class of [Year]” or “You Did It!”—and tie it around the stems.
Wrapping Options for a Polished Finish
Even a simple selection of flowers can look high-end with thoughtful wrapping. The wrapping should complement the bouquet’s style while protecting the stems and making the arrangement easy to carry.
Classic Paper Cone Style
This style mimics the look of a florist’s hand-tied bouquet and works well for nearly any combination of flowers. It is ideal if you want something streamlined and photo-friendly.
- Lay a sheet of kraft paper or decorative wrapping paper on a flat surface in a diamond orientation.
- Place the bouquet diagonally on the paper, with the flower heads near one corner and the stems extending toward the opposite side.
- Fold the bottom corner up over the stems, then bring one side around the bouquet and wrap the other side over it, forming a cone.
- Secure with tape and finish with a ribbon tied around the stems on the outside of the paper.
Layered Tissue for a Softer Look
Layering tissue paper in coordinating or school colors creates a bright, celebratory feel, especially for younger graduates.
- Stack two or three sheets of tissue paper in slightly different colors, rotating each layer so the points do not line up perfectly.
- Place the bouquet in the center and gather the tissue up around the stems.
- Secure with ribbon, leaving some of the tissue’s points visible above the tie for a flared effect.
Personalization Ideas for Different Graduates
One of the joys of DIY is customizing each bouquet for the individual. Consider the graduate’s age, interests, and future plans when deciding how to personalize.
- For high school grads: Add a charm representing their future college, or include a small envelope with a handwritten note of encouragement.
- For college grads: Include a symbolic item, such as a miniature book, tiny tool, or small emblem tied to their major.
- For preschool or kindergarten grads: Use bright, cheerful colors and tuck in small, lightweight toys or stickers.
Timing and Storage Tips
To keep your bouquet fresh and vibrant, timing is everything. Aim to assemble it close to the ceremony while still giving yourself enough cushion in case you need to adjust anything.
- Buy or cut flowers the day before and store them in water in a cool spot out of direct sunlight.
- Assemble the bouquet the morning of the ceremony, then keep the stems in a vase of water until it is time to leave.
- If possible, wrap the bouquet after transport so the paper does not get crushed in the car.
Display and Photo Ideas
Once the graduate has the bouquet in hand, it becomes part of the day’s story. Think about how it will appear in photos and how it can be enjoyed after the ceremony.
- Encourage the grad to hold the bouquet slightly angled forward, with both hands low enough that the flowers do not hide the cap and gown.
- After the celebration, trim the stems and place the bouquet in a vase so it can be enjoyed for several days.
- Dry a few special blooms or save attached charms and keepsakes in a memory box or scrapbook.
Frequently Asked Questions About DIY Graduation Bouquets
How many flowers do I need for one bouquet?
The exact number depends on flower size, but most medium hand-tied bouquets use about 12–20 stems total. Combining a handful of larger focal flowers with several smaller filler flowers and greenery will create a full, lush look without overspending.
Can I mix real and artificial flowers?
Yes, mixing fresh and faux flowers is a great way to stretch your budget and create a keepsake that lasts. Use real flowers for fragrance and texture, and tuck in a few high-quality artificial blooms that the graduate can save long after the real flowers fade.
What if I am new to arranging flowers?
Start simple: stick to one or two types of flowers and a basic rounded shape. Focus on balance rather than perfection, and remember that wrapping, ribbon, and small graduation-themed accents will elevate even a very simple arrangement.
How far in advance can I make the bouquet?
You can condition and organize your flowers the day before, but assemble and wrap the bouquet as close to the ceremony as you reasonably can. Keeping stems in water right up until you leave for the event will help the flowers stay fresh throughout the day.
What is a good color scheme if I do not want to use school colors?
Neutrals such as white, cream, soft pink, and greenery are always timeless. Alternatively, choose colors that match the graduate’s favorite outfits or room decor, so the bouquet feels more connected to who they are rather than where they studied.
Final Thoughts
A handmade graduation flower bouquet is more than a pretty accessory for photos; it is a symbol of pride, care, and the time you spent thinking about the person who earned it. With a few basic supplies and the steps outlined here, you can create a bouquet that feels as special as the milestone it celebrates.