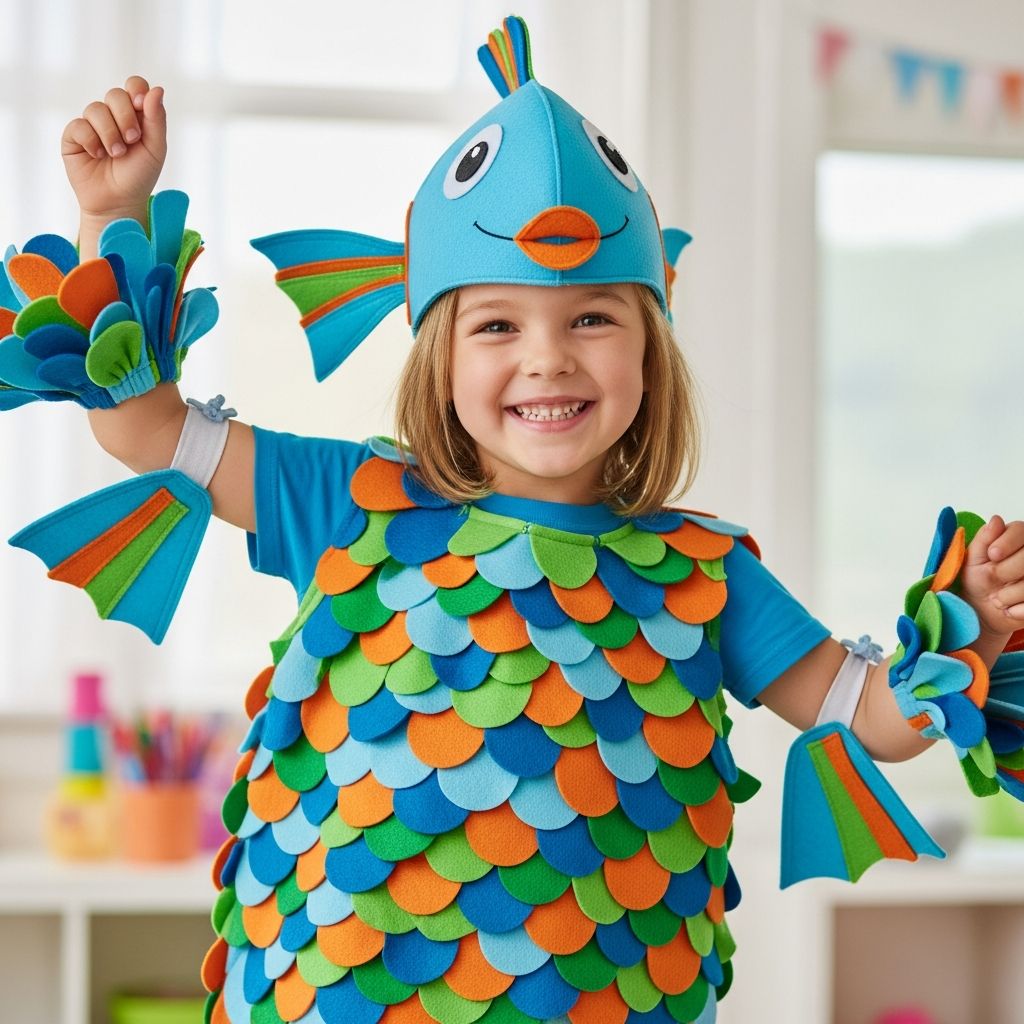
If a child is dreaming of shimmering scales, wiggly fins, and an ocean of imagination, a homemade fish costume is an easy and affordable way to bring that underwater fantasy to life. This guide walks through a kid-friendly, mostly no-sew project that uses everyday craft supplies to build a playful, comfortable fish outfit.
Why a Fish Costume Is Perfect for Kids
Fish costumes are ideal for school events, Halloween, themed birthday parties, or dress-up play because they are colorful, lightweight, and easy to customize. Unlike complex character outfits, a fish design can be simplified into bold shapes and bright textures so adults and older kids can craft it in an afternoon.
- Works for a wide age range, from preschoolers to early teens.
- Adapts to any color palette, from tropical rainbow fish to sleek silver or deep-sea blue.
- Can be made with minimal sewing, or entirely no-sew using glue and pre-made clothing.
Planning Your Under-the-Sea Look
Before gathering materials, decide what style of fish best fits the childs personality and the event. A simple oval-shaped fish with fins and scales is the easiest starting point, and extra details like glitter or shiny pieces can be layered on at the end.
Choosing a Fish Style
- Tropical fish: Bright oranges, pinks, yellows, and blues with bold patterns.
- Rainbow fish: Multicolored scales with foil or glitter accents.
- Goldfish: Warm oranges and yellows with rounded fins.
- Deep-sea fish: Dark blues and purples with metallic hints and big eyes.
Once the style is selected, sketch a rough outline on paper. This sketch does not need to be perfect; it just helps determine how large the fish body and tail should be in relation to the childs height and arm span.
Materials and Tools Checklist
This project can be built from inexpensive craft supplies and basic clothing that might already be at home. Substitutions are fine, as long as the materials are lightweight and comfortable to wear.
Essential Materials
- Large piece of cardboard or foam board (for the main fish body)
- Colored craft paint or non-toxic spray paint
- Colored paper, felt, or foam sheets for scales and fins
- Glue (hot glue with adult supervision, or strong craft glue)
- One ping pong ball or large button for the fish eye (optional)
- Elastic straps, ribbon, or wide fabric strips for shoulder straps
- Base clothing: leggings or pants and a long-sleeve top (colors that match the fish)
Helpful Tools
- Scissors suitable for paper and felt
- Craft knife for cardboard (used only by adults)
- Pencil and marker for tracing shapes
- Ruler or measuring tape for sizing
- Hole punch (optional, for attaching straps)
Simple Safety Tips
- Have adults handle sharp blades and hot glue.
- Use non-toxic paints and work in a well-ventilated area.
- Keep costume pieces flexible and lightweight to avoid strain on small shoulders.
Designing the Fish Body
The fish body forms the main silhouette of the costume. A simplified shape keeps the project approachable while still reading clearly as a fish from a distance.
Creating the Basic Shape
- Measure the child: From shoulder to mid-thigh for height, and across the chest for width.
- Sketch an outline: Draw a wide oval for the body and add a large triangle on one side for the tail.
- Cut the shape: Using scissors or a craft knife, carefully cut out the fish silhouette from the cardboard or foam board.
- Mirror the shape: Trace the first fish onto another piece of board to create a front and back panel that match.
Making It Wearable
The child can wear the fish like a sandwich board, with straps over the shoulders. Adjust the placement so the fish body does not hit the knees or drag when walking.
- Mark two spots near the top of each fish panel, roughly above the shoulders.
- Use a hole punch or craft knife to create small holes for straps.
- Thread elastic or ribbon through the holes and knot or glue in place, leaving enough slack for a comfortable fit.
- Test the fit on the child and trim or adjust as needed.
Adding Color: Painting and Base Layers
Once the structure is ready, the fish can be painted in the chosen color scheme. A single bold base color helps the details stand out while keeping the process simple.
- Lay out scrap paper or an old sheet to protect the work surface.
- Apply a base coat of paint to each side of both fish panels, covering the body and tail.
- Allow the panels to dry fully before adding details or gluing on scales.
- Optional: lightly blend a second color near the tail or belly to add depth.
Children can help with painting as long as the paint is child-safe and an adult supervises. Pattern details such as stripes or spots can be brushed on after the base layer has dried.
Crafting Scales, Fins, and Features
The scales and fins give the costume its character. Mixing textures (felt, foam, metallic paper) creates a lively, underwater look that catches the light during movement.
Making Fish Scales
- Cut a small oval or teardrop shape from scrap paper to serve as a template.
- Trace the template multiple times onto felt, foam, or colored paper.
- Cut out a stack of scales in different colors or shades.
- Starting at the bottom of the fish body, glue the first row of scales in a slight overlap.
- Work upward, layering each new row over the top edge of the previous row to mimic real scales.
Designing Fins and Tail Details
- Side fins: Cut rounded triangles from felt or foam and glue them to the sides of the body, slightly raised.
- Dorsal fin: For an extra tall fin on the top, cut a curved triangle and attach it along the top edge of the fish panel.
- Tail accents: Draw or glue lines that radiate from the base of the tail to suggest movement.
Adding Eyes and Expressions
A big, friendly eye makes the fish costume feel playful. For a 3D effect, a ping pong ball can be cut in half (by an adult) and glued onto the head area, with a pupil drawn or painted on. Alternatively, stacked circles of felt or paper can form a flat eye with just as much character.
Comfort, Fit, and Mobility
Even the most beautiful costume needs to be practical for walking, climbing steps, and participating in activities. Take a few minutes to refine the fit once the decorations are complete.
- Check that the bottom of the fish does not block the knees or trip the child.
- Ensure arm movement is free and the straps are not digging into the shoulders.
- Keep the weight of cardboard, paint, and glued items to a minimum to avoid fatigue.
Layer the costume over comfortable clothes that match the color scheme. For colder weather, thermal layers under leggings and a long-sleeve shirt keep the outfit cozy without altering the design.
Styling Ideas: From Simple to Show-Stopping
The base fish design can be dressed up or kept simple, depending on time, budget, and how long the costume needs to last. Accessories also help connect siblings or friends into a full underwater cast.
Easy Add-Ons
- Use blue or green leggings to mimic water and blend with the fish body.
- Add sparkling face paint or temporary tattoos in wave or bubble shapes.
- Attach a few loose ribbons at the tail to float as the child walks.
Group and Family Variations
- Turn siblings into a school of fish by repeating the design in different colors.
- Have adults dress as a scuba diver or coral reef using simple accessories.
- Create matching sea creatures, like a starfish, jellyfish, or crab using similar techniques.
Fish Costume Component Overview
The table below summarizes the main parts of the costume and the easiest materials to use for each. This quick reference helps when planning what to purchase or gather from home.
| Component | Suggested Material | Primary Function |
|---|---|---|
| Fish body panels | Cardboard or foam board | Provides structure and main silhouette |
| Base clothing | Leggings and long-sleeve shirt | Adds comfort and background color |
| Scales | Felt, foam, or colored paper | Creates texture and visual interest |
| Fins and tail | Felt, foam, or stiff fabric | Emphasizes movement and fish shape |
| Straps | Elastic, ribbon, or bias tape | Allows the child to wear the costume comfortably |
| Eye detail | Ping pong ball, buttons, or layered felt | Gives the fish personality and expression |
FAQs About DIY Fish Costumes
Can this costume be made without any sewing?
Yes. The entire project can be completed by gluing scales, fins, and straps to the board and base clothing. Fabric glue or hot glue (used safely by an adult) keeps everything in place without a single stitch.
How long does it usually take to make?
The time required depends on how many scales and details are added. A basic version with a painted body, simple fins, and a single row of scales can be assembled in about an hour, while a heavily decorated, multi-color fish might take an afternoon.
What age group is this costume best for?
This design works best for children who are old enough to walk comfortably while wearing a lightweight board on their shoulders, typically ages three and up. For toddlers, consider shrinking the fish panels and using softer, thinner materials so the costume is easier to manage.
How can it be stored for future use?
Once the event is over, allow any remaining glue or paint to dry fully and then hang the fish body by the straps in a cool, dry place. Avoid stacking heavy objects on top of it so the cardboard does not bend or warp before the next adventure.
Can the design be recycled into other costumes?
Absolutely. The same basic shape can be repainted and re-decorated to become a different sea creature for another year, or the scales and fins can be removed and reused for craft projects, collages, or school art assignments.
This DIY fish costume project turns simple materials into a vivid, under-the-sea outfit that invites kids to play, dance, and imagine. With flexible steps, plenty of room for personalization, and a focus on comfort, it is an accessible way to create a memorable costume without relying on store-bought options.