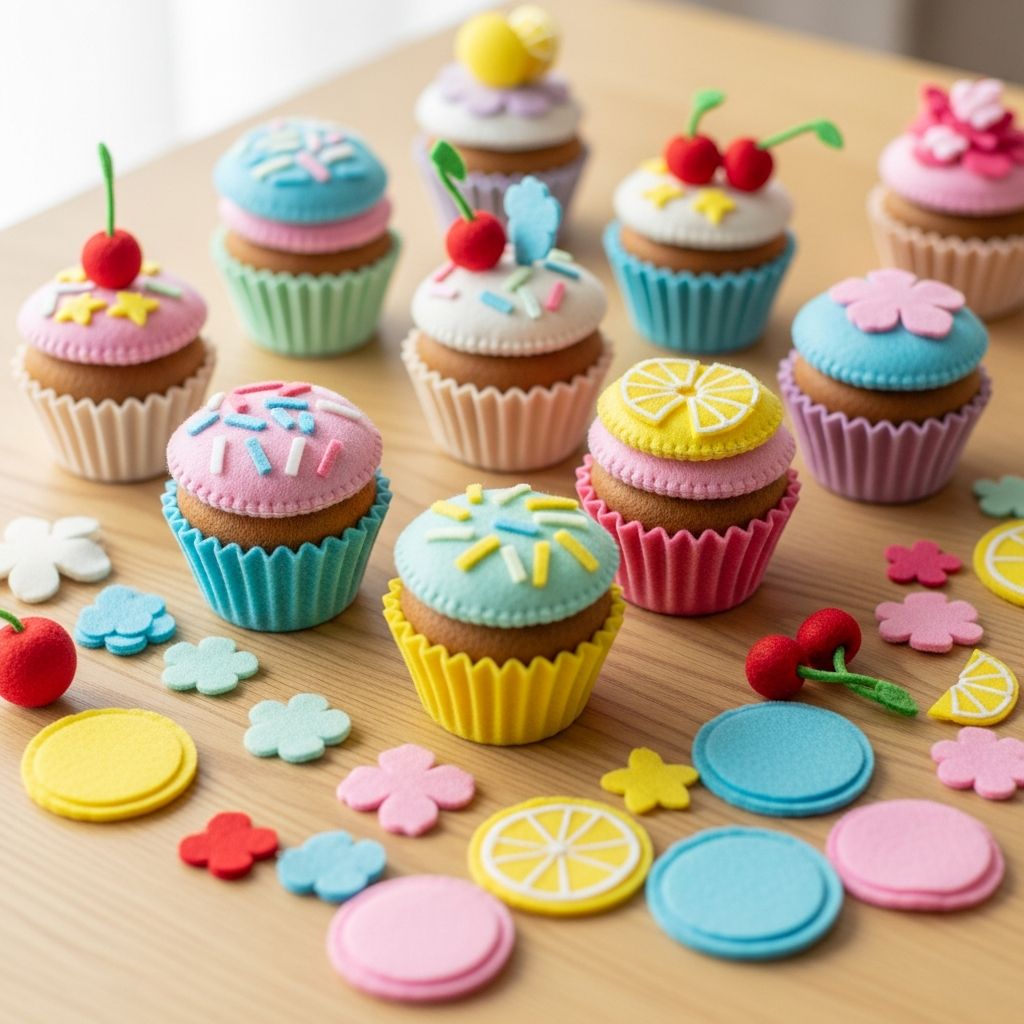
Felt food is a favorite in many homes and classrooms because it is soft, durable, and endlessly reusable. A set of build-your-own felt cupcakes adds an extra layer of fun: kids can assemble, decorate, and redecorate their treats again and again without any sugar rush or sticky mess.
This guide walks you through designing a flexible felt cupcake kit rather than a single fixed toy. Think of it as a box of baking ingredients made from felt: mix-and-match bases, frosting tops, and colorful decorations that invite open-ended play.
Why Felt Cupcakes Make a Great Kids’ Craft
Before gathering materials, it helps to understand what makes this project especially useful for families, teachers, and caregivers.
- Quiet entertainment: Soft pieces make almost no noise, which is ideal for rest time, travel, or waiting rooms.
- Open-ended play: Children can invent their own recipes, patterns, and pretend bakery stories.
- Skill-building: Cutting, sorting, and arranging small parts supports fine-motor coordination and hand-eye control, which are important for early writing and self-care skills.
- Reusable and washable: Felt pieces can be used repeatedly, and many synthetic and wool blend felts tolerate gentle hand-washing.
- Adaptable for ages: Very young kids can simply stack pieces, while older kids can help design and cut their own decorations.
Supplies and Basic Tools
You can scale this project up or down depending on how many cupcakes you want in your set. The list below covers one generous starter kit.
- Felt sheets in cupcake-friendly colors (browns, tans, pinks, whites, pastels, brights for sprinkles)
- Sharp fabric scissors or child-safe craft scissors for older kids
- Paper and pencil for sketching simple templates
- Optional:
- Fabric glue or tacky glue (for permanent embellishments adults make)
- Embroidery thread and needles (if you want stitched decorative details)
- Buttons, small pom-poms, or ribbon scraps (for supervised decoration with older kids)
- Reusable storage container, tin, or zip bag to hold the finished set
For young children, keep loose items large enough not to pose a choking hazard, and supervise closely with any small parts.
Designing the Cupcake Layers
Instead of sewing three-dimensional cupcakes, this project focuses on flat but layered pieces that can be stacked like paper dolls. This keeps the craft fast and accessible, especially for group settings or parties.
Core Pieces in Your Cupcake Kit
Plan at least three basic categories of pieces:
- Cupcake bases: The “cake” and wrapper shape.
- Frosting tops: Swirls or domes that sit on the base.
- Decorations: Sprinkles, cherries, fruit slices, candles, and more.
| Piece Type | Suggested Size | Recommended Colors | Notes |
|---|---|---|---|
| Base (wrapper + cake) | 6–8 cm wide, 5–6 cm tall | Tans, browns, yellows, reds | Cut several shapes to mimic different flavors. |
| Frosting top | 6–8 cm wide, 4–5 cm tall | Whites, creams, pinks, blues, purples | Use gentle curves or scallops for a frosting look. |
| Sprinkles & chips | 0.5–1 cm | Bright assorted colors | Thin rectangles, circles, and tiny ovals work well. |
| Fruit or candy toppers | 1–3 cm | Reds, greens, yellows, oranges | Hearts, stars, cherries, strawberries, lemons, etc. |
| Candles | 5–7 cm tall | Any stripe or solid color | Include a tiny yellow or orange flame piece. |
Sketching Simple Templates
You do not need advanced drawing skills. A few basic shapes will do:
- Draw a trapezoid with a rounded top for the cupcake base.
- Draw a puffy cloud shape for the frosting.
- Trace coins, bottle caps, or small lids for perfect circles.
- Use triangles, half-circles, and rectangles for fruit slices and sprinkles.
Cut your paper templates first, test how they layer together on the table, and adjust their size before you touch the felt. This reduces waste and helps kids visualize the finished kit.
Cutting the Felt Pieces
Once your templates are ready, you can move to the felt. If multiple kids will share one set, aim for variety.
Step-by-Step Cutting Plan
- Trace the paper templates lightly onto felt using a disappearing fabric marker or a regular pen on the back side of the felt.
- Cut slowly with sharp scissors, keeping your cutting hand steady and turning the felt with the other hand to manage curves.
- Cut multiples of each piece: several bases, numerous frosting tops, and a generous pile of small decorations.
- Sort pieces by type into small bowls or sections of your workspace. This makes it easier for children to “shop” for parts as they build cupcakes.
Tips for Crafting with Kids
- Pre-cut small pieces in advance for toddlers or preschoolers.
- Offer children blunt-tip scissors and supervise as they cut larger shapes like bases and frosting.
- Keep a scrap bowl: kids often enjoy turning offcuts into extra toppings or mini cookies.
Optional Embellishments and Stitching Details
The simplest version of this project is completely no-sew. However, adults or older kids may enjoy adding stitched elements for extra texture and visual interest.
No-Sew Enhancements
- Layered frosting: Glue a smaller frosting piece on top of a larger one to suggest extra frosting swirls.
- Two-tone wrappers: Glue narrow stripes or a band of contrasting felt onto the bottom portion of the base.
- Fixed decorations: For very young children, glue some sprinkles permanently to certain frosting pieces so there are always ready-to-go decorated tops.
Simple Hand-Stitched Details
If you enjoy embroidery or want to introduce basic stitches, felt is an excellent learning fabric because it does not fray easily.
- Use running stitch or backstitch lines to suggest ridges on the cupcake wrapper.
- Add French knots or tiny cross stitches for stitched-on sprinkles.
- Outline fruit pieces with a simple whipstitch for a more defined look.
Keep in mind that permanent stitching transforms some pieces from loose decorations into fixed designs. If you want maximum mix-and-match flexibility, limit stitched embellishments to just a few “special” frosting tops.
Setting Up the Cupcake Play Area
Once your pieces are cut, you can turn them into a mini bakery play station. How you present the kit can dramatically influence how long kids stay engaged.
Organizing the Cupcake “Ingredients”
Try grouping components the way a real baker might:
- Base bin: All plain cupcake bases.
- Frosting tray: Different frosting colors and shapes.
- Sprinkle dish: Tiny rectangles, dots, and chips.
- Special toppings bowl: Fruit, hearts, stars, candles, and other statement pieces.
A divided container, cutlery tray, or muffin tin works especially well for sorting small parts and helps younger children practice categorizing by shape or color, which supports early math skills.
Inviting Imaginary Play
To spark storytelling and role play, you might:
- Place a small notepad and pencil nearby so kids can “take orders.”
- Write a simple pretend menu with flavor names like “Galaxy Grape Swirl” or “Sunny Lemon Burst.”
- Offer play money or paper coins for a makeshift bakery or café.
- Add toy plates, cups, and a tray to encourage serving and sharing games.
Adapting the Craft for Different Ages and Settings
This project can grow with your child and adapt to a variety of environments, from home to classroom to therapy settings.
For Toddlers and Preschoolers
- Use large, simple shapes with no small parts that could be swallowed.
- Focus on color sorting (“Find all the pink toppings”) and simple stacking.
- Encourage vocabulary building: talk about “smooth,” “bumpy,” “circle,” “triangle,” “top,” and “bottom.”
For Early School-Age Children
- Invite kids to design their own flavors on paper first and then create matching felt versions.
- Introduce simple pattern challenges:
- “Make a cupcake with three red sprinkles and two blue sprinkles.”
- “Can you make a pattern: pink-green-pink-green?”
- Integrate basic math: count toppings, compare which cupcake has more or fewer sprinkles, or group sets of toppings.
For Classrooms, Libraries, or Therapy Rooms
- Use the cupcakes to practice turn-taking and social skills: one child is the baker, another is the customer.
- Combine the cupcakes with story time and let kids build a treat that matches a scene from the book.
- Use the felt pieces to support occupational therapy goals focused on grasp strength, pincer grip, and visual-motor coordination, in consultation with a professional.
Care, Storage, and Safety
With a bit of care, your felt cupcake kit can last for many play sessions.
Keeping Pieces Clean
- Shake or gently brush off lint and crumbs between uses.
- Spot-clean with a damp cloth and mild soap for occasional stains.
- Air-dry pieces thoroughly before returning them to a closed container, since trapped moisture can encourage mold on natural fibers.
Safe Play Guidelines
- For children under three, avoid tiny pieces like bead sprinkles, buttons, and very small felt bits.
- Inspect the set regularly; remove anything that has become frayed or too small.
- Supervise closely whenever small parts are in use or when multiple age groups share the same kit.
Felt Cupcake Craft: Frequently Asked Questions
Do I need to sew anything to make this cupcake kit?
No. The basic kit is completely no-sew. All pieces can be cut as flat shapes that children simply layer on top of each other. Sewing is optional if you want more durable or embellished designs.
What type of felt works best?
Stiffer wool-blend or high-quality synthetic craft felt usually holds its shape better than very thin felt. Medium-weight felt is ideal because it is easy to cut yet sturdy enough for repeated handling.
How many pieces should I make for one child?
A good starter set for one child might include 4–6 bases, 6–8 frosting pieces, and a handful of each decoration type (sprinkles, fruit, stars, candles). For group play, multiply those numbers so several cupcakes can be built at the same time.
Can I turn these flat pieces into a three-dimensional cupcake?A: Yes. You can sew two base pieces and two frosting pieces together, leave a gap, add stuffing, and then close the seam to create a plush cupcake. However, you will lose some of the mix-and-match flexibility that the flat play set offers.
Q: Are felt cupcakes suitable for classroom use?
Felt cupcake kits can work very well in classrooms and learning centers when pieces are large enough, sorted into containers, and checked regularly for wear. They support imaginative play, early math concepts, and fine-motor practice in a quiet, low-mess format.
References
- Play in Children’s Development, Health and Well-Being — Office of the United Nations High Commissioner for Human Rights / UN Committee on the Rights of the Child (General Comment No. 17). 2013-04-17. https://www.ohchr.org/en/documents/general-comments-and-recommendations/general-comment-no-17-2013-right-child-rest-leisure
- Early Mathematics: A Guide for Improving Teaching and Learning — What Works Clearinghouse, U.S. Department of Education / Institute of Education Sciences. 2021-03-01. https://ies.ed.gov/ncee/wwc/practiceguide/29
- Textiles — Determination of the Effect of Applied Repeated Laundering, Drycleaning or Wetcleaning on Dimensional Change and Appearance (ISO 7771:2012) — International Organization for Standardization. 2012-07-01. https://www.iso.org/standard/53028.html
- Choking Prevention and Safe Feeding of Infants and Young Children — Canadian Paediatric Society. 2018-04-26. https://cps.ca/en/documents/position/safe-feeding