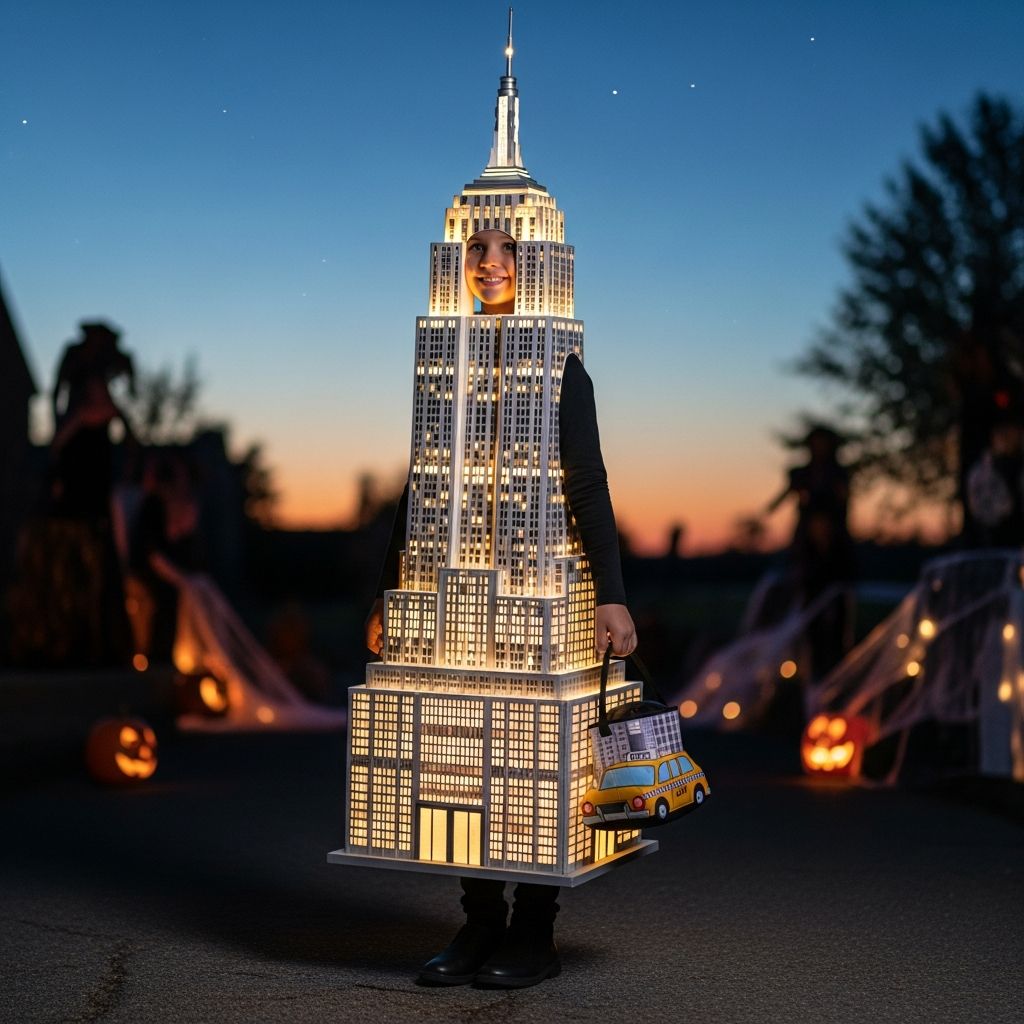
Transform a simple box of craft supplies into a towering, glowing Empire State Building costume that steals the show on Halloween night. This guide walks you through every step, from planning and measuring to painting, lighting, and fitting the costume for real-world trick-or-treating.
Why a Skyscraper Costume Is a Showstopper
An Empire State Building costume is memorable because it blends architecture, creativity, and glow-in-the-dark fun in one wearable project. Unlike store-bought characters, a skyscraper outfit turns your child into a one-of-a-kind piece of city skyline art.
- It stands out on crowded sidewalks and at school parades.
- It can be customized to match your city, your favorite colors, or a full skyline group theme.
- It teaches kids about buildings, design, and problem-solving while you craft together.
Planning Your Mini Skyscraper
Before you cut cardboard, take a few minutes to design the general shape and height of the costume. Think of it as a wearable sandwich board with a tall crown that suggests the famous tower and spire.
- Decide if the costume will hang from the shoulders like a board, or fit more like a box with armholes.
- Choose whether you want realistic architectural details or a more cartoon, blocky style.
- Sketch a quick front view showing windows, tiers, and the top spire.
Materials and Tools Checklist
Most of the supplies are basic craft or hardware store items. Substitute what you have on hand to keep the project budget-friendly.
Core Structure
- 2–3 large pieces of corrugated cardboard (for front, back, and optional side panels)
- 1 smaller cardboard strip or foam board (for the headpiece and spire)
- Strong tape (duct tape or gaffer tape) for seams and straps
- Optional: wide elastic or webbing for more comfortable shoulder straps
Visual Details
- Gray, silver, or metallic spray paint or acrylic paint
- White or light-colored paper or tissue paper for backing windows
- Black marker, paint pen, or thin tape for grid lines and edges
- Glitter glue or metallic craft paint for accents
Lighting and Extras
- Battery-operated mini lights or fairy lights
- Glow sticks or LED wands for the spire and window glow
- Thin craft wire or twist ties to secure lights
- Velcro dots or hook-and-loop strips for closures
- Foam sheets or felt to pad the inside where it touches shoulders and head
Tools
- Craft knife or box cutter (adults only)
- Metal ruler or straightedge
- Scissors
- Cutting mat or thick scrap cardboard to protect surfaces
- Pencil and measuring tape
Size and Fit: Measuring Your Child
Proper sizing makes the difference between a costume that gets worn for ten minutes and one that survives an entire night of candy hunting. Aim for a building that looks tall without limiting movement.
- Measure from the child’s shoulders to just above the knees for the height of the main building panel.
- Measure across the chest and hips to determine a comfortable width that still allows arms to swing freely.
- Leave generous space around the neck and shoulders to layer clothing underneath for cold weather.
| Age Range | Panel Height (front) | Panel Width | Notes |
|---|---|---|---|
| 4–6 years | 55–65 cm | 30–35 cm | Keep sides open for easy arm movement. |
| 7–9 years | 65–75 cm | 35–40 cm | Consider light side panels for extra detail. |
| 10–12 years | 75–85 cm | 40–45 cm | Use elastic straps to support extra height. |
Step 1: Sketch and Cut the Building Shape
Begin with a tall rectangle for the body of the building, then add stepped layers near the top to mimic the classic tapered silhouette. Keep the bottom edge mostly straight so your child can walk naturally without tripping.
- Draw a long rectangle on the cardboard using your measurements.
- On the top third of the rectangle, sketch tiers that gradually narrow as they rise.
- Cut out the front panel, then trace it to create a matching back panel.
If you want a more three-dimensional look, cut two narrow side panels and a small top piece to form a simple box, leaving the bottom open.
Step 2: Create the Crown and Spire
The headpiece is what makes the costume instantly recognizable as a skyscraper instead of just a tall box. Think of it as a narrow tower that frames your child’s head while leaving their face fully visible.
- Draw a tall, narrow tower shape on a separate piece of cardboard, including the spire at the top.
- Cut out the tower, then cut or trace an opening that will go around the child’s head like a loose crown.
- Use an extra strip of cardboard to extend the headband area if needed, securing it with tape to fit comfortably.
Leave plenty of space so the headpiece can slide on and off without catching hair or ears.
Step 3: Add Windows and Architectural Details
Windows are the most time-consuming part, but they are also what turns plain cardboard into a convincing city building. Decide whether you want cut-out windows that really glow or just drawn-on windows for a faster option.
- Cut-out method: Lightly draw a grid of small rectangles, then carefully cut them out with a craft knife, leaving enough cardboard between windows for strength.
- Drawn-on method: Use a ruler and marker or paint pen to create horizontal and vertical lines, forming “windows” across the surface.
For more realism, add different window sizes on the lower, middle, and upper sections to suggest how the building narrows as it rises.
Step 4: Paint the Skyscraper
Paint provides both color and durability. Metallic spray paint gives the fastest, most uniform coverage, while brush-on acrylics are better for working indoors with kids.
- Lay the cardboard panels flat on a protected surface.
- Apply an even coat of gray or silver, including the edges of cut windows.
- Once dry, add darker lines around sections to suggest floors, ledges, and corner edges.
You can dab on a tiny bit of white or lighter gray paint in random windows to hint at offices being lit or dark.
Step 5: Back the Windows and Add Glow
If you chose cut-out windows, back them with thin paper to diffuse the light from inside. This creates that magical glowing-tower look after dark.
- Cut pieces of white or pale yellow tissue paper slightly larger than your window areas.
- Attach the paper to the inside of the panels with clear tape or glue, covering the openings completely.
- On the inside, tape short glow sticks or sections of battery lights along the window areas so the light shines through the tissue.
Make sure switches and battery packs stay accessible so you can turn them on just before heading out.
Step 6: Build Shoulder Straps and Closures
Comfortable straps are crucial for younger kids. A simple sandwich-board style is easy to put on and take off quickly.
- Lay the front and back panels face down.
- Cut two lengths of duct tape or webbing long enough to reach from front to back over the shoulders.
- Attach each end firmly with tape on both sides of the cardboard, reinforcing with extra strips.
For extra convenience, use Velcro at one shoulder so the costume can open like a door and fasten around your child.
Step 7: Light Up the Spire
The glowing spire is the costume’s finishing touch and adds a dramatic vertical line of light. This can be as simple or as elaborate as your supplies allow.
- Tape a glow stick or slim LED wand along the length of the spire piece.
- Wrap the stick with translucent tape or lightweight paper to soften the brightness.
- If using small fairy lights, spiral them around the spire and secure with clear tape or thin wire.
Always position wiring and lights so they don’t poke the child’s head or catch in hair.
Finishing Touches and Accessories
Once the main structure is complete, small details help bring the skyscraper personality to life. These extra touches can be as subtle or playful as you like.
- Add a tiny cardboard “observation deck” near the top with a slightly protruding shelf.
- Stick miniature paper flags on toothpicks along the upper edge for a festive look.
- Use glitter glue sparingly to highlight certain window rows or ledges.
Underneath the costume, have your child wear neutral clothing (gray, black, or navy) so all the attention stays on the building itself.
Safety, Comfort, and Visibility Tips
Because this costume is tall and structured, prioritize safety at every step. A few smart choices ensure that your skyscraper looks impressive without getting in the way.
- Keep the bottom edge high enough so it doesn’t catch on stairs, curbs, or other kids’ feet.
- Make the head opening wide and open-faced so your child has full peripheral vision.
- Distribute lights and batteries evenly to avoid a heavy front or back.
Have your child do a test walk, practice turning around, and try sitting down before the big night so you can adjust straps or trim the panels if needed.
Turning One Building into a Full Skyline
This Empire State Building costume works wonderfully on its own, but it becomes even more fun as part of a group skyline theme. Each child can claim a different structure or design their own imaginary tower.
- Pair the Empire State Building with other famous towers to make a “world cities” lineup.
- Let siblings or friends create colorful, fictional skyscrapers to stand beside the iconic gray tower.
- Adults can join in as bridges, subway cars, or city parks to complete the scene.
Group costumes make family photos more memorable and encourage kids to collaborate on designs and color schemes.
Storage and Reuse Ideas
After Halloween, your child’s skyscraper does not have to go straight to the recycling bin. With a little imagination, it can enjoy a second life.
- Turn it into a dramatic prop for school history or geography presentations.
- Use it as a backdrop for toy cars, trains, or miniature figures during indoor play.
- Hang it on a bedroom wall as oversized city art once the straps are removed.
If the cardboard stays in good shape, you can refresh the paint and lights next year or modify the top section to represent a different building.
Frequently Asked Questions
How long does this costume take to make?
Plan on one long afternoon or a weekend project. Cutting windows and letting paint dry are the most time-consuming parts, so starting a few days before Halloween will keep everything low-stress.
Can younger kids wear this costume safely?
Yes, if you scale the building to their size and keep the design simple. For toddlers and preschoolers, skip cut-out windows and heavy lights, using drawn-on windows and a lightweight crown instead.
Do I have to use spray paint?
No. Brush-on acrylic paints or even poster paint work well, especially if you are crafting indoors. The finish may not be as metallic, but most of the drama comes from the shape and lights, not the exact sheen of the paint.
What if my child wears glasses or a hat?
Make the head opening extra roomy and test it with their everyday accessories. You can also attach the spire to a separate simple headband instead of a full crown to keep everything flexible.
How can I make the costume easier to transport?
Design the panels so they can detach and lay flat in a car trunk. Velcro or ribbon ties at the shoulders and sides make it possible to assemble and disassemble quickly at school or party locations.
Bringing the Skyline to Life
A homemade Empire State Building costume proves that a few pieces of cardboard can turn into something spectacular with a bit of cutting, painting, and lighting. As you build each tier and window, you create not just a Halloween outfit but a hands-on project your child will remember long after the candy is gone.