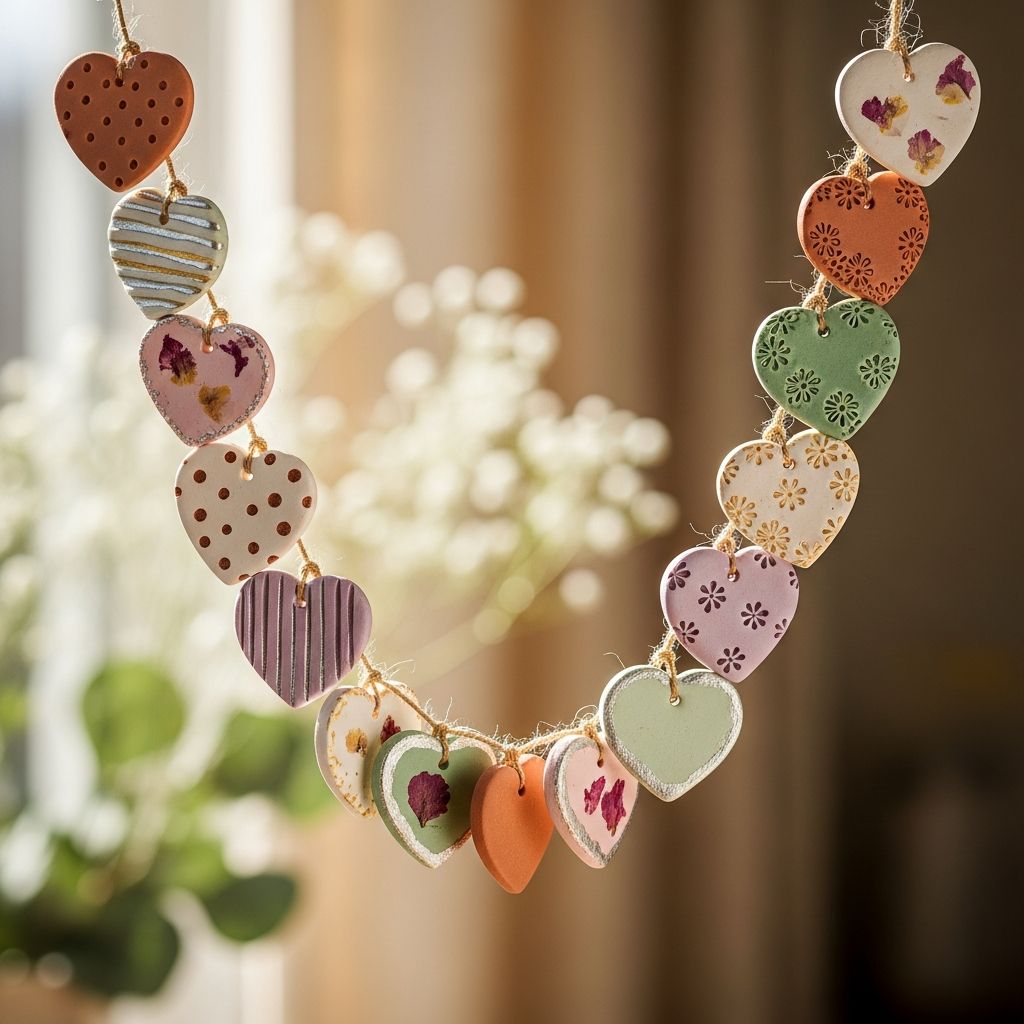
Few gifts feel as special as something made by hand, especially when tiny fingerprints, heartfelt messages, and soft colors come together in one keepsake. A clay heart garland is a beautiful way to celebrate Mother’s Day, and it doubles as a decoration mom can enjoy long after the holiday is over.
This guide walks you through designing and creating a custom polymer clay or oven-bake clay garland, from planning your design to baking, assembling, and displaying it with pride. The process is kid-friendly with adult supervision and can be easily adapted for birthdays, baby showers, or any celebration of someone you love.
Why a Clay Garland Makes the Perfect Mother’s Day Gift
Handmade gifts carry a story: who made them, what was happening that day, and the small imperfections that make the piece unique. A clay garland captures all of that in a format that is practical, pretty, and long-lasting.
- Personal and meaningful: Each clay piece can feature a word, fingerprint, date, or drawing.
- Display-ready: Unlike many crafts that end up in a drawer, a garland can hang on a mantle, wall, headboard, or shelf.
- Customizable style: Change shapes, colors, and size to suit mom’s decor and taste.
- Kid-friendly project: Rolling, cutting, and pressing textures are simple steps kids can master with a little guidance.
Planning Your Design
Before opening the clay package, take a few minutes to plan. A quick sketch on paper will help you choose the right number of pieces and an arrangement that feels balanced.
Choose a Theme
Decide how you want the garland to feel: romantic, playful, modern, or rustic. Then choose shapes and colors that match that mood.
- Classic Mother’s Day: Hearts in soft pinks, creams, and gold accents.
- Garden inspired: Flowers and leaves in mint, blush, and sage.
- Modern minimalist: Simple circles in white, gray, and black with clean lettering.
- Kids’ doodles: Free-form shapes with bright colors and scribble-style designs.
Plan Length and Layout
Think about where the garland will hang: across a mantle, taped to a wall, or draped on a bed frame. This helps you decide the length and spacing of each clay piece.
| Display Area | Approximate Length | Number of Clay Pieces | Recommended Spacing |
|---|---|---|---|
| Small picture frame or mirror | 60–80 cm | 6–8 medium shapes | 6–7 cm apart |
| Standard fireplace mantle | 120–150 cm | 10–14 medium shapes | 8–10 cm apart |
| Wall or window | 150–200 cm | 12–18 mixed sizes | 10–12 cm apart |
Sketch the order of shapes and colors in a simple line. This makes it easier to stay consistent while you’re working, especially with excited kids at the table.
Materials and Tools
You can keep this project simple with just a few supplies, or you can add optional extras for more detail and shine. The list below uses polymer or oven-bake clay for durability, but air-dry clay also works if you follow the manufacturer’s instructions.
Essential Supplies
- Polymer or oven-bake clay in 2–4 colors
- Baker’s twine, thin cord, or ribbon for stringing
- Rolling tool (small rolling pin, acrylic rod, or clean bottle used only for crafts)
- Small cookie cutters (hearts, circles, flowers, or stars)
- Drinking straw, skewer, or toothpick to make holes
- Baking tray lined with parchment or a dedicated craft baking sheet
Helpful Extras
- Acrylic paints or paint pens for details
- Letter stamps or alphabet tools
- Metallic leaf, mica powder, or glitter for accents
- Fine sandpaper or a nail buffer to smooth edges after baking
- Matte or gloss varnish suitable for your clay type
Protect your work surface with wax paper, a silicone mat, or a cutting board so the clay doesn’t stick and your table stays clean.
Step-by-Step: Making the Clay Pieces
The heart of this project is the individual clay elements that will eventually hang on the string. Working in batches keeps things organized and allows kids to focus on one stage at a time.
1. Condition and Roll the Clay
- Break off a small piece of clay and knead it in your hands until it is soft and slightly warm.
- Roll the clay into a ball, then place it on your prepared surface.
- Use your rolling tool to flatten the ball into a sheet about 3–4 mm thick. Aim for even thickness, which helps the pieces bake more uniformly.
If working with younger children, give each child their own small portion to roll. It keeps everyone busy and proud of “their” section of the garland.
2. Cut Out Shapes
- Press cookie cutters firmly into the rolled clay to cut hearts, circles, flowers, or other shapes.
- Gently wiggle the cutter before lifting to release the shape cleanly.
- Remove excess clay, combine it into a new ball, and roll again to create additional pieces.
Vary the sizes slightly for a more organic, handmade look. Consider mixing large hearts with small circles in between for rhythm and interest.
3. Add Holes and Texture
- Decide how each piece will hang: from the top edge, both sides, or through a small channel near the back.
- Use a straw, skewer, or toothpick to make holes just large enough for your string.
- Test by threading a spare piece of string through a sample hole before baking.
This is also the perfect moment to imprint textures and designs while the clay is still soft.
- Press lace, leaves, or fabric gently into the surface and lift away for a subtle pattern.
- Draw tiny lines or dots with a toothpick for borders or simple illustrations.
- Stamp letters to spell words like “MOM,” “LOVE,” children’s names, or meaningful dates.
Baking and Curing the Clay
Once the shapes are ready, they need to be cured so they become firm and long-lasting. Always follow the instructions for your specific clay brand, as baking temperatures can vary.
4. Prepare for Baking
- Place the clay shapes on a lined baking tray, leaving a small space between them.
- Check that the holes are still open and clear, as edges sometimes soften or close slightly.
- Preheat your oven to the temperature indicated on the clay packaging (often around low to moderate heat).
If you plan to sand or paint the pieces, let them cool completely after baking. Warm clay can still be fragile and more prone to fingerprints.
5. Bake and Cool
- Bake the pieces for the time recommended on the clay package, usually based on thickness.
- Once the time is up, turn off the oven and carefully remove the tray using oven mitts.
- Allow the clay shapes to cool on the tray or a heat-safe surface until they reach room temperature.
After cooling, the pieces should feel firm and slightly solid to the touch. If any feel rubbery or flexible, they may need a little more time in the oven at the same low temperature.
Decorating and Personalizing Each Piece
Decoration is where the garland becomes uniquely yours. Children can each design a few pieces, and adults can add finishing touches that unify the look.
6. Sand and Seal (Optional)
- Use fine sandpaper or a nail buffer to gently smooth rough edges or small bumps.
- Wipe away dust with a soft cloth or slightly damp paper towel.
- If you want a more durable surface, brush on a thin layer of varnish once painting is complete.
This step is optional but gives the garland a more polished, professional feel.
7. Add Color and Details
- Paint washes: Dilute acrylic paint with a little water for a soft, watercolor effect.
- Paint pens: Draw borders, tiny hearts, dots, or handwritten words on each piece.
- Metallic accents: Gently tap metallic paint or mica powder on raised textures to highlight designs.
- Mixed finishes: Combine matte colors with one or two glossy shapes for contrast.
To keep the design cohesive, choose one or two main colors and a single accent shade rather than using every color in the paint box.
Stringing the Garland
Once the clay pieces are cured and decorated, the final step is assembling everything into a garland. This is where the overall layout and rhythm really come to life.
8. Cut and Prepare the String
- Measure the area where the garland will hang and add 20–30 cm on each end for tying or taping.
- Cut the twine, cord, or ribbon to this length.
- Wrap a small piece of tape around each end of the string to create a temporary “needle” that slides easily through the holes.
If you prefer a more permanent finish, tie a small loop at each end of the garland so it can hook onto nails or removable wall hangers.
9. Arrange and Knot
- Lay the string flat on the table and arrange the clay pieces beneath it in the order you sketched earlier.
- Thread each piece onto the string, sliding it to its approximate location.
- To keep pieces from sliding, tie a small knot on either side of each shape, or use a tiny dab of clear-drying glue on the string where it meets the clay.
Step back periodically to see the garland from a distance. Adjust spacing or swap positions until the colors and shapes feel balanced from one end to the other.
Creative Variations for Different Moms
No two families are the same, and your garland can reflect shared hobbies, memories, or inside jokes. Use the ideas below as a starting point and adapt freely.
- Memory garland: Add tiny numbers or symbols that reference important dates, places, or family traditions.
- Recipe-inspired: If mom loves baking, shape miniature rolling pins, cupcakes, or utensils as part of the strand.
- Nature lover’s garland: Include leaf and flower impressions taken from the family garden.
- Monochrome chic: Use only one color of clay and rely on texture and shape for interest, perfect for modern decor.
Where and How to Display Your Garland
Once complete, the garland deserves a spot where mom can see it every day. Consider surprising her by hanging it before she wakes up on Mother’s Day morning.
- Drape it across a mantle above a row of framed family photos.
- Hang it around a mirror in the entryway to greet her as she leaves and returns home.
- Attach it to the headboard or footboard of the bed for a cozy, personal touch.
- Use it to decorate the brunch or breakfast table as a centerpiece accent.
If you create multiple short garlands, cluster them together at different heights for a layered look, almost like a backdrop for photos.
Safety and Kid-Friendly Tips
Crafting with children is rewarding, but it also calls for a few basic safety guidelines. These tips keep the project fun and stress-free for everyone involved.
- Always supervise oven use and handle hot trays yourself.
- Reserve specific tools and a baking tray only for crafting, not for food.
- Remind kids to keep clay away from mouths, eyes, and hair.
- Have wipes or a damp cloth nearby for quick cleanup of hands and surfaces.
Breaking the project into short sessions—shaping one day, baking and decorating the next—can also help little crafters stay focused and excited.
Frequently Asked Questions
How far in advance can we make the garland?
You can create the clay pieces several weeks ahead of time as long as they are fully cured and stored in a dry place. Assemble the garland a few days before gifting so you can adjust spacing and make any last-minute touch-ups.
Can this project work with air-dry clay instead of oven-bake clay?
Yes, air-dry clay is a good alternative, especially if you prefer not to use the oven. Follow the drying times on the package, lay pieces on a flat surface, and turn them occasionally so they dry evenly. Only string the garland once the shapes are completely hard.
How do we keep the clay pieces from breaking?
Keeping the thickness even and avoiding extremely thin edges makes the pieces more durable. Be gentle when threading and hanging the garland, and store it flat in a box with tissue paper when not in use.
Is there a way to add the children’s handwriting?
One easy method is to let children draw lightly onto the baked, cooled clay with pencil, then trace over their lines with a thin paint pen. Another option is to use very fine brushes and let them write directly with paint for a more spontaneous look.
Can the garland be used outdoors?
Clay pieces and paint may not hold up well to rain or intense sunlight, even with varnish. If you want to display the garland outside for a short time, hang it in a covered area and bring it indoors afterward to preserve the colors and details.
Making Mother’s Day Memories
A clay heart garland is more than a decoration; it’s a collection of small moments—kids giggling over wobbly hearts, adults carefully helping with the oven, and everyone admiring the finished strand together. With simple materials and an afternoon of creativity, you can craft a keepsake that reminds mom how loved she is every time she sees it.
Once you have tried this project, save your favorite clay colors and tools. The same basic steps can turn into seasonal garlands, birthday banners, or holiday decorations, each one carrying its own story and special memories.