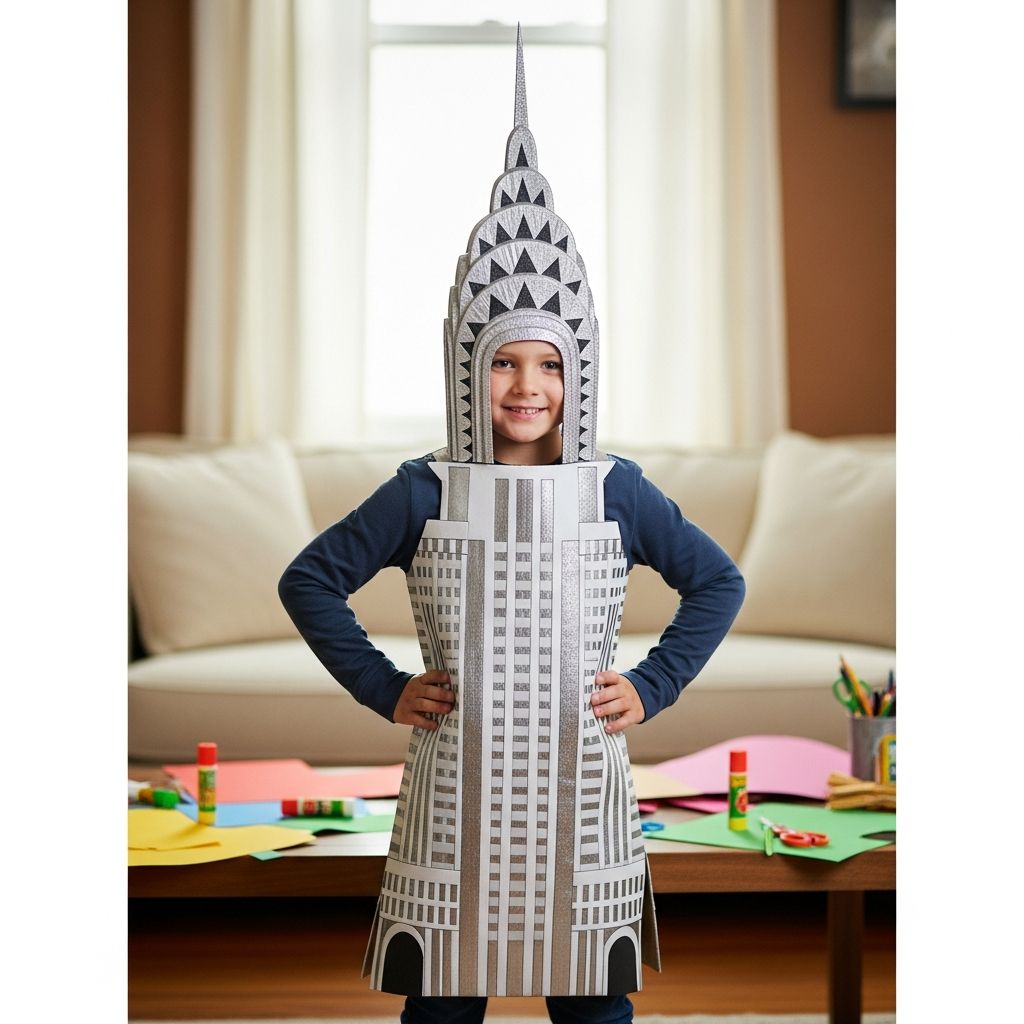
A Chrysler Building–inspired costume is a fun way to turn your child into a walking piece of New York City’s skyline using inexpensive materials and plenty of imagination. This guide shows you how to build a lightweight, glowing skyscraper costume from cardboard so your child can light up Halloween night.
Why Choose a Skyscraper Costume?
Turning an iconic skyscraper into a costume blends architecture, art, and pretend play, giving kids something more original than store-bought characters. A Chrysler Building–style costume stands out because of its recognizable spire, gleaming metallic look, and rows of glowing “windows” that look magical after dark.
- It works beautifully for school parades, neighborhood trick-or-treating, or themed parties.
- It can be adapted for different ages, from preschoolers to older kids, by adjusting size and details.
- It pairs well with other landmark costumes to create a walking city skyline with friends or siblings.
Planning Your Chrysler Building Look
Before touching scissors or paint, spend a few minutes planning the overall silhouette and fit. Decide how tall the costume should be in relation to your child, and whether you want the spire to sit like a hat, a crown, or as a tall panel above the shoulders.
Sketch a simple front view of the building: a tall rectangle for the main tower, stepped sections near the top, and a pointed spire. Do not worry about perfect architectural accuracy; the goal is a stylized, recognizable shape that is easy to wear and move in.
Key Design Choices
- Height: Aim for a body section that ends around the knees so your child can walk and climb steps safely.
- Width: Keep shoulders free to move; the cardboard should not extend far beyond the child’s body.
- Spire placement: Decide if the pointed crown is attached to a headband, helmet, or the top of the front panel.
Materials and Tools Checklist
Most supplies for this costume are common craft or hardware items. Use what you have at home and substitute where needed to keep the project budget-friendly.
- Large cardboard sheets (from boxes or purchased poster-size sheets)
- Silver or gray spray paint or craft paint
- Metallic markers (silver, black, white) for details
- Battery-operated LED string lights or glow sticks
- Colored tissue paper or thin craft paper
- Strong tape (duct tape or gaffer tape)
- Comfortable straps (ribbon, webbing, or wide fabric strips)
- Scissors and/or craft knife (for adults only)
- Ruler, pencil, and eraser
- Glue stick, craft glue, or low-temp hot glue (for adults)
Optional Extras
- Foam sheets for soft edging around the neck and arm openings
- Glitter paint or iridescent medium for a shimmery finish
- Elastic headband or old hat base to support the spire
- Reflective tape to boost night-time visibility
Quick Size and Fit Reference
Use this simple table as a starting point and adjust measurements to match your child’s height and comfort level. All heights refer to the cardboard structure, not the child’s total height.
| Child Height | Body Panel Height | Body Panel Width | Spire Height |
|---|---|---|---|
| 3–4 ft (approx. 90–120 cm) | 20–24 in (50–60 cm) | 12–14 in (30–35 cm) | 10–12 in (25–30 cm) |
| 4–4.5 ft (approx. 120–135 cm) | 24–28 in (60–70 cm) | 14–16 in (35–40 cm) | 12–14 in (30–35 cm) |
| 4.5–5 ft (approx. 135–150 cm) | 28–32 in (70–80 cm) | 16–18 in (40–45 cm) | 14–16 in (35–40 cm) |
Step 1: Create the Building Panels
Start by cutting two tall rectangles from cardboard, one for the front of the skyscraper and one for the back. Round the bottom corners slightly so they are less likely to catch on stairs or curbs, and mark where the shoulders and neck opening will be so the costume does not bump against your child’s chin.
Draw simple horizontal lines on the front panel to suggest floors, spacing them an inch or two apart. In the upper section, mark stepped shapes to mimic the Chrysler Building’s layered crown without copying exact architectural details.
Design Tips for the Panels
- Keep lines bold and simple; thin, fussy details disappear at a distance.
- Use the back panel for fewer windows and more structural lines so the costume does not become too time-consuming to decorate.
- Mark window areas lightly in pencil first so you can adjust spacing before cutting or coloring.
Step 2: Cut Windows and Openings Safely
Windows are the most striking feature of a skyscraper costume, especially when they glow. For younger children, fake windows drawn or painted directly on the surface are usually enough. For a more dramatic effect, cut out some of the window shapes and fill them with tissue paper.
Adults should handle all craft-knife cutting, working on a protective surface and keeping blades away from small hands. Select only a portion of the windows to cut out; leaving some areas solid helps the cardboard stay sturdy and less floppy.
Window Ideas
- Mix filled and unfilled windows to create contrast across the building.
- Use darker tissue paper in the lower floors and brighter colors near the top to suggest active offices or apartments.
- Skip cutting windows near the edges to reduce the risk of tearing.
Step 3: Add Metallic Color and Shine
Once the basic shapes are ready, move on to painting. A silver or gray base coat gives the costume its metallic skyscraper look, while darker details create depth and emphasize the building’s art-deco personality.
If using spray paint, work outdoors or in a very well-ventilated area and allow each side to dry completely before flipping. Brush-on craft paint is a safer alternative for kids to help with, though it may take an extra coat to achieve full coverage.
Finishing Details
- Use a ruler and dark marker to redraw floor lines and window frames after the paint dries.
- Add small triangular or fan-shaped designs near the top to echo the feel of the Chrysler Building’s crown.
- Brush on a thin layer of glitter paint or iridescent medium over selected areas for a subtle sparkle.
Step 4: Light Up the “Windows”
Lighting transforms the costume from a simple cardboard building into a glowing night-time landmark. Battery-operated LED lights are ideal because they stay relatively cool, run on small batteries, and can be turned on and off easily.
Tape or glue strands of lights to the back side of the front panel, lining them up behind the tissue-covered windows so the colors glow when the lights are on. Battery packs can be secured with tape near the bottom or tucked into a small pocket cut into the cardboard.
Alternative Lighting Options
- Glow sticks taped behind tissue windows for a one-night effect without cords.
- Stick-on mini LEDs scattered across the upper floors to imitate twinkling office lights.
- Reflective tape in window shapes if you prefer to avoid electronics altogether.
Step 5: Build the Spire Headpiece
The pointed spire is what makes this costume clearly inspired by a famous skyscraper rather than just any tall building. Cut a separate piece of cardboard in a tall triangle or stepped triangular shape that will rise above your child’s head.
Attach the spire to a comfortable base, such as a fabric-covered headband, a lightweight hat, or a strip of cardboard formed into a crown. Add matching metallic paint and simple arc or fan patterns to make the spire feel cohesive with the main building panels.
Comfort and Balance
- Keep the spire light so it does not wobble or tip forward.
- Use soft padding on the inside of the headband or crown for a secure but gentle fit.
- Test the headpiece while your child walks and looks around to ensure it does not block vision.
Step 6: Attach Straps and Test Fit
When all decorative work is finished and fully dry, connect the front and back panels with shoulder straps. Wide fabric or webbing feels better than thin string, which can dig into shoulders during a long evening of trick-or-treating.
Tape or glue the straps in place on the inside of each panel, then have your child try on the costume. Adjust the strap length so the bottom of the building falls above the knees and the neck opening does not press against the chin or throat.
Optional Side Connections
- Add short straps or ribbons at the sides near the waist to keep the panels aligned without restricting arm movement.
- Use Velcro closures instead of fixed knots so the costume can be taken on and off easily.
- Reinforce strap attachment points with extra layers of cardboard or tape.
Step 7: Add Final Touches and Accessories
A few final details can make the costume feel complete and polished. Consider what your child will wear underneath, how you will handle cold weather, and whether to add small city-themed accessories.
A monochrome base outfit in gray, black, or navy keeps the focus on the skyscraper while making it easier to hide straps and battery packs. Comfortable sneakers are a must for safety and long walks.
Fun Accessory Ideas
- Mini taxi or subway train toys attached to a belt or carried in hand to continue the city theme.
- Face paint in silver and white to echo the glow of the building’s windows.
- Glow bracelets or a reflective trick-or-treat bag for a cohesive, illuminated look.
Safety and Comfort Checklist
No matter how impressive the costume looks, comfort and safety come first. Before Halloween night, schedule a “test walk” where your child wears the full costume indoors or in the yard.
- Ensure your child can see clearly in all directions.
- Check that they can sit down, climb steps, and turn around easily.
- Confirm that lights and batteries do not heat up and that wires or cords are kept away from skin.
- Trim any sharp corners or rough edges and cover them with tape or foam.
Ideas for a Whole Skyline Group
Once you have a Chrysler Building–inspired costume, it is easy to expand the concept into a whole skyline. Friends or siblings can become other famous skyscrapers, bridges, or city elements, all based on the same simple cardboard panel method.
- Assign each participant a different building or landmark and coordinate color schemes.
- Use matching lighting (all warm white or all color-changing) to visually link the costumes together.
- Arrange the group from “shortest building” to “tallest” for memorable photos.
SEO-Friendly FAQs
How do you make a Chrysler Building–inspired Halloween costume out of cardboard?
Cut two tall cardboard panels for the front and back of the building, sketch and cut or draw windows, paint the surfaces in silver or gray, and then attach straps at the shoulders so the panels can be worn like a sandwich board. Add a separate triangular spire headpiece and optional LEDs or glow sticks behind tissue-paper windows to make the building light up.
Is this skyscraper costume comfortable and safe for kids to wear?
With lightweight cardboard, wide shoulder straps, and a length that ends above the knees, the costume can be very comfortable for walking and trick-or-treating. Always test visibility, mobility, and the position of any lights or batteries before Halloween so adjustments can be made.
What age is best for a Chrysler Building–style costume?
Elementary-age children typically enjoy this costume the most because they can appreciate the landmark theme and are tall enough to handle a multi-layered cardboard structure. For younger kids, scale the design down and skip heavy lighting or very tall spires to keep the costume easy to manage.
Can this building costume be reused or recycled?
Yes, the cardboard panels can be stored flat and reused for future Halloweens or school projects, especially if you keep the design somewhat generic. When you are finished with it, remove lights and any non-recyclable additions, then recycle the clean cardboard portions according to local guidelines.
How can I make this costume more weather-proof?
Adding a clear sealer or varnish over the paint layer helps protect the cardboard from light moisture, though it will never be fully waterproof. Dressing your child in a warm base layer and keeping an umbrella handy is usually the easiest way to handle chilly or damp weather while still showing off the costume.