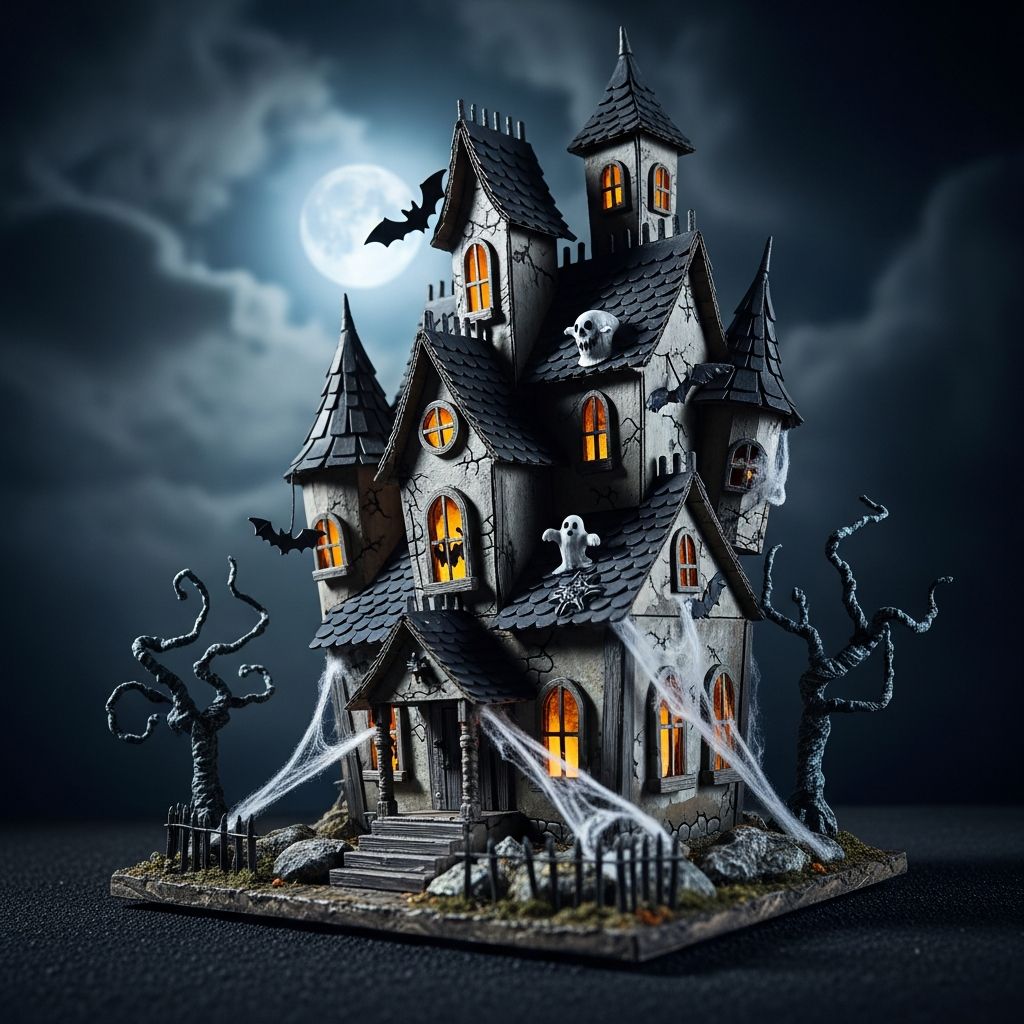
Transform everyday milk or juice cartons into a miniature haunted village that glows on Halloween night. This project is ideal for families, classrooms, and anyone who loves spooky decor on a small budget.
Why Make a Carton Haunted House?
Instead of buying plastic decorations, this craft lets you reuse packaging that would otherwise be thrown away. It also gives kids a hands-on way to design a spooky house from scratch, from the roofline to the tiniest ghost in the window.
- Eco-friendly: Reuses packaging you already have at home.
- Budget-conscious: Most supplies are basic art materials.
- Customizable: Every house can look completely different.
Materials and Tools You Will Need
Gather your supplies before you begin so you can focus on the fun part: designing and decorating.
Basic Structure Supplies
- Clean, dry milk or juice cartons (any size)
- Cardboard scraps (for roofs, chimneys, and steps)
- Masking tape or painter’s tape
- Craft knife (for adults) or strong scissors
Painting and Decorating
- Acrylic paints (black, gray, purple, green, orange)
- Paintbrushes (one wide, one fine-tipped)
- Colored cardstock or construction paper
- Fine-tip markers or gel pens (black, white, silver)
- Glue stick and white craft glue
- Optional: glitter, sequins, stickers, faux spider webs
Lighting and Display
- Battery-operated tealights or LED string lights
- Tracing paper or tissue paper for windows
- Tray, wooden board, or piece of cardboard for a “street” base
Safety Tips Before You Start
Because this project uses cutting tools, paint, and small parts, a little planning keeps things safe and stress-free.
- Adults should handle any cutting with craft knives.
- Cover the work surface with newspaper or a plastic tablecloth.
- Use only battery-powered lights inside the cartons; never use candles.
Step 1: Prepare and Shape the Carton
The first step is turning a basic carton into something that resembles a building. How you trim and cut it will define the character of your haunted house.
- Wash and dry: Rinse out each carton thoroughly and let it dry completely inside and out.
- Remove plastic spouts: If there is a screw cap or spout, either cut it out to make a round window or tape over it to hide the opening.
- Trim the top: Decide if you want a tall peaked roof, flat roof, or slanted roof. Cut along the top corners of the carton to create the shape you want.
- Reinforce with tape: Use masking tape to secure any flaps or seams so the structure is sturdy before painting.
Step 2: Add a Roof and Extra Architecture
Roof details and add-ons like chimneys or turrets instantly make your haunted house more dramatic.
- Cut a rectangle of cardboard slightly larger than the carton’s top to create an overhanging roof.
- Score lightly down the center of the rectangle so it bends into a peaked roof.
- Glue the roof on top of the carton and hold it in place with tape until it dries.
- Add extra pieces like a crooked chimney, small balcony, or extra gable by gluing on more cardboard shapes.
You can mix roof styles within your village: one house with a tall, narrow roof and another with a sagging flat roof covered in “boards.”
Step 3: Cut Windows and Doors
Windows and doors give the house personality. They also let the light shine through when your haunted village is lit up.
- Sketch first: Use a pencil to draw windows and doors on all sides of the carton.
- Choose a style:
- Tall, narrow windows for a gothic mansion look.
- Round or arched windows for an older, eerie feel.
- Uneven, crooked windows for a cartoon-style haunted house.
- Cut carefully: Adults can use a craft knife to cut out the openings. Kids can safely mark and design while an adult handles the cutting.
- Keep some panes: For a broken-window effect, leave narrow strips of carton in place inside the opening so they look like shattered frames.
Step 4: Add Glowing Window “Glass”
Softly glowing windows are what make these mini haunted houses magical at night. Thin paper makes great faux glass.
- Cut pieces of tissue paper or tracing paper slightly larger than each window opening.
- Glue the paper to the inside of the carton so it fully covers the opening.
- Use yellow, orange, or even pale green tissue for different lighting moods.
- Layer two colors (such as yellow and red) for a warm, fiery glow in a “witch’s workshop” window.
Once the glue dries, your windows will look frosted and mysterious even before the lights are switched on.
Step 5: Base Coat the House
A base coat of paint will hide brand logos and unify all the taped seams. Choose a dark foundation color to keep things spooky.
- Use black, charcoal gray, or deep purple acrylic paint for the base coat.
- Apply the paint in thin, even layers so it dries quickly.
- Paint the roof a contrasting but still eerie color, such as greenish-gray or dark brown.
Let the base coat dry completely before adding any details so lines stay sharp and colors don’t smear together.
Step 6: Paint Textures and Creepy Details
Now it’s time to turn a plain, dark box into a haunted house full of history. Layers of texture and detail create that timeworn, spooky look.
Simple Texture Techniques
- Dry-brushing: Dip a dry brush into a small amount of lighter paint (like gray on top of black), wipe most of it off, then lightly sweep the brush across the surfaces to mimic weathered wood or stone.
- Brick or stone lines: Use a fine brush or marker to draw irregular brick shapes or stone outlines. Avoid perfect patterns; a little unevenness looks more realistic.
- Moss streaks: Lightly drag a brush with green paint downward from the roof or window ledges to look like dripping moss or slime.
Spooky Exterior Accents
- Paint shutters that hang at odd angles next to the windows.
- Add a weathered front door with tiny “boards” painted across it.
- Use a white gel pen to draw tiny cobwebs in the corners of windows and rooflines.
- Paint a crooked house number or a “Keep Out” sign near the door.
Step 7: Add Paper Details and Mini Props
Flat paint can only do so much. Dimensional details created with paper and cardboard make your haunted house stand out on the mantel.
- Cut tiny gravestones from gray cardstock and glue them to the base of the house.
- Create miniature bats by cutting out small silhouettes and gluing them to toothpicks that stick into the roof.
- Use black paper strips to form crooked fences along the sides of the carton.
- Make a tiny paper ghost and glue it peeking out of a window or from behind a chimney.
If kids are helping, this is an excellent stage for them to design characters, signs, and creatures while adults finish any finer painting work.
Step 8: Add Safe Lighting Inside
Once the house is decorated and the paint is dry, you can bring it to life with soft, flickering light.
- Turn the carton over and cut a flap in the back or base large enough for your hand.
- Place a battery-powered tealight or a small bundle of LED fairy lights inside.
- Close the flap loosely so you can reopen it whenever you need to turn the lights on or off.
When the room is dark, your glowing tissue-paper windows and painted details will create a dramatic haunted-house effect.
Step 9: Build a Whole Haunted Neighborhood
One house is fun, but an entire spooky street is even better. Use cartons of different shapes to create variety.
- Use tall juice cartons for narrow towers or clock towers.
- Shorter cartons can become cottages, crypts, or sheds.
- Arrange three or four houses together on a base for a haunted village centerpiece.
You can add a shared “yard” with paper trees, a cardboard moon on a stick behind the scene, and paths made from painted pebbles or torn brown paper.
Table: Quick Ideas for Themes
Use the table below to pick a theme for each house so your village feels like a storybook come to life.
| House Theme | Color Palette | Signature Details |
|---|---|---|
| Witch’s Cottage | Deep purple, forest green, black roof | Cauldron painted by the door, broomstick leaning on the wall, crescent moon on roof |
| Ghost Manor | Charcoal gray, white highlights, pale blue windows | Translucent tissue ghosts, cobweb drawings, tall skinny windows |
| Vampire Tower | Black, dark red, silver accents | Pointed roof, bat silhouettes, arched door with “V” crest |
| Monster Laboratory | Black, neon green, bright yellow windows | Lightning bolts on walls, bubbling “tanks,” hazard symbols near doors |
Kid-Friendly Adaptations
If you are crafting with young children, you can simplify several steps while still keeping the project exciting.
- Pre-cut all windows and doors before inviting kids to paint.
- Offer large brushes, sponge brushes, and paint in shallow trays.
- Use stickers (bats, pumpkins, stars) so kids can decorate without needing to draw tiny details.
- Skip intricate texture painting and focus on bold, fun colors.
Children can also help crumple tissue paper, glue fences, and arrange the houses on the final display base.
Ways to Display Your Haunted Houses
Once your haunted houses are finished, you can use them in many parts of your Halloween decorating plan.
- On a mantel: Line up several houses with cotton “fog” and string lights behind them.
- In a window: Place a few glowing houses on the windowsill for passersby to enjoy.
- As a table centerpiece: Group the houses on a tray surrounded by candy, mini pumpkins, and fake spiders.
- On a bookshelf: Tuck a single spooky house between books for a subtle Halloween touch.
Eco-Friendly and Budget Tips
Because this craft focuses on reuse, it’s naturally more sustainable than many store-bought decorations. A few extra choices make it even kinder to your wallet and the planet.
- Save cartons throughout the year so you have a variety of shapes by October.
- Use leftover house paint samples or old craft paint before buying new colors.
- Cut decorative shapes (bats, tombstones, trees) from packaging cardboard instead of purchasing embellishments.
- Store houses carefully after Halloween so they can be reused for several years.
Frequently Asked Questions
How long does it take to make one haunted house?
Most people can complete one basic house in a single afternoon. This includes drying time for glue and paint, though thicker paint layers or extra details may require overnight drying before adding lights.
Can very young kids participate in this craft?
Yes, with supervision and some preparation. Adults can handle the cutting and structural work, while young children paint broad areas, glue paper details, and help place battery-powered lights inside.
Which type of paint works best on cartons?
Acrylic paint sticks well to most cartons, covers logos, and dries quickly. If the surface is very glossy, lightly scuff it with sandpaper or apply a thin layer of gesso or white paint as a primer first.
How do I store the haunted houses after Halloween?
Keep the houses in a dry box or plastic bin, with tissue or bubble wrap between them to protect delicate paper details. Remove the lights and store those separately so the decorations are ready to use again next year.
Can I use real candles inside the cartons?
No. Open flames are unsafe inside paper and cardboard structures and can start a fire quickly. Always use battery-operated tealights or LEDs, which are safe, long-lasting, and still give a convincing spooky glow.
Final Touches and Variations
Once you have tried the basic version, you can experiment with new ideas each year. Add sound effects nearby, layer in spooky figurines, or create a themed village that matches your costume for the season.
- Make a “haunted school” or “ghost library” house to fit your family’s interests.
- Swap color schemes from year to year to keep the display fresh.
- Invite friends to a craft night and have everyone design a different themed house for one large community display.
With nothing more than empty cartons, simple art supplies, and a little imagination, your home can host an entire haunted town that glows warmly on Halloween night.