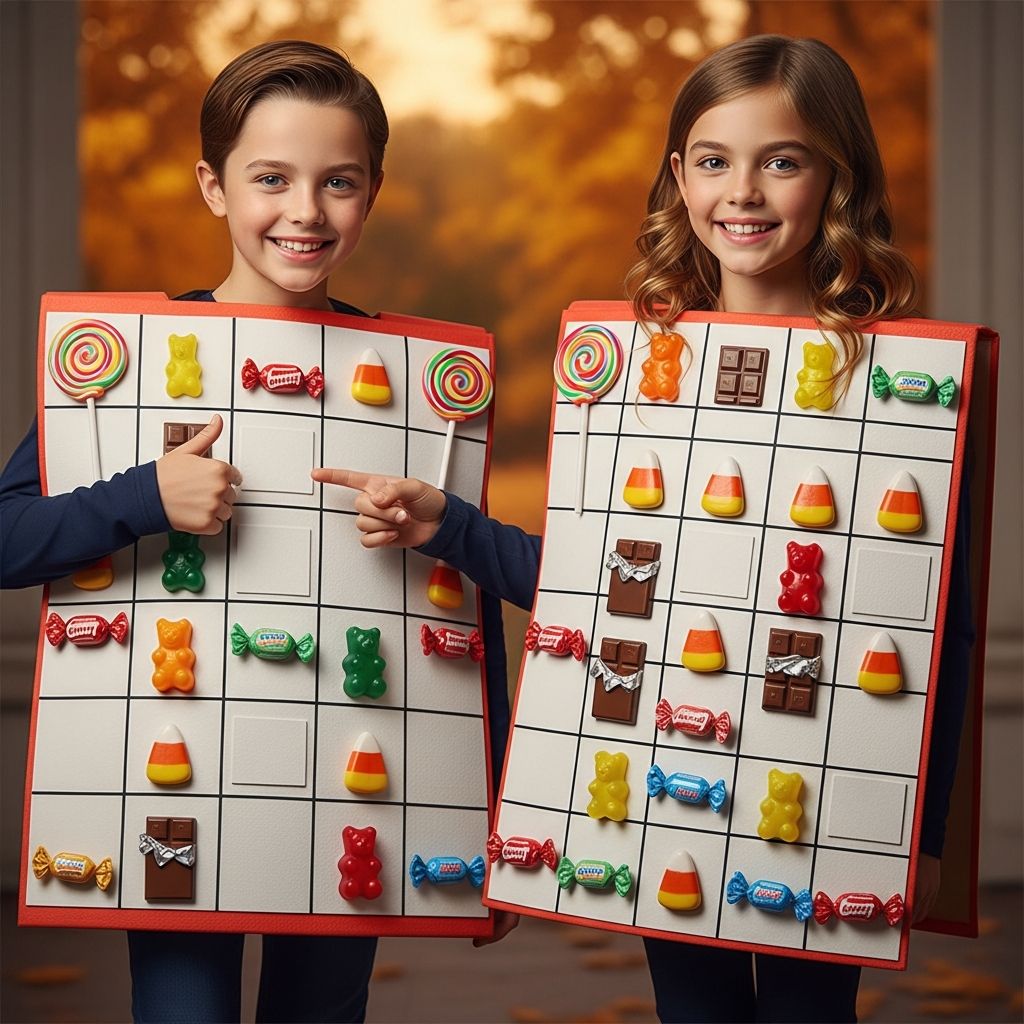
Colorful match-3 style games have become a favorite distraction for kids and parents alike, and their bright candies and simple grids translate perfectly into a playful Halloween costume.
This guide walks you through creating a kid-sized candy puzzle game costume from scratch, using inexpensive materials and basic crafting skills, while keeping it comfy, safe, and fun to wear.
Why This Costume Is a Great Idea
A candy match game costume stands out on Halloween because it is recognizable, colorful, and different from the usual witches and superheroes.
It also doubles as a fun craft project that kids can help design, letting them choose their own candy colors, special pieces, and power-ups for a personalized look.
Benefits of a DIY Candy Game Costume
- Budget-friendly: Most supplies are cardboard, paper, and tape or glue you probably already own.
- Customizable: Change colors, board layout, and candy types to match your child’s favorite game or their own imagination.
- Kid-participation friendly: Children can help paint candies, choose patterns, and arrange the game board.
- Comfortable: Designed to be worn over normal clothes, so kids stay warm and can remove it easily.
Planning Your Costume Design
Before you cut or glue anything, sketch a simple version of the costume so you know what size board you want, where the candies will go, and how your child will move while wearing it.
Planning also helps you decide which features of match-3 games to include, such as special striped candies, wrapped candies, or glowing bonus tiles.
Key Design Decisions
- Board orientation: Decide if the board will hang like a sandwich board (front and back) or just cover the front of the body.
- Grid size: A 4×5 or 5×5 grid is usually large enough to be clear without becoming heavy.
- Color palette: Choose 4–6 strong candy colors for instant visual impact and easy candy matching.
- Game elements: Consider adding arrows, score numbers, or a pretend progress bar to make the board look like a real game screen.
Materials and Tools Checklist
You can create this costume almost entirely from recycled materials and basic craft supplies, but having the right tools ready will make the process smoother and faster.
Use the list below as a starting point and adapt according to what you already have at home or can borrow from friends.
Suggested Materials
- Sturdy cardboard (from a large box) for the main game board.
- Colorful cardstock, craft foam, or construction paper for candies and tiles.
- Acrylic paint or markers for details and background color.
- White glue, glue stick, or low-temperature hot glue gun (adult use only).
- Wide masking tape or duct tape for reinforcing edges and straps.
- Ribbon, wide fabric strips, or elastic for shoulder straps.
- Round objects to trace (cups, lids, cookie cutters) for candy shapes.
- Scissors and craft knife (for adult use), plus a cutting mat or scrap cardboard.
- Optional: adhesive-backed Velcro for removable candies and interactive play.
- Optional: metallic paper, glitter, or sequins for special “power-up” candies.
Step-by-Step Costume Construction
The building process can be broken into manageable stages: building the base, creating the grid, designing candies, and attaching straps.
Involve your child as much as possible in the low-risk steps, such as coloring candies or arranging pieces on the board.
1. Build the Game Board Base
Start by cutting a flat, rectangular piece of cardboard that is slightly wider than your child’s torso and reaches roughly from their shoulders to their thighs.
For a full “wearable screen,” cut a second matching rectangle for the back and connect them later with shoulder straps so the costume hangs like a sign.
- Trace a large rectangle and trim any flaps or uneven edges for a clean shape.
- Lightly bend the cardboard to follow your child’s body curve, but avoid sharp creases.
- Reinforce the back side with extra strips of cardboard if the main piece feels flimsy.
2. Paint or Cover the Background
Many match-3 games use soft, vibrant backgrounds behind the playing grid, so choose a color that makes your candies pop, such as navy, teal, or deep purple.
Paint the entire front surface of the board or glue a large sheet of colored paper to create a smooth, even background.
- Apply paint in thin layers to avoid warping the cardboard.
- Let each layer dry completely before adding grid lines or details.
- If using paper, fold extra paper around the edges and tape it securely on the back.
3. Create the Game Grid
The grid is what makes the costume instantly look like a puzzle game, so take a few minutes to measure and draw evenly spaced lines.
Use a ruler or yardstick to divide the rectangle into equal rows and columns, then outline them with paint, tape, or bold markers.
- Lightly pencil the grid first, then go over it with thicker lines.
- Consider using thin strips of colored tape for crisp, straight grid lines.
- Leave a border at the top or bottom to add a score, level number, or move counter.
4. Design and Cut the Candy Pieces
Candy pieces are the stars of this costume, so make them bright and varied, with simple, bold shapes that are easy to recognize from a distance.
Decide on a few basic candy types, such as circles, squares, beans, and wrapped candies, then cut several of each from colorful paper or foam.
- Trace around cups, lids, or small bowls to get neat circular shapes.
- Use stripes, polka dots, or swirls drawn with markers or paint to distinguish candies.
- Create special “power” candies with metallic paper or glitter details.
5. Attach Candies to the Board
Once the candies are ready, arrange them on the grid like a frozen moment from a game, with some matching sets lined up and a few special pieces scattered around.
Decide whether the candies will be permanently glued in place or attached with removable fasteners so your child can rearrange them for play.
- For a fixed design, glue each candy in the center of its square.
- For interactive play, stick Velcro dots to the back of each candy and the board.
- Ensure no small pieces are loose enough to be a choking hazard for younger siblings.
6. Add Game Interface Details
To complete the illusion of a game screen, add a few simple interface elements such as a score display, level bar, or pretend timer at the top or sides.
These small touches help people instantly recognize the costume, especially adults who play similar games on their phones.
- Create a narrow scoreboard strip near the top labeled with playful numbers.
- Add a vertical bar with colored rectangles to act as a “progress meter.”
- Include simple icons like hearts or stars to represent lives or bonuses.
7. Attach Straps and Test Fit
Comfortable straps are essential so your child can walk, run, and climb steps while trick-or-treating without constantly adjusting the costume.
Use wide ribbon, elastic, or fabric strips taped and glued securely to the back of the board, then adjust them to fit your child’s height.
- Place straps so the board hangs at mid-chest level and doesn’t bang knees when walking.
- Reinforce attachment points with extra cardboard and tape to prevent tearing.
- Have your child walk around the room and practice sitting down while wearing the costume.
Styling the Rest of the Outfit
The clothing underneath the costume should be comfortable, warm enough for the weather, and coordinated with the candy theme without competing with the main design.
Simple, solid-colored pieces work best, acting like a neutral backdrop so the game board remains the focus of the look.
Clothing Suggestions
- Solid leggings or sweatpants in a dark or candy color.
- A long-sleeve T-shirt in a coordinating shade, such as blue or purple.
- Comfortable sneakers for long walks around the neighborhood.
- Optional: a matching beanie or headband decorated with a single candy piece.
Accessory Ideas
- Carry a plastic bucket decorated to look like a candy jar.
- Wear candy-colored face paint dots (applied carefully and tested for sensitivity).
- Add a simple cape in one of the candy colors for extra warmth and flair.
Safety Considerations for Kids’ Costumes
A creative costume should never compromise visibility, mobility, or warmth, especially on a busy Halloween night with crowds and low lighting.
While building your candy game costume, check that it is lightweight, does not block your child’s view or hearing, and can be removed quickly if needed.
Key Safety Tips
- Keep the board narrow enough that your child can fit through doorways and between parked cars.
- Avoid sharp edges: round off corners and cover cut areas with tape.
- Add reflective tape to the edges of the board or straps to increase visibility at night.
- Make sure straps are strong but not tight around the neck; shoulder straps are safer than anything tied near the throat.
- Check that the total costume weight is comfortable for the full trick-or-treat route.
Fun Variations on the Candy Game Theme
Once you understand the basic concept, you can adapt the design into several themed versions tailored to your child’s preferences, favorite colors, or current obsessions.
These variations still rely on the idea of a colorful grid and candy-like pieces but change the setting or style to keep things fresh and unique.
Variation Ideas
- Galaxy Candy Board: Use a starry, dark background with neon candies that look like glowing planets or comets.
- Fruit Match Board: Swap candies for cartoon-style fruit pieces like strawberries, bananas, and apples.
- Spooky Treat Board: Create a Halloween edition with ghost-shaped candies, pumpkins, and little bat icons.
- Winter Candy Board: Use snowflake tiles and peppermint candies for a winter festival or classroom party, not just Halloween.
Simple Build Overview Table
The following table summarizes the main stages of building the candy match game costume and the approximate effort involved in each step.
| Stage | Main Task | Kid Involvement | Approximate Time |
|---|---|---|---|
| Board prep | Cut and reinforce cardboard base | Low (adult cutting) | 20–30 minutes |
| Background & grid | Paint or cover board, draw grid lines | Medium (painting, simple measuring) | 30–45 minutes plus drying |
| Candy pieces | Design, cut, and decorate candies | High (coloring, decorating) | 45–60 minutes |
| Assembly | Glue candies, add scoreboard details | Medium (arranging pieces) | 30–40 minutes |
| Straps & fitting | Attach straps, adjust length, test mobility | Medium (test-wearing) | 20–30 minutes |
Tips for Last-Minute Builders
Even if Halloween is very close, this costume is still possible by simplifying a few design choices and focusing on high-impact details rather than perfection.
Concentrate on bold colors, a clear grid, and a handful of large, simple candies, skipping time-consuming extras like removable pieces or elaborate interface graphics.
- Use colored duct tape instead of paint for both the background and grid lines.
- Cut large, basic shapes (circles and squares) rather than intricate wrapped candies.
- Draw score numbers directly with a marker instead of creating layered paper labels.
Frequently Asked Questions
How long does the costume take to make?
For most families, building a candy match game costume takes around two to three hours of active work, plus extra time for paint to dry if you choose to paint the background.
If multiple adults and children work together, especially on cutting and decorating candies, the process can be much faster and turn into a fun craft session.
Can younger kids help build it?
Younger children can safely participate in low-risk tasks such as choosing colors, gluing larger candy pieces, and helping place decorations, while adults handle cutting and any hot glue.
Involving kids in the creative parts also makes them more excited to wear the finished costume and proud to show it off at school or in the neighborhood.
What if it rains on Halloween?
Because the costume is made from cardboard and paper, light rain can cause warping or damage, so consider adding a thin clear plastic layer over the front or carrying a large umbrella.
Another option is to take a few photos in the costume before leaving home, then switch to a backup poncho or jacket if the weather gets worse while out trick-or-treating.
How do I store the costume after Halloween?
Store the costume flat in a dry place like under a bed or on the top shelf of a closet to prevent bending and moisture damage.
It can be reused for dress-up, school spirit days, or recycled and rebuilt with new candies the following year if your child wants a refreshed version.
Can this design work for adults?
The same basic approach works for teens and adults, but the board size and strap length should be adjusted, and the cardboard reinforced more heavily so it stays rigid.
Adults might add more detailed interface elements, puns, or coordinated group costumes where each person represents a different level or game mode.
Making Halloween More Playful and Personal
A DIY candy match game costume transforms a familiar digital pastime into a handmade, wearable piece of art that encourages creativity, collaboration, and conversation.
With a bit of cardboard, color, and imagination, your child can step out on Halloween as the star of their own irresistible puzzle game, ready to collect real candies while dressed as the sweetest board in town.