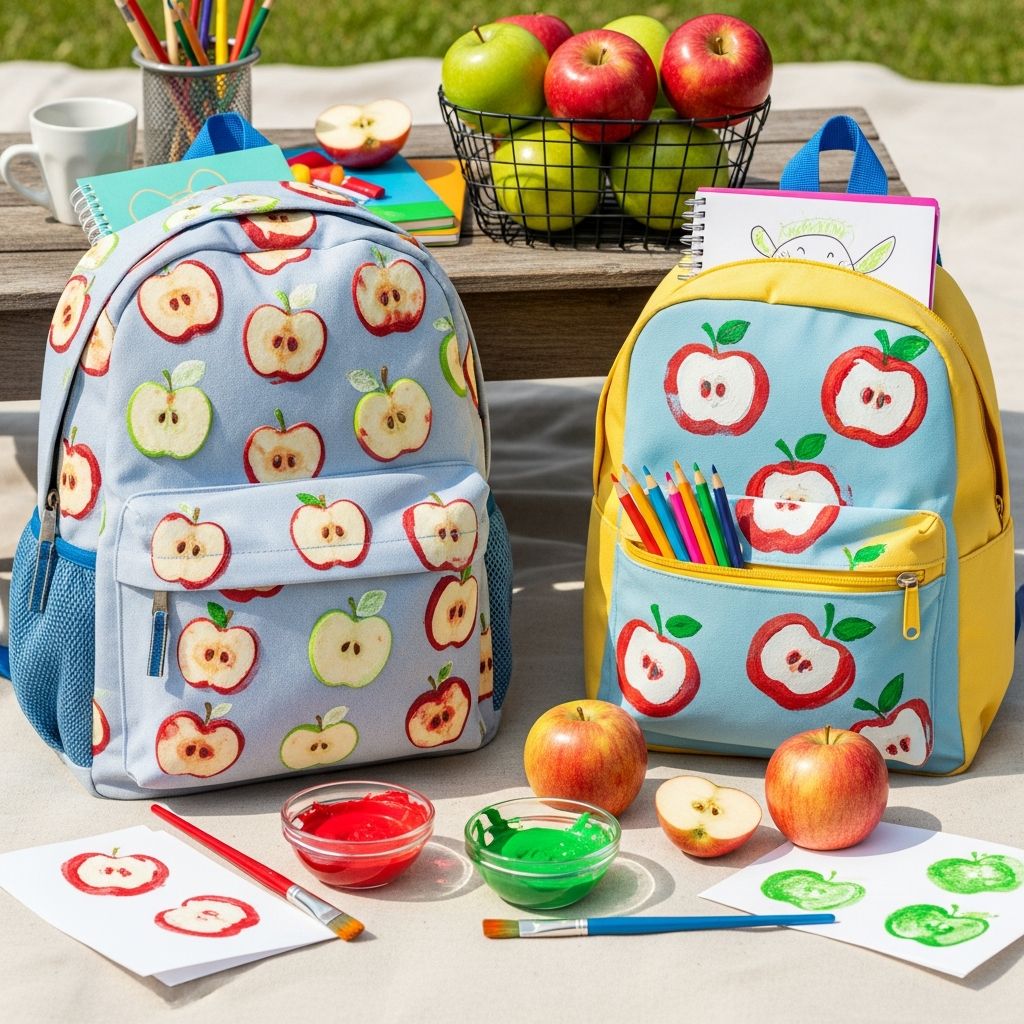
Back-to-school season brings new teachers, new routines, and plenty of excitement—so why not send kids off with a backpack they helped design themselves? This apple print backpack project uses real apples as stamps and turns a basic bag into a colorful, custom accessory that feels both playful and personal.
Why Apple Prints Make the Perfect School Craft
Apples are a classic symbol of school and learning, so using them as stamps on a backpack instantly gives a back-to-school vibe while still feeling fresh and fun. The natural shape of an apple makes a bold, simple print that even very young children can recognize and enjoy creating.
Because this project uses fabric paint and sturdy fabric surfaces, the finished backpack can handle daily wear, light washing, and plenty of trips to and from the classroom. Kids also love seeing their own artwork on something they carry every day.
Supplies You Will Need
Gather everything in advance so kids can focus on the fun part—designing and printing. A clean, flat workspace with good lighting will help make the stamping process smoother.
- Plain fabric backpack (canvas or cotton blends work best)
- 1–2 fresh apples (firm, not mushy)
- Fabric paint in apple colors (red, green, yellow, or any bright hues)
- Small paintbrushes or foam brushes
- Disposable plates or paint palettes
- Cardboard or thick paper to slide inside the backpack
- Painter’s tape or masking tape (optional, for borders or patterns)
- Fabric markers or fabric pens for stems, leaves, and details
- Paper towels and scrap paper for test prints
- Aprons or old T-shirts to protect clothing
- Sharp knife and cutting board for the apple (adult use only)
Safety and Setup Tips
Before starting, protect your workspace with newspaper or an old tablecloth and make sure children know where the “messy zone” begins and ends. Keep a roll of paper towels and a small bowl of water or wipes nearby to clean little hands between paint colors.
- Only an adult should cut the apple; keep knives out of kids’ reach.
- Test your fabric paint on a hidden area of the backpack to ensure it adheres well.
- Help younger kids practice stamping on paper first to learn how much pressure to use.
- Remind kids to keep paint away from zippers and straps so those parts stay functional.
Step-by-Step: Creating the Apple Stamp Backpack
The process is straightforward: cut, paint, stamp, and add details. The key to a successful design is letting each layer dry and encouraging kids to enjoy the imperfect, handmade look of their prints.
1. Prepare the Backpack
Start by emptying the backpack completely and shaking out any crumbs or dust. If the fabric is wrinkled, a quick press with an iron (handled by an adult) can create a smoother surface for stamping.
- Slide a piece of cardboard inside the main compartment, positioning it under the area that will receive the prints.
- If the backpack has multiple pockets, decide which panel will feature the design: the front pocket, the main body, or even one strap.
- Use painter’s tape to block off areas you want to keep paint-free or to create clean borders for a more graphic look.
2. Cut and Prepare the Apples
An adult should slice the apples from top to bottom to reveal the classic apple silhouette. A single apple can produce multiple stamps: one half for red apples, one half for green, or one for solid colors and another for patterned effects.
- Pat the cut surface gently with a paper towel to remove excess moisture that could dilute the paint.
- For a crisp edge, trim any ragged sections so the cut surface is as flat as possible.
- If desired, create a second, smaller stamp from a slice of apple trimmed into a leaf shape for stamping leaves separately.
3. Add Paint to the Apple Stamp
Pour a small amount of fabric paint onto your disposable plate and spread it into a thin, even layer. The goal is to avoid thick puddles of paint that can blur the print.
- Dip the cut side of the apple into the paint, then lift and check the coverage.
- If paint is uneven, use a brush to gently smooth and fill in thin spots.
- Make one or two test prints on scrap fabric or paper so kids see how hard to press and how much paint they need.
4. Stamp the Backpack
Now comes the most exciting part for kids: pressing the apple onto the backpack and lifting it to reveal a bold, fruity print. Encourage them to think about spacing, patterns, and color combinations as they work.
- Position the painted apple on the backpack, press firmly with both hands, and hold for a few seconds.
- Lift the apple straight up to avoid smudging the design.
- Reapply paint before each new stamp to keep the color strong and opaque.
- Experiment with rows, scattered prints, clusters of three, or a diagonal trail of apples across the bag.
5. Add Stems, Seeds, and Leaves
Once the main apple shapes have dried to the touch, kids can personalize the design further with smaller painted details. This step transforms simple circles into recognizable apples with personality.
- Use fabric markers to draw stems, tiny leaves, or even smiling faces on some apples.
- Paint small dots or teardrop shapes inside the apples to suggest seeds.
- Layer a leaf stamp near the top of each apple, using green paint or a contrasting color for a playful look.
6. Drying and Setting the Paint
Follow the instructions on your fabric paint, as some brands air-dry while others require heat setting. Proper drying ensures the prints stay bright and intact during daily use.
- Lay the backpack flat in a safe, dust-free area and allow it to dry completely before removing the cardboard insert.
- If heat setting is required, an adult can use an iron, placing a thin cloth between the iron and the painted surface.
- Wait the full recommended curing time before washing the backpack or exposing it to heavy rain.
Design Ideas and Variations
Once kids master the basic apple stamp, the design possibilities expand quickly. You can keep the look classic and simple or push it toward bold patterns and layered color effects.
- Rainbow apples: Blend two or three colors of paint on the apple surface for a tie-dye or ombré effect.
- Monogram in the middle: Leave a blank oval in the center of the front pocket and add a painted or marker-drawn initial there after the prints dry.
- Teacher gift version: Use a smaller tote or pencil pouch instead of a backpack and let kids stamp just a few apples around a thank-you message.
- Pattern play: Try alternating rows of right-side-up and upside-down apples, or make a border of apples framing the front pocket.
- Mixed fruit bag: Add other simple stamps, like a potato cut into a circle for oranges or a triangle for watermelon slices.
Simple Apple Print Layout Suggestions
If kids feel overwhelmed by a blank backpack, show them a few easy layout ideas and let them choose. A quick sketch on scrap paper can help them visualize the pattern before they start stamping.
| Layout Style | Description | Best For |
|---|---|---|
| Neat Rows | Apples lined up in straight horizontal or vertical lines across the front panel. | Kids who like order and symmetry. |
| Apple Confetti | Randomly scattered apple stamps in different colors and sizes. | Kids who enjoy a freeform, playful style. |
| Apple Corner Cluster | A dense group of apples in one corner fading into fewer prints toward the center. | Backpacks with a logo or large zipper pull in the center. |
| Diagonal Trail | Apples marching from the bottom corner to the opposite top corner. | Kids who want movement and a dynamic look. |
| Apple Frame | Apples arranged around the edges, framing the middle of the backpack front. | Displaying a name or patch in the center area. |
Making the Craft Kid-Friendly for Different Ages
This project adapts well to a wide range of ages, from preschoolers to tweens. Adjust how many steps each child handles independently, and keep expectations flexible so everyone feels proud of the outcome.
- Preschoolers: Let adults handle cutting and paint pouring, then encourage kids to press the apple stamp and choose colors.
- Early elementary: Kids can help tape off sections, choose patterns, and draw simple stems or hearts on their apples.
- Older kids: Invite them to design the full layout, mix custom colors, and add more detailed illustrations or lettering alongside the prints.
Care Tips for Your Apple Print Backpack
With a little care, apple print designs can stay bright from the first day of school to the last. Gentle cleaning and proper storage protect both the fabric and the painted artwork.
- Spot clean with mild soap and a soft cloth instead of frequent full washes.
- Avoid bleach and harsh detergents, which can fade the colors.
- Air-dry the backpack away from direct, intense sunlight to keep prints from dulling.
- Remind kids not to drag their backpack on the ground to preserve both fabric and design.
Fun Ways to Extend the Project
Once kids experience the satisfaction of wearing something they decorated themselves, they may want to coordinate other school accessories. Keep the same apple theme or branch out into new motifs inspired by the stamping technique.
- Make a matching pencil case or lunch bag with smaller apple prints.
- Stamp an apple on a fabric bookmark, then outline it with a favorite quote or word.
- Create a classroom gift set: a teacher tote, a small zipper pouch, and a bookmark, all with a similar apple pattern.
- Use leftover paint and stamps on scrap fabric squares that can later become a mini wall hanging or banner.
Frequently Asked Questions
Can I use regular acrylic paint instead of fabric paint?
Regular acrylic paint may work on some backpacks, but it can crack or peel over time and often feels stiffer than paint designed for fabric. Fabric paint is formulated to flex with the material and typically withstands washing better.
Do I have to pre-wash the backpack?
If the backpack is brand new, pre-washing can remove finishes that sometimes prevent paint from bonding well. Follow the care instructions on the label and allow the backpack to dry completely before painting.
How long does the project take from start to finish?
The hands-on stamping portion usually takes about 30–60 minutes, depending on how detailed the design is and how many helpers are involved. Drying and any required heat setting will add extra time, so it is best to start at least a day before the backpack is needed.
What if my child makes a “mistake” while stamping?
Uneven edges and unexpected smudges are part of the charm of hand-stamped designs. If something really bothers your child, turn it into a creative feature by adding extra details, layering another stamp, or outlining the shape with a fun pattern.
Can we reuse the apple stamps another day?
Because apple stamps are made from real fruit, they will not keep well for long periods and can become sticky or moldy. It is better to plan the stamping for one session and simply compost or discard the apples afterwards.
Turning a Simple Bag into a School Day Keepsake
An apple print backpack is more than just a craft—it becomes a keepsake from a particular school year, a reminder of little hands learning to create, and a practical item that carries books, snacks, and treasured finds. Each stamp tells a story, from wobbly first tries to confident, colorful apples marching across the fabric.
With basic supplies, a bit of planning, and plenty of enthusiasm, families can transform a plain backpack into a wearable piece of kid art that makes the first day of school feel even more special.