Homemade popsicles turn leftover fruit, yogurt and juice into fun, affordable snacks, but the experience depends heavily on the molds you use. A well-designed popsicle mold makes freezing, unmolding and serving almost effortless, while a poor design can lead to sticky spills, broken sticks and icy blocks you have to chisel out.
This guide walks through the main types of popsicle molds, how to compare features, and which styles work best for babies, kids, teens and adults, so you can stock your freezer with treats that actually get eaten.
Why Popsicle Molds Matter More Than You Think
At first glance, all popsicle molds look similar: a tray, some cavities and a few sticks. Look closer, and you will see crucial differences in material, handle design and capacity that change how your popsicles freeze, release and hold up in little hands.
The right molds help you:
- Control ingredients, avoiding excess sugar and artificial colors.
- Use up leftover smoothies, purees and yogurt instead of throwing them away.
- Prevent drips and messes with better shapes and built-in guards.
- Demold quickly so weeknight desserts do not turn into a wrestling match at the sink.
Common Popsicle Mold Materials
Material choice affects durability, ease of removal and how the popsicles feel in your hand. Here is a quick overview of the options you will see most often.
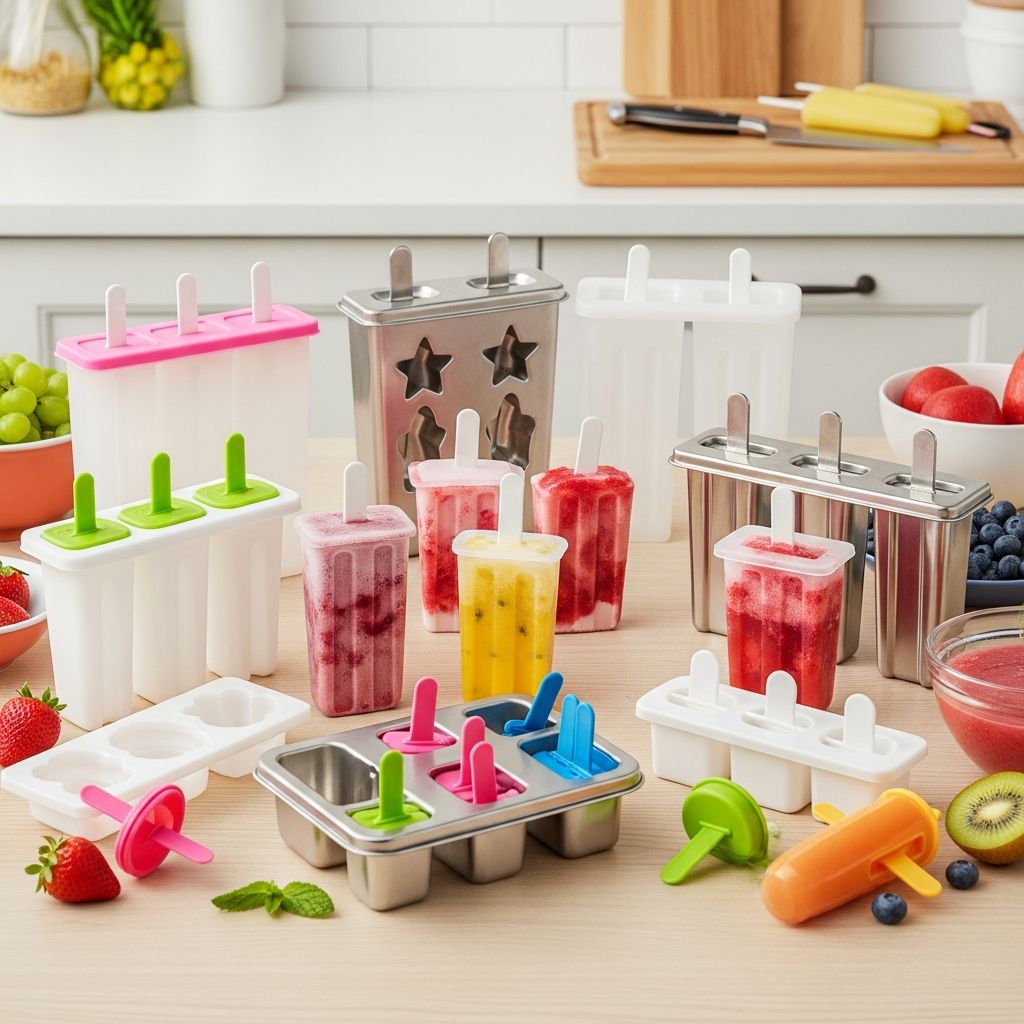
Silicone Popsicle Molds
Silicone molds are flexible, which makes it easy to peel the mold away from the frozen pop without running it under hot water. They are a great choice for families who make popsicles often and care about quick unmolding.
- Pros: Nonstick, usually dishwasher safe, easy to demold, available in many playful shapes.
- Cons: Can flop around when filling, may pick up freezer odors if stored next to strong-smelling foods.
- Best for: Households that make popsicles weekly and want smooth, detailed shapes that release cleanly.
Rigid Plastic Popsicle Molds
Rigid plastic molds are what many people picture when they think of classic popsicles. They tend to be affordable, lightweight and available in multi-cavity trays that freeze many pops at once.
- Pros: Inexpensive, familiar design, often come with reusable sticks and a stand.
- Cons: Demolding can require warm water; lower-quality plastic may cloud or crack over time.
- Best for: Casual use, larger batches and households that want a traditional straight-sided popsicle shape.
Stainless Steel Popsicle Molds
Stainless steel molds offer durability and fast freezing, and they appeal to people who want to avoid plastic altogether. They generally come as individual metal cups that sit in a rack.
- Pros: Very durable, conduct cold well for faster freezing, do not retain flavors or odors.
- Cons: Higher upfront cost, metal can feel very cold to hold, individual pieces can clatter or get misplaced.
- Best for: Long-term, heavy use and anyone prioritizing non-plastic kitchen tools.
Reusable Ice Pop Tubes
Ice pop tubes are long, narrow sleeves (often silicone) that you fill and freeze horizontally. They mimic store-bought freezer tubes but can be washed and reused.
- Pros: Compact in the freezer, great for lunchboxes, usually less messy because kids squeeze up instead of biting.
- Cons: Harder to see where any air pockets are, shape is less fun than a classic popsicle for some kids.
- Best for: On-the-go snacks, snack bags and coolers for summer outings.
Key Features to Consider Before You Buy
Once you decide on a material, look closely at design details. Small features can make a big difference in busy kitchens.
Capacity and Batch Size
Think about how many popsicles disappear in your household in a single day. Some trays make just four treats, while larger racks can freeze 8–10 at a time.
- Small capacity (4–6 pops): Good for occasional treats, tiny freezers or experimenting with new flavors.
- Medium capacity (6–8 pops): A balanced choice for most families.
- Large capacity (10+ pops): Best if you host often or your kids bring friends home regularly.
Size and Shape of Each Pop
The size of individual cavities matters just as much as overall capacity. Bigger is not always better, especially for toddlers.
- Toddler-sized molds: Shorter, slimmer shapes that melt more slowly and are easier to hold.
- Standard molds: Classic bar shapes appropriate for older kids and adults.
- Mini-bite molds: Tiny shapes designed as one- or two-bite treats, ideal for tasting new recipes or serving alongside dessert.
Drip Guards and Handles
Mess control is often what separates a beloved mold from one that collects dust. Good handles help little hands hold on, and drip guards catch melting liquid before it reaches the floor.
- Look for wide, textured handles that are easy to grip when the pop is cold and slippery.
- Built-in trays or flared bases under the stick act as drip catchers, especially helpful for younger kids.
- Check whether the handle sits straight in the mold so the stick stays centered as it freezes.
Storage and Freezer Footprint
Freezer space is precious, so the way a mold sits and stacks matters. Some designs take up only a small footprint, while others demand an entire shelf.
- Narrow bases are good for crowded freezers but must still be stable when filled with liquid.
- Individual molds that stand alone can tuck into small spaces but are easier to knock over.
- Flat-laying tubes can be slipped into corners or stacked on top of other items.
Comparing Popsicle Mold Types
If you are torn between two or three styles, it can help to compare them side by side. The table below highlights how popular mold types stack up in day-to-day use.
| Type | Best For | Ease of Demolding | Typical Capacity | Cleaning |
|---|---|---|---|---|
| Silicone tray molds | Frequent use, fun shapes, smooth pops | Very easy, thanks to flexible sides | 4–10 pops per tray | Usually dishwasher safe, soft material |
| Rigid plastic molds | Classic bar-style pops on a budget | Moderate; may need warm water dip | 6–10 pops per tray | Hand wash or dishwasher top rack |
| Stainless steel molds | Durability and fast freezing | Easy; quick warm-water rinse releases pops | 4–10 cups in a rack | Hand wash or dishwasher; very long-lasting |
| Reusable tubes | Lunchboxes, travel, mess control | Easy; squeeze to push pop upward | Varies; often sold in 4–10 packs | Rinse well inside; many are dishwasher safe |
Matching Molds to Different Ages
Not every popsicle mold suits every age group. A teenager might happily tackle a giant frozen smoothie, while a toddler needs something smaller and easier to manage.
Molds for Babies and Toddlers
For the youngest eaters, think mini and manageable. Short, rounded shapes help prevent sharp corners from poking gums, and smaller volumes prevent overwhelming them with too much cold at once.
- Look for stubby handles or ring-style grips that tiny hands can hold securely.
- Choose small cavities that freeze quickly so you can make gentle fruit or yogurt pops on short notice.
- Consider silicone molds because they flex easily when you are wiggling out just one tiny pop at a time.
Molds for School-Age Kids
Kids in this age group enjoy colorful shapes and are usually ready to eat a standard-size pop. Fun designs can make it easier to slip in nutrient-rich ingredients like blended fruit and vegetables.
- Novelty shapes—stars, animals, geometric designs—add excitement without adding sugar.
- Sturdier handles and built-in drip guards keep patio furniture, shirts and floors cleaner.
- Medium-capacity trays ensure there are enough pops for siblings and friends.
Molds for Teens and Adults
Older eaters tend to care more about flavor combinations than shapes, but they do appreciate molds that create smooth, attractive pops for photos or entertaining.
- Larger molds handle smoothie-style mixtures with oats, protein powders or rich creams.
- Stainless steel cups or sleek silicone bars produce clean lines ideal for dipping in chocolate or rolling in toppings.
- Reusable tubes are great for post-workout snacks or quick cool-downs after yardwork.
Practical Tips for Using Popsicle Molds
Choosing the mold is only half the story. A few small habits can dramatically improve your results and keep your molds in good condition for many summers.
Filling Without Spills
Sticky spills on the way from the counter to the freezer are a common complaint. Fortunately, a bit of planning can help.
- Place the empty mold tray on a small baking sheet before you start filling so you can move everything at once.
- Use a spouted measuring cup or a small funnel to guide liquid neatly into narrow cavities.
- Leave a little headspace at the top of each cavity to allow for expansion as the mixture freezes.
Demolding Without Breaking Pops
Few things discourage kids faster than watching a popsicle snap in half. Gentle temperature contrast is usually enough to release the pop cleanly.
- Dip the outside of the mold in lukewarm water for 10–20 seconds, or run it briefly under the tap.
- Wiggle the stick gently instead of pulling hard; if it resists, dip again for a few more seconds.
- Pop out only as many treats as you plan to serve, leaving the rest frozen in the mold or transferring them to freezer bags.
Storing and Labeling Frozen Pops
To free up your molds more quickly, you can store finished pops separately. This is especially handy if you rotate flavors often.
- Once the pops are completely frozen, remove them from the molds and place them in a single layer on parchment in a container.
- After they are firm, stack them, separate layers with parchment or wax paper and label the container with the flavor and date.
- Refilling your molds immediately ensures there are always new pops on the way.
Cleaning and Caring for Popsicle Molds
Proper cleaning keeps your pops tasting fresh and your molds working smoothly. It also protects against stains and lingering odors from strong ingredients.
- Rinse molds with cool water right after use to loosen any sticky residue before it dries.
- Check whether your molds are rated dishwasher safe; when in doubt, hand wash with a soft brush to reach corners.
- A mild baking soda paste can help remove stubborn stains from fruit or vegetables without scratching surfaces.
- Make sure molds are completely dry before storing them to prevent odors and mineral spots.
Creative Ways to Use Popsicle Molds
While popsicle molds were designed for juice and smoothie mixtures, they can do much more than basic frozen fruit blends. Thinking beyond the usual helps you get more value out of your purchase.
- Freeze leftover coffee with a splash of milk for grown-up breakfast pops.
- Turn flavored yogurt into grab-and-go snacks that feel like dessert but function as a snack.
- Make savory broth pops for teething toddlers or for adding to soups later.
- Create layered treats by filling molds one-third at a time with different colors and freezing between additions.
Frequently Asked Questions About Popsicle Molds
How many popsicle molds do I really need?
Most families do well with one main set and, optionally, a second specialty set. Start by asking how often you plan to make pops and how many people usually share them. If popsicles are an occasional weekend treat, a single six-cavity tray is probably enough. If you have multiple children or host relatives frequently, a larger set or a backup mold can prevent arguments over the last pop.
Can I mix different ingredients in the same mold tray?
You can, as long as the mixtures have similar freezing times and textures. For example, you might fill half the tray with a fruit-and-water blend and the other half with a fruit-and-yogurt blend. Just be mindful that pops with more dairy or fat may feel softer at the same temperature, so check them before removing the whole tray.
Why are my homemade popsicles icy instead of creamy?
Ice crystals form more readily when a mixture is mostly water. To reduce iciness, include ingredients that add body, such as yogurt, banana, avocado, or a small amount of honey or maple syrup. The mold type does play a role, but the recipe itself is usually the biggest factor in texture.
Is it worth buying stainless steel molds if I already have plastic ones?
That depends on how often you make popsicles and what you value most. Stainless steel molds are more of an investment, but they excel in longevity and quick freezing. If you are making frozen treats several times a week or want to move away from plastic in the kitchen, upgrading may feel worthwhile. If you only make pops a few times each summer, a good-quality plastic or silicone set should be sufficient.
How long do popsicles need to freeze before serving?
Most home freezers will fully freeze standard-size popsicles in about 4–8 hours, depending on the mixture and mold type. Thicker, creamier recipes may take a bit longer than juice-based ones. When in doubt, prepare them the night before so you can be confident they are ready when everyone is asking for a snack.