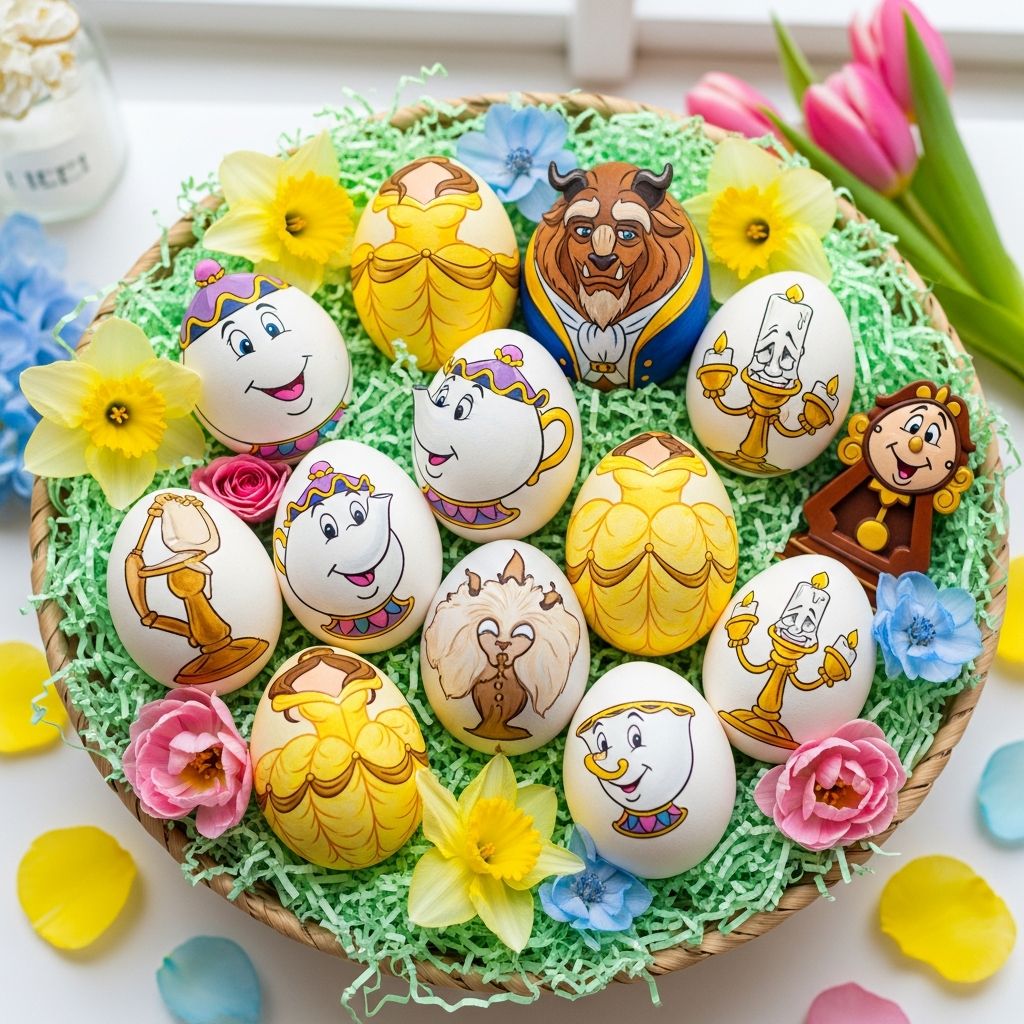
Bring the magic of an enchanted castle to your Easter basket by turning simple eggs into Beauty and the Beast–inspired treasures. This guide walks you through planning, decorating ideas, and kid-friendly tips so you can create a memorable crafting day at home.
Why Choose a Beauty and the Beast Theme?
Beauty and the Beast offers a rich mix of colors, characters, and symbolic objects that translate beautifully onto Easter eggs. From Belle’s golden gown to the enchanted rose, each element gives you a fresh way to decorate without repeating the same design.
- Recognizable characters and icons that kids and adults both love.
- A wide color palette: gold, red, royal blue, deep purple, and soft pastels.
- Options for every skill level, from simple silhouettes to detailed character art.
Planning Your Craft Session
Before pulling out the paint, take a moment to plan the overall look of your Beauty and the Beast collection. Decide whether you want a full cast of characters, a focus on the enchanted objects, or a mix of both.
- Choose a main style: minimalist, glittery and glamorous, or hand-painted and detailed.
- Limit your color scheme to 3–5 core colors to keep the eggs looking cohesive.
- Assign each family member a character or symbol to decorate for a fun group project.
Materials and Tools You Will Need
Most Beauty and the Beast Easter egg designs can be achieved with basic craft supplies. Feel free to substitute items based on what you already have at home to keep the project budget-friendly.
- Eggs: hard-boiled, blown, or plastic craft eggs.
- Acrylic craft paints in primary colors, metallic gold, white, and black.
- Fine-tip permanent markers or paint pens.
- Soft and fine paintbrushes in a variety of sizes.
- Craft glue or hot glue (for adults only).
- Small embellishments: rhinestones, glitter, ribbon scraps, faux rose petals, felt, or craft foam.
- Disposable cups or egg stands for drying.
- Protective table covering and smocks or old shirts.
Egg Choices: Real vs. Plastic
Your choice of egg base will affect how long your creations last and how you decorate them. Both real and plastic eggs work well for Beauty and the Beast themes, but they serve different purposes.
| Egg Type | Best For | Pros | Cons |
|---|---|---|---|
| Hard-boiled eggs | Short-term displays and egg hunts | Inexpensive, easy to dye, fun for kids. | Perishable and must be refrigerated until use. |
| Blown real eggs | Long-lasting keepsakes | Lightweight and more durable than hard-boiled. | Fragile and takes extra prep time to empty. |
| Plastic or wooden eggs | Reusable decorations | Sturdy, kid-friendly, perfect for complex designs. | Paint may require primer or light sanding. |
Prepping Your Eggs for Decorating
Proper preparation helps paint and markers cling smoothly so your enchanted designs last longer. Take a few extra minutes to get your eggs ready before you start any detailed work.
- Wipe plastic or wooden eggs with a slightly damp cloth to remove dust or oils.
- Let hard-boiled or blown eggs dry completely after boiling or cleaning.
- Apply a thin layer of white or neutral base paint if the egg surface is glossy or uneven.
- Allow base coats to dry fully before adding any detailed lines, faces, or embellishments.
Belle-Inspired Golden Gown Egg
Celebrate the iconic ballroom scene by decorating an egg inspired by Belle’s golden dress. This design focuses on rich yellow tones, graceful folds, and a hint of sparkle.
- Paint the entire egg a warm yellow or golden color and let it dry.
- Add gentle curved lines in a slightly darker shade to mimic fabric folds.
- Brush a thin layer of glitter glue or metallic paint over the lower half of the egg.
- Finish with a tiny painted rose or stick-on gem as a “brooch” near the top of the egg.
For younger children, keep the design simple by using markers or stickers rather than detailed brushwork.
Beast-Inspired Textured Egg
The Beast’s look can be captured with texture, bold colors, and a few strong lines rather than a realistic portrait. Think of the egg as a stylized version of his formal outfit.
- Paint the top half of the egg in a deep royal blue to represent his coat.
- Paint a V-shape of white on the front to stand for his shirt, then add a thin yellow line for the lapels.
- For texture, lightly dab brown paint with a sponge on the back of the egg for a fur-like effect.
- Optional: Glue a tiny piece of brown felt to the back as a playful “mane.”
If you want a more whimsical version, draw cartoon-style eyes and fangs with a black paint pen on one side of the egg.
The Enchanted Rose Egg
The enchanted rose might be the easiest and most elegant Beauty and the Beast egg design. It works well for beginners but can also be adapted into a more complex, stained-glass-inspired piece.
- Paint the egg a deep, dramatic color such as midnight blue, dark purple, or black.
- Use a red paint pen or fine brush to draw a rose shape with a stem and a few petals.
- Outline the rose with thin, metallic gold or silver lines to make it stand out.
- Add a subtle shimmer by dabbing a small amount of glitter glue around the rose, like magical sparkles.
For a faux “glass dome” effect, finish with a coat of clear glossy sealer once everything is fully dry.
Mrs. Potts and Chip Egg Duo
Turn a pair of eggs into the teapot and teacup duo that always steal the scene. These designs rely on curved lines and pastel colors instead of complex details.
Mrs. Potts Egg
- Base coat the egg in a soft white or very pale lavender.
- Add a scalloped band of pastel colors around the middle to echo her decorative base.
- Paint small cartoon eyes and a smiling mouth near the top of the egg.
- Glue a tiny strip of gold ribbon around the top as a playful nod to a teapot lid.
Chip Egg
- Use a smaller egg if possible and paint it white.
- Add a simple smiling face and one small zigzag line at the rim to represent his “chip.”
- Paint a delicate band of gold or yellow near the bottom to resemble his saucer.
Lumière and Cogsworth Character Eggs
Lumière and Cogsworth add humor and personality to your Beauty and the Beast egg collection. They are perfect for older kids or adults who enjoy more detailed painting.
Lumière Egg
- Paint the egg a warm cream or pale yellow to represent candle wax.
- Add a simple face near the center, keeping the expression friendly and mischievous.
- Paint narrow golden bands at the top and bottom for his candle holder base.
- Optional: Glue a tiny flameless LED tea light to the top of a plastic egg for a dramatic, safe “flame.”
Cogsworth Egg
- Coat the egg in brown or tan paint.
- Use gold or bronze tones to draw clock hands and decorative trim.
- Add eyes, eyebrows, and a small mustache for instant character.
- Paint a small pendulum shape near the bottom front as a final clock detail.
Stained Glass Storybook Egg
For a more advanced project, create an egg that looks like it was taken straight from the opening storybook sequence. This design is all about bold outlines and color blocking.
- Paint the egg a light neutral shade and let it dry completely.
- With a black fine-tip marker, draw a series of curved and straight segments like pieces of stained glass.
- Fill each section with bright, contrasting colors: red, blue, green, purple, and gold.
- Include a simplified rose or a silhouette of Belle and the Beast dancing in the largest section.
Finish with a clear glossy sealer to enhance the “glass” effect and help protect your artwork.
Quick No-Paint Options
If you are short on time or working with very young children, you can still create a Beauty and the Beast vibe without using any liquid paint. These approaches reduce mess while keeping the theme recognizable.
- Use character stickers on colored plastic eggs and add ribbon accents.
- Wrap eggs in yellow or blue tissue paper and tie with matching string to suggest Belle and Beast colors.
- Draw simple roses, books, or hearts with permanent markers on pre-dyed eggs.
- Attach tiny faux roses using glue dots for a quick enchanted rose design.
Safety Tips for Family Crafting
Keeping everyone safe and comfortable will make your Beauty and the Beast craft day more enjoyable. A few simple precautions go a long way, especially with younger children.
- Assign an adult to handle hot glue, sharp tools, and any cutting.
- Use non-toxic paints and markers labeled as safe for children.
- Cover surfaces, roll up sleeves, and keep a damp cloth or wipes handy.
- If decorating hard-boiled eggs that will be eaten, avoid painting the shells with products not intended for food use and keep them refrigerated until just before the activity.
Displaying Your Enchanted Egg Collection
Once your eggs are finished, display them in a way that highlights your hard work and the Beauty and the Beast theme. Simple props can transform your finished eggs into a centerpiece worthy of an enchanted castle.
- Arrange eggs in a basket lined with gold or royal blue fabric.
- Place an “enchanted rose” egg under a small plastic cup or cloche-style dome.
- Group character pairs together, such as Belle with the Beast or Mrs. Potts with Chip.
- Scatter silk rose petals or book pages (from a damaged or thrifted book) beneath the display for extra charm.
Fun Variations for Groups and Parties
These projects also work beautifully for parties, classroom activities, or extended family gatherings. Adjust the complexity of the designs based on the ages and interests of your group.
- Host a “decorate your favorite character” challenge and let each guest pick from a list of Beauty and the Beast icons.
- Create pre-sketched eggs with basic outlines for young children to color in.
- Offer a mix of paint, markers, glitter, and stickers so everyone can customize their own style.
FAQ: Beauty and the Beast Easter Egg DIY
Do I need to be good at drawing to make these eggs?
No. Many designs in this guide rely on simple shapes, color blocks, and patterns rather than realistic portraits. Start with basic icons like roses, books, and silhouettes, and move to detailed faces only if you feel comfortable.
Which paints work best on plastic eggs?
Thin layers of acrylic craft paint tend to adhere well to most plastic eggs. If the surface is very shiny, lightly sanding with fine sandpaper or using a primer can help the paint stick more evenly.
How long will my decorated eggs last?
Plastic and wooden eggs can last for many seasons if stored gently in a box with tissue paper or bubble wrap. Real blown eggs are more fragile, but they can also be saved as keepsakes if you handle and store them carefully.
Can children help with all of the steps?
Children can handle most painting, coloring, and simple gluing tasks. Adults should take responsibility for using hot glue, cutting felt or foam, and managing any small pieces that could pose a choking hazard.
How can I make this activity more educational?
Use the crafting time to discuss themes from the story, such as kindness, bravery, and not judging by appearances. You can also incorporate counting, color recognition, or simple storytelling as kids describe their character eggs.
Adding Your Own Fairy-Tale Twist
Once you feel confident with the classic Beauty and the Beast designs, start inventing your own variations. Imagine alternate outfits, seasonal color schemes, or mash-ups with other stories to keep the tradition fresh year after year.
Whether you are creating a full cast of characters or just one magical rose, these Easter eggs will bring a touch of fairy-tale wonder to your spring celebrations and become a cherished part of your family’s holiday memories.