Starting a new school year can feel exciting, overwhelming, and a little bit scary all at once. Friendship bracelet cards combine a small handmade gift with a sweet message, giving kids an easy way to say, “Want to be friends?” without feeling awkward or shy.
This guide walks you through creating your own back-to-school friendship bracelet cards from scratch. You will learn how to make the bracelets, design the cards, organize an exchange activity, and adapt the idea for different ages, classrooms, and occasions.
Why Friendship Bracelet Cards Work So Well
Friendship bracelet cards work because they combine a tangible keepsake with a kind message. Kids have something to hold, something to wear, and something to talk about, which makes starting conversations much easier.
- Break the ice: The card gives shy kids a simple script: hand over the card and let the bracelet start the conversation.
- Encourage kindness: Making gifts for others helps kids think beyond themselves as they head into a new school year.
- Create memories: A bracelet worn for weeks reminds kids of the person who gave it and the moment they met.
- Flexible for any setting: Use them in classrooms, scout groups, after-school programs, or neighborhood playgroups.
Basic Idea: What You’re Making
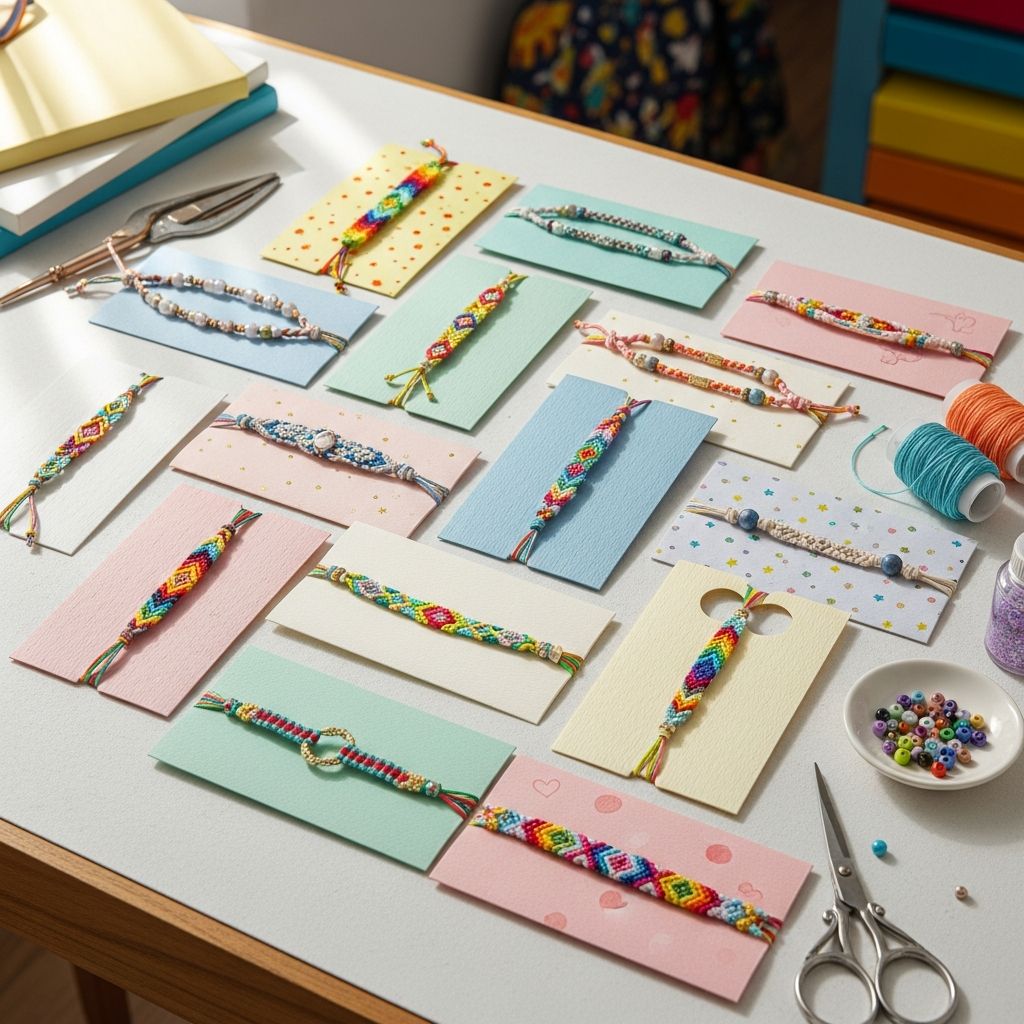
At its core, this project has two main components: a simple bracelet and a sturdy card that displays it. The bracelet is threaded through or taped onto the card, which features a greeting, a short note, and space for the giver’s name.
| Component | Purpose | Tips |
|---|---|---|
| Friendship bracelet | Wearable reminder of a new or returning friend. | Keep designs simple for large groups; save fancy patterns for small batches. |
| Card base | Protects the bracelet and showcases a message. | Use cardstock so the bracelet doesn’t tear the card when attached. |
| Message area | Holds greeting, name, and optional note. | Leave room for kids to personalize handwriting and doodles. |
| Decorations | Add personality and seasonal flair. | Stickers, stamps, or simple drawings keep it fun but manageable. |
Supplies You’ll Need
You can keep this project very minimal or let kids go all-out with decorations. Start with the basics and add extras if time and budget allow.
Core Supplies
- Colored cardstock or thick paper for cards
- Embroidery floss, thin yarn, or craft cord
- Scissors suitable for paper and string
- Ruler and pencil for measuring
- Hole punch or craft awl (for threading bracelets onto the card)
- Tape or washi tape (optional, for securing the bracelet on the back)
Optional Extras
- Letter beads for initials or short words
- Small charms or classroom-safe pendants
- Stickers, doodle pens, stamps, and ink pads
- Pre-printed short phrases or labels to glue on
Step 1: Plan Your Card Theme
Before you cut any paper, decide on an overall theme or mood for your cards. A shared theme makes the batch look cohesive, but each child can still personalize colors and details.
- Classic back-to-school: Use simple school icons like pencils, notebooks, stars, or apples.
- Color-based theme: Assign each child a color palette that reflects their personality.
- Positive words: Build your design around words like “kind,” “brave,” or “welcome.”
- Classroom mascot: If the class has a mascot or theme (owls, rockets, rainbows), incorporate it into the card art.
Step 2: Create Simple, Repeatable Card Bases
For a smooth project, especially with groups, create a repeating card format. This keeps the process organized while still leaving space for personalization.
- Cut cardstock into rectangles around 4 x 6 inches or 5 x 7 inches, depending on bracelet size.
- Decide whether cards will be horizontal or vertical and keep that consistent for a batch.
- Lightly draw or mark a rectangle or line where the bracelet will sit across the card front.
- Punch two small holes or slits on either side of that area so you can thread the bracelet through later.
Step 3: Make Kid-Friendly Friendship Bracelets
There are countless bracelet patterns, but for back-to-school cards, simple is best. Choose easy techniques that kids can complete in one short sitting.
Three Easy Bracelet Styles
- Basic braided bracelet: Use three strands of embroidery floss. Tie a knot at one end, tape it to the table, and braid until you reach the desired length. Knot the other end, leaving tails for tying onto a wrist.
- Twisted cord bracelet: Cut two or three long strands, tie them together at one end, twist them tightly in one direction, then fold them in half and let them twist onto themselves. Knot the open ends.
- Beaded accent bracelet: Use elastic cord or slightly thicker string and slide on a few colorful beads or letter beads, then knot securely at the ends.
Measure each bracelet so that it is long enough to fit around a child’s wrist with some extra space for tying. When used on cards, bracelets should span the card front and still have visible tails for wearing later.
Step 4: Attach Bracelets to the Cards
Once bracelets are complete, it’s time to turn them into a gift by mounting them onto the cards. This step makes the project look polished and keeps bracelets from tangling.
- Thread one end of the bracelet through one punched hole or slit and the other end through the opposite side.
- Adjust the bracelet so that the decorative portion lies flat and centered on the card front.
- On the back of the card, secure the bracelet ends with a small piece of tape or tie them in a simple bow or knot.
- Make sure the bracelet can be removed without cutting the string: use gentle tape or loose knots.
Step 5: Add Meaningful Messages
The message transforms a simple craft into a moment of connection. Even a few words can help a new classmate feel welcomed and included.
- Invite kids to write their name and a short greeting like “From your classmate” or “From your new friend.”
- Include an optional prompt on the back: “Something I like is ______,” which can spark conversation later.
- Encourage kids to write legibly and decorate around the message with small doodles or stickers.
Ideas for Classrooms and Groups
Friendship bracelet cards make a great first-week activity for teachers, troop leaders, or club organizers. With a few adjustments, the same concept can support classroom community-building.
Whole-Class Exchange
- Have each student create one card and bracelet for every classmate, or create a smaller set and exchange within table groups.
- Number the cards or shuffle them in a basket, then let kids draw one at random so everyone both gives and receives.
- Use the exchange as a springboard for circle discussions about what makes a good friend.
Welcome New Students
- Keep a small stash of ready-made friendship bracelet cards in the classroom for new arrivals throughout the year.
- Assign a few “friendship ambassadors” whose job is to write a brief welcome note and choose a bracelet to give.
Adapting the Craft by Age Group
This project can grow with kids. Younger children may need more help with bracelet making and writing, while older kids can handle more complex designs and deeper messages.
| Age Range | Recommended Bracelet Type | Message Style |
|---|---|---|
| Preschool–Grade 1 | Chunky beads on elastic or simple twisted cord | Pre-printed phrases; child signs name or initials |
| Grades 2–4 | Basic braids or simple bead patterns | Short handwritten greetings in large letters |
| Grades 5–8 | More detailed patterns, word beads, or charms | Thoughtful messages, jokes, or affirmations |
| Teens | Trend-driven colors, layered bracelets, or symbolic patterns | Personal, reflective, or humorous notes |
Design Variations for Extra Fun
Once you master the basic friendship bracelet card, experiment with different design twists. Small changes keep the project fresh if you revisit it each school year.
- Shape cards: Cut cards into shapes such as speech bubbles, backpacks, or hearts and thread the bracelet across the shape.
- Mini envelopes: Tuck the bracelet inside a small handmade envelope glued to the front of the card.
- Photo cards: Add a small photo of the giver on the back so the recipient remembers who made their bracelet.
- Affirmation sets: Create multiple bracelets with different positive words and let friends choose the one they need that day.
Tips for a Smooth Group Craft Session
When working with several kids at once, planning and organization make the experience calmer and more enjoyable. Use these tips to keep everyone engaged and successful.
- Pre-cut card bases and pre-measure bracelet strands so kids can start decorating right away.
- Set up separate stations: one for bracelet making, one for card decorating, and one for writing messages.
- Offer visual examples on the board or table so kids know what a finished card might look like while still encouraging creativity.
- Build in drying time if using glue or paint before stacking or transporting cards.
Safety and Inclusivity Considerations
Because friendship bracelet cards are shared items, especially in classrooms, it’s important to think about comfort and safety. A few simple choices help every child feel included and respected.
- Check for any school rules about jewelry or small objects before planning the activity.
- Avoid materials that can trigger allergies, such as certain metal charms; stick to fabric, plastic beads, or paper decorations.
- Allow opt-outs: kids who don’t want to wear jewelry can still participate by making or receiving a card only.
- Reinforce that friendship bracelets are symbols of kindness, not popularity contests, and everyone deserves to receive one.
FAQ: Friendship Bracelet Cards
How long should each bracelet be?
For elementary-aged wrists, aim for bracelets around 18–22 cm (7–8.5 inches) before tying knots. It’s better to make them a little long rather than too short, since extra length can be trimmed after tying.
What if kids don’t know how to braid?
Start with twisted cord bracelets or elastic bead bracelets. These techniques are easier to learn and still look colorful and fun on the finished cards.
Can this project be done last-minute?
Yes. If you’re short on time, buy pre-made simple bracelets or use ribbon instead of hand-made ones. Focus your energy on decorating cards and writing thoughtful notes.
How many cards should each child make?
That depends on your setting. For a full classroom exchange, each student might create one bracelet card for every classmate, but for a more relaxed activity, one or two cards per child is plenty.
Can the idea be reused after back-to-school?
Absolutely. Friendship bracelet cards work beautifully for birthdays, team celebrations, camp goodbyes, holidays, or as a simple “thank you” gift during the year.
Encouraging Connection All Year Long
Friendship bracelet cards are more than a craft; they are a small, wearable reminder that someone took the time to think of you. When kids exchange these cards at the start of the school year, they set a tone of kindness and connection that can last well beyond the first day back in class.
Whether you are a parent preparing your child for a new classroom or a teacher building community among students, this simple project offers a fun, hands-on way to say, “You belong here.” With a little string, some cardstock, and a few thoughtful words, kids can carry that message on their wrists and in their hearts all year long.